Yamaha PSR-9000 Owner's Manual - Page 90
Track Setting for Recording (Multi Track Recording
 |
View all Yamaha PSR-9000 manuals
Add to My Manuals
Save this manual to your list of manuals |
Page 90 highlights
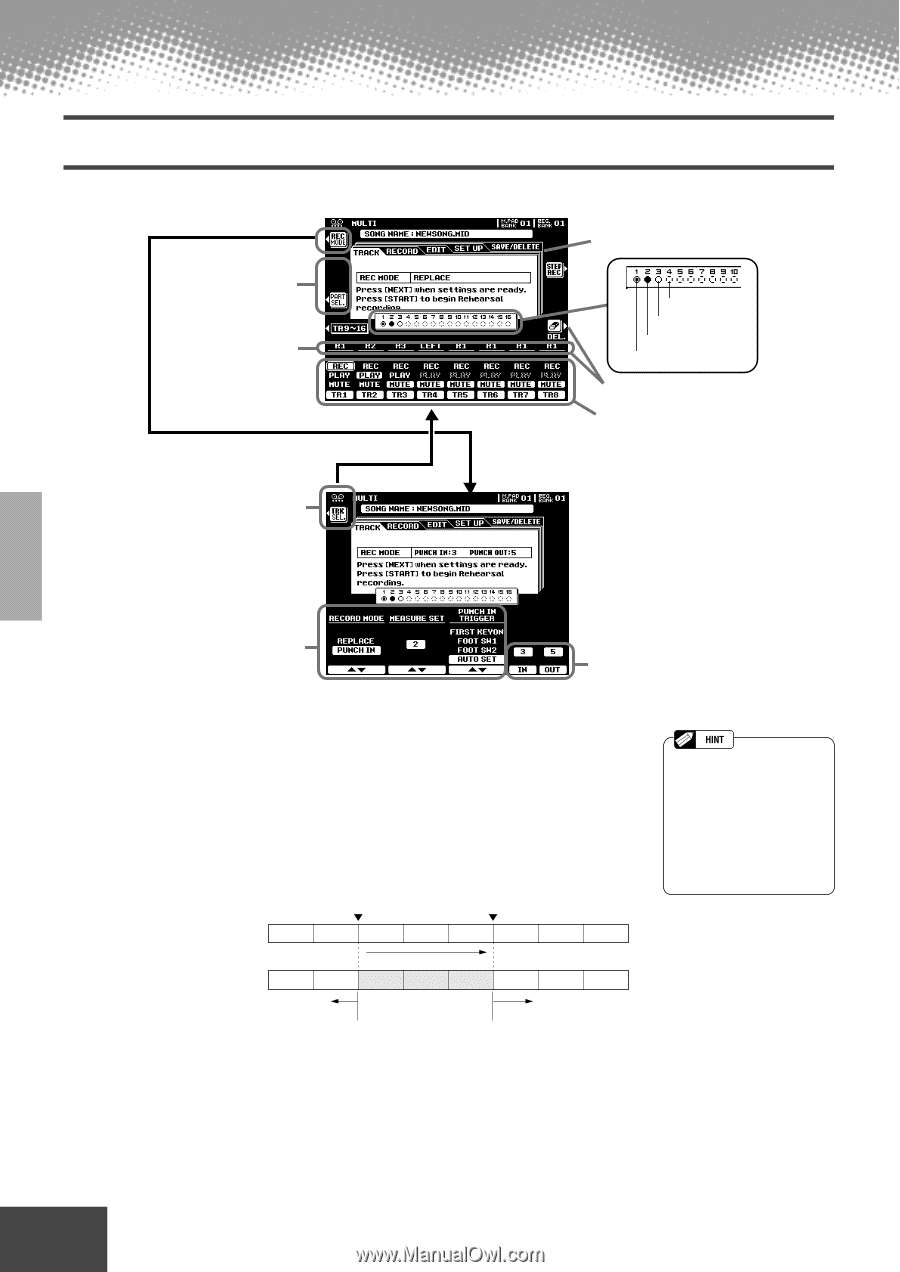
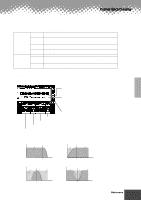
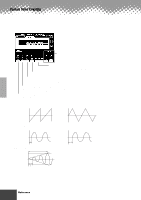
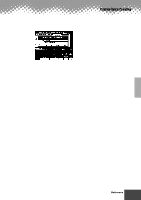
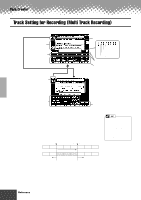
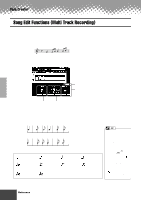
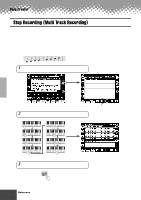
Song Creator Track Setting for Recording (Multi Track Recording) The explanations here apply to step #5 on page 89. See "Part Selecting/ Record Selecting" on page 91. Select the part for the corresponding track. Select this to return to the TRACK main display. Select the desired menu. No data Muted track Play track Record track See "Delete" on page 91. Set the desired track to "REC." Select "REC MODE" which appears when selecting "CURRENT SONG" in step #3. Set the related parameter. For details, see below Available when "PUNCH IN TRIGGER" is set to "AUTO SET." s Record Mode • Replace........... Follow the normal recording procedure described in the previous section. The only difference is that recording will begin from the measure specified at the MEASURE SET, and all data from that point to the end of the song will be replaced by the newly-recorded material. • Punch In.......... This function allows you to selectively re-record a portion of a song track (the measures between the specified punch-in and punch-out points). In the eight-measure example below, measures 3 through 5 are re-recorded. Recording start (Punch In) Recording stop (Punch Out) 1 2 3 4 5 6 7 8 • Punch In recording has another exceptionally convenient advantage - it automatically records any panel settings you've made, allowing you to have various settings (such as voice, volume, pan, etc.) change instantly and automatically right before the Punch In point! 1 2 Previously played data 3 4 5 6 7 8 Newly played data Previously played data s Measure Set • When the RECORD MODE is set to "REPLACE," this parameter specifies the mea- sure you want to start recording from. • When the RECORD MODE is set to "PUNCH IN," this parameter specifies the first playback measure. Be sure to give yourself a few measures "lead-in" prior to the actual punch-in point. 90 Reference q q q q q q q q q q q q q q q q q q q q q q q q q q q q q q q q q q q q q q q q q q q 88
-
 1
1 -
2
-
3
-
4
-
5
-
6
-
7
-
8
-
9
-
10
-
11
-
12
-
13
-
14
-
15
-
16
-
17
-
18
-
19
-
20
-
21
-
22
-
23
-
24
-
25
-
26
-
27
-
28
-
29
-
30
-
31
-
32
-
33
-
34
-
35
-
36
-
37
-
38
-
39
-
40
-
41
-
42
-
43
-
44
-
45
-
46
-
47
-
48
-
49
-
50
-
51
-
52
-
53
-
54
-
55
-
56
-
57
-
58
-
59
-
60
-
61
-
62
-
63
-
64
-
65
-
66
-
67
-
68
-
69
-
70
-
71
-
72
-
73
-
74
-
75
-
76
-
77
-
78
-
79
-
80
-
81
-
82
-
83
-
84
-
 85
85 -
 86
86 -
 87
87 -
 88
88 -
 89
89 -
 90
90 -
 91
91 -
 92
92 -
 93
93 -
 94
94 -
 95
95 -
96
-
97
-
98
-
99
-
100
-
101
-
102
-
103
-
104
-
105
-
106
-
107
-
108
-
109
-
110
-
111
-
112
-
113
-
114
-
115
-
116
-
117
-
118
-
119
-
120
-
121
-
122
-
123
-
124
-
125
-
126
-
127
-
128
-
129
-
130
-
131
-
132
-
133
-
134
-
135
-
136
-
137
-
138
-
139
-
140
-
141
-
142
-
143
-
144
-
145
-
146
-
147
-
148
-
149
-
150
-
151
-
152
-
153
-
154
-
155
-
156
-
157
-
158
-
159
-
160
-
161
-
162
-
163
-
164
-
165
-
166
-
167
-
168
-
169
-
170
-
171
-
172
-
173
-
174
-
175
-
176
-
177
-
178
-
179
-
180
-
181
-
182
-
183
-
184
-
185
-
186
-
187
-
188
-
189
-
190
-
191
-
192
-
193
-
194
-
195
-
196
-
197
-
198
-
199
-
200
-
201
-
202
-
203
-
204
-
205
-
206
-
207
-
208
-
209
-
210
-
211
-
212
-
213
-
214
 |
 |