Yamaha PSR-9000 Owner's Manual - Page 42
Basic Basic Operation, Display-based Controls
 |
View all Yamaha PSR-9000 manuals
Add to My Manuals
Save this manual to your list of manuals |
Page 42 highlights
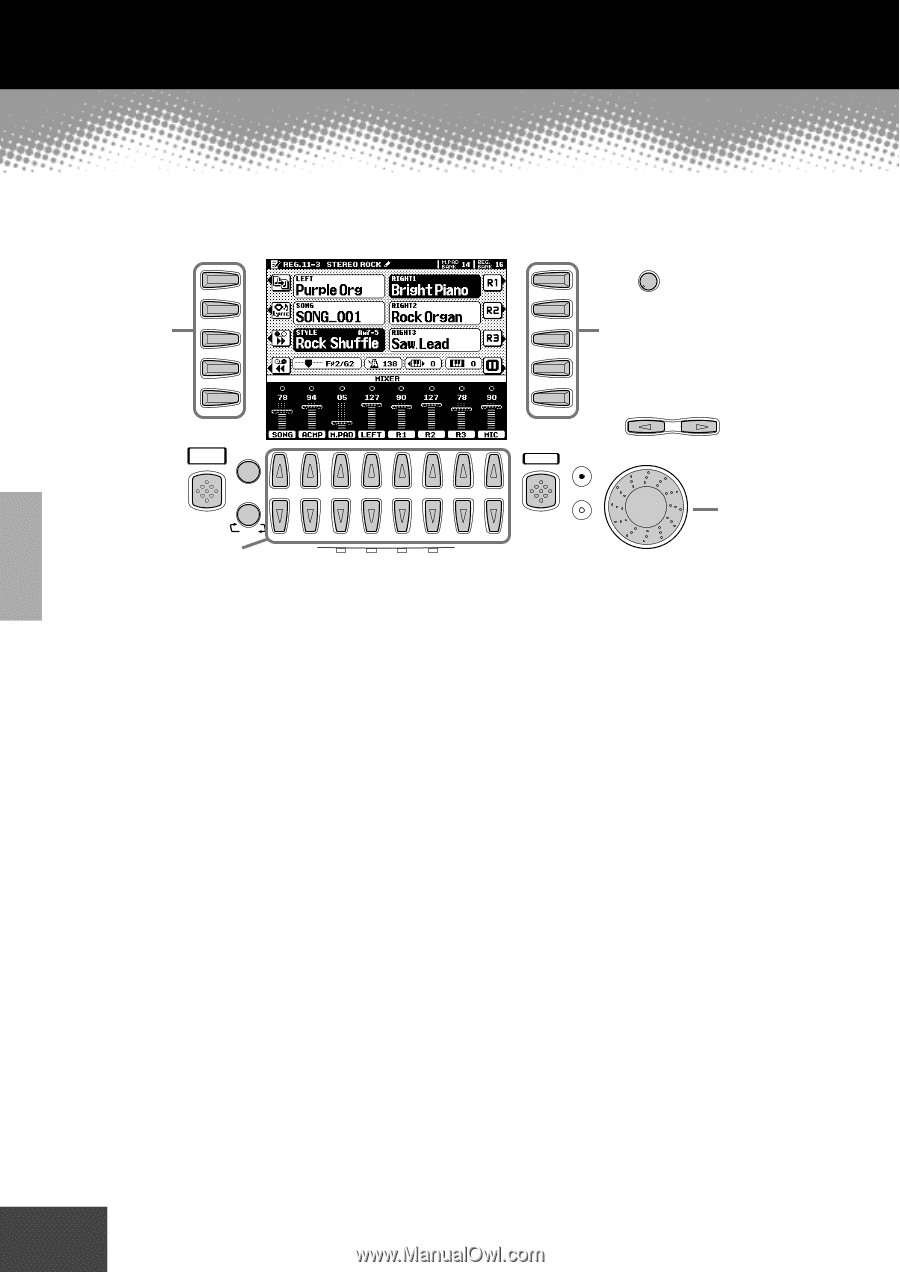
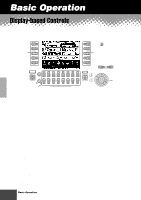
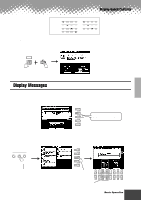
Basic Operation q q q q q q q q q q q q Display-based Controls As you've seen in "Quick Guide" above, the PSR-9000 features an exceptionally large and easy-to-understand display. It provides comprehensive at-a-glance information on all current settings, and gives you convenient, intuitive control over the PSR-9000's functions. A B LCD buttons C D E LCD CONTRAST F G LCD buttons H I J PAGE CONTROL DIRECT ACCESS MAIN MIXER EXIT TEMPO BACK NEXT PART 1 2 3 4 5 6 7 8 ON/OFF PART LCD buttons BEAT DATA ENTRY Data dial q LCD buttons The LCD (A~J) buttons are used to select the corresponding menu. In the example display shown above, for example, the LCD [F] button can be used to turn the R1 voice on. The LCD (1~8) buttons are divided into eight sets of up/down buttons, and are used to make selections or adjust settings (up or down correspondingly) for functions shown directly above them. In the example display shown above, for example, the LCD [6] buttons can be used to adjust the volume of the R2 voice. q Data dial This is usually used to change the tempo of accompaniment/song playback (when the TEMPO lamp is lit). However, when certain functions (for example, Music Database selection, Naming and Mixing Console adjusting) are shown on the LCD display, this dial is used to change the corresponding data values (when the DATA ENTRY lamp is lit). Depending on the selected display, the lamps switch between each other automatically. (This cannot be changed manually.) Rotating the data dial to the right (clockwise) increases the value, while rotating it to the left (counterclockwise) decreases it. q PAGE CONTROL buttons If you've selected several different functions' displays in succession, you can "retrace your steps" and revisit each display by using the [BACK] and [NEXT] buttons. Pressing [NEXT] button go to the next available page and pressing the [BACK] button return to the previous available page. q The [LCD CONTRAST] Control The PSR-9000 display panel is a liquid-crystal type which features an [LCD CONTRAST] control. Use the [LCD CONTRAST] control to set the display for optimum legibility. q [EXIT] button No matter where you are in the PSR-9000 display hierarchy, the [EXIT] button will return you to the next highest level, or to the normal play mode display. Since the PSR-9000 has so many different displays, you may occasionally find yourself confused as to which operation's display is currently shown. If this happens, you can return to "home base" by pressing the [EXIT] button several times. This returns the PSR-9000 to the default display - the same display that appears when the power is turned on. q [MAIN MIXER] button and [PART ON/OFF] button Refer to pages 24, 25 and 31. 42 Basic Operation q q q q q q q q q q q q q q q q q q q q q q q q q q q q q q q q q q q q q q q q 40
-
 1
1 -
2
-
3
-
4
-
5
-
6
-
7
-
8
-
9
-
10
-
11
-
12
-
13
-
14
-
15
-
16
-
17
-
18
-
19
-
20
-
21
-
22
-
23
-
24
-
25
-
26
-
27
-
28
-
29
-
30
-
31
-
32
-
33
-
34
-
35
-
36
-
 37
37 -
 38
38 -
 39
39 -
 40
40 -
 41
41 -
 42
42 -
 43
43 -
 44
44 -
 45
45 -
 46
46 -
 47
47 -
48
-
49
-
50
-
51
-
52
-
53
-
54
-
55
-
56
-
57
-
58
-
59
-
60
-
61
-
62
-
63
-
64
-
65
-
66
-
67
-
68
-
69
-
70
-
71
-
72
-
73
-
74
-
75
-
76
-
77
-
78
-
79
-
80
-
81
-
82
-
83
-
84
-
85
-
86
-
87
-
88
-
89
-
90
-
91
-
92
-
93
-
94
-
95
-
96
-
97
-
98
-
99
-
100
-
101
-
102
-
103
-
104
-
105
-
106
-
107
-
108
-
109
-
110
-
111
-
112
-
113
-
114
-
115
-
116
-
117
-
118
-
119
-
120
-
121
-
122
-
123
-
124
-
125
-
126
-
127
-
128
-
129
-
130
-
131
-
132
-
133
-
134
-
135
-
136
-
137
-
138
-
139
-
140
-
141
-
142
-
143
-
144
-
145
-
146
-
147
-
148
-
149
-
150
-
151
-
152
-
153
-
154
-
155
-
156
-
157
-
158
-
159
-
160
-
161
-
162
-
163
-
164
-
165
-
166
-
167
-
168
-
169
-
170
-
171
-
172
-
173
-
174
-
175
-
176
-
177
-
178
-
179
-
180
-
181
-
182
-
183
-
184
-
185
-
186
-
187
-
188
-
189
-
190
-
191
-
192
-
193
-
194
-
195
-
196
-
197
-
198
-
199
-
200
-
201
-
202
-
203
-
204
-
205
-
206
-
207
-
208
-
209
-
210
-
211
-
212
-
213
-
214
 |
 |