Yamaha PSR-9000 Owner's Manual - Page 29
Registering the Panel Settings - factory setup data
 |
View all Yamaha PSR-9000 manuals
Add to My Manuals
Save this manual to your list of manuals |
Page 29 highlights
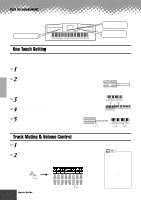
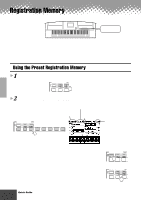
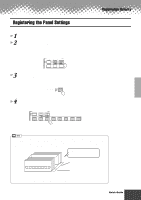
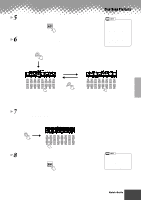
Registration Memory Registering the Panel Settings You can also create your own Registration Memory setups. 1 Set up the panel controls as required. 2 Select a Registration Bank (04 through 64). Avoid selecting one of the Registration Banks 01 through 03 (even though they can be selected), since you may inadvertently delete some important data. (See the "NOTE" note below.) REGISTRATION MEMORY FREEZE REGISTBANK 1~64 BAN 1 2 3 1 2 3 3 Press the [MEMORY] button. The LCD display will prompt you to select the desired Registration number. Press the [MEMORY] button again to exit from this display. REGISTRATION ONE TOUCH SETTING MEMORY 4 Press one of the REGISTRATION MEMORY buttons: [1] through [8]. REGISTRATION MEMORY FREEZE REGISTBANK 1~64 BANK VIEW 1 2 3 4 5 6 7 8 1 2 3 4 5 6 7 8 In this example, the panel settings are memorized to button number 3. Since all Registration Memory data is stored to Flash ROM, any data in the Registration Memory location you selected in step #2 above will be erased and replaced by your new settings. This includes the factory programmed preset Registration Memory settings (banks 01 - 03). If you've deleted the factory-set data, you can use the Restore function (page 130) to load a copy of it from the included disks (page 6). Registration Memory banks 64 banks in Flash ROM All banks can be edited. BANK 01 1 2 3 4 5 6 7 8 04~64 These banks do not contain preset setups. 01~03 These banks contain preset setups (factory settings). For details about Flash ROM, refer to "Memory Structure" on page 50. q q q q q q q q q q q q q q q q q q q q q q q q q q q q q q q q q q q q q q q q q q Quick Guide 29 27
-
 1
1 -
2
-
3
-
4
-
5
-
6
-
7
-
8
-
9
-
10
-
11
-
12
-
13
-
14
-
15
-
16
-
17
-
18
-
19
-
20
-
21
-
22
-
23
-
 24
24 -
 25
25 -
 26
26 -
 27
27 -
 28
28 -
 29
29 -
 30
30 -
 31
31 -
 32
32 -
 33
33 -
 34
34 -
35
-
36
-
37
-
38
-
39
-
40
-
41
-
42
-
43
-
44
-
45
-
46
-
47
-
48
-
49
-
50
-
51
-
52
-
53
-
54
-
55
-
56
-
57
-
58
-
59
-
60
-
61
-
62
-
63
-
64
-
65
-
66
-
67
-
68
-
69
-
70
-
71
-
72
-
73
-
74
-
75
-
76
-
77
-
78
-
79
-
80
-
81
-
82
-
83
-
84
-
85
-
86
-
87
-
88
-
89
-
90
-
91
-
92
-
93
-
94
-
95
-
96
-
97
-
98
-
99
-
100
-
101
-
102
-
103
-
104
-
105
-
106
-
107
-
108
-
109
-
110
-
111
-
112
-
113
-
114
-
115
-
116
-
117
-
118
-
119
-
120
-
121
-
122
-
123
-
124
-
125
-
126
-
127
-
128
-
129
-
130
-
131
-
132
-
133
-
134
-
135
-
136
-
137
-
138
-
139
-
140
-
141
-
142
-
143
-
144
-
145
-
146
-
147
-
148
-
149
-
150
-
151
-
152
-
153
-
154
-
155
-
156
-
157
-
158
-
159
-
160
-
161
-
162
-
163
-
164
-
165
-
166
-
167
-
168
-
169
-
170
-
171
-
172
-
173
-
174
-
175
-
176
-
177
-
178
-
179
-
180
-
181
-
182
-
183
-
184
-
185
-
186
-
187
-
188
-
189
-
190
-
191
-
192
-
193
-
194
-
195
-
196
-
197
-
198
-
199
-
200
-
201
-
202
-
203
-
204
-
205
-
206
-
207
-
208
-
209
-
210
-
211
-
212
-
213
-
214
 |
 |
