Canon CanoScan FB 1200S Printing Guide - Page 19
Quick Start to Scanning, Preparing the Scanner, Previewing an Image
 |
View all Canon CanoScan FB 1200S manuals
Add to My Manuals
Save this manual to your list of manuals |
Page 19 highlights
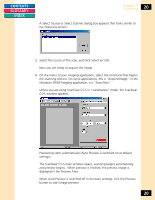
CONTENTS GLOSSARY INDEX Chapter 3 Scanning 19 Quick Start to Scanning Use these steps to get going with ScanGear CS-S quickly, with the installed settings. Note: ScanGear CS-S does not launch unless a scanner is powered on and recognized by Windows. Preparing the Scanner Before you start scanning, be sure the scanner is connected and powered on. It is recommended that you power on your scanner before you turn on your PC. If you want to ensure that the scanner is functioning correctly, run the Test Scanner from FB1200S tab. See "Testing the Scanner" in Chapter 4, "Scanning Devices." Place the item to be scanned image side down, and position it squarely on the platen. Previewing an Image The advantage of using ScanGear CS-S is that you can preview the image and make changes before actually scanning. That way, you can make sure you are getting the most out of your scanner's capabilities and of your time spent scanning and working with the image. Some applications, (for example OCR applications) do not require the ScanGear CS-S window to open before the scan starts. However, ScanGear CS-S has settings such as Text Enhanced that automatically give you the best available scan without previewing the image. To preview an image: 1. Place the item to be scanned on the scanner. 2. You must select a source if you have not already done so. On the menu of your imaging application, use the command that selects the data source. On many imaging applications, the menu item looks similar to the following picture: In the Imaging application that is included in the Windows 95/98 Accessories, the command is "Select Scanner" on the File menu. 19
-
 1
1 -
2
-
3
-
4
-
5
-
6
-
7
-
8
-
9
-
10
-
11
-
12
-
13
-
 14
14 -
 15
15 -
 16
16 -
 17
17 -
 18
18 -
 19
19 -
 20
20 -
 21
21 -
 22
22 -
 23
23 -
 24
24 -
25
-
26
-
27
-
28
-
29
-
30
-
31
-
32
-
33
-
34
-
35
-
36
-
37
-
38
-
39
-
40
-
41
-
42
-
43
-
44
-
45
-
46
-
47
-
48
-
49
-
50
-
51
-
52
-
53
-
54
-
55
-
56
-
57
-
58
-
59
-
60
-
61
-
62
-
63
-
64
-
65
-
66
-
67
-
68
-
69
-
70
-
71
-
72
-
73
-
74
-
75
-
76
-
77
-
78
-
79
-
80
-
81
-
82
-
83
-
84
-
85
-
86
-
87
-
88
-
89
-
90
-
91
-
92
-
93
-
94
-
95
-
96
-
97
-
98
-
99
-
100
-
101
-
102
-
103
-
104
-
105
-
106
-
107
-
108
-
109
-
110
-
111
-
112
-
113
-
114
-
115
 |
 |