Canon CanoScan FB 1200S Printing Guide - Page 21
Specifying How the Image is Previewed, Cropping Part of an Image, Zooming In and,
 |
View all Canon CanoScan FB 1200S manuals
Add to My Manuals
Save this manual to your list of manuals |
Page 21 highlights
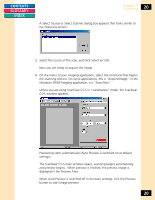
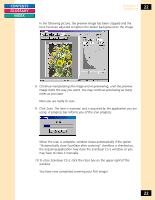
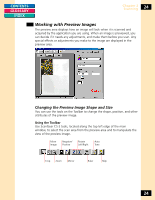
CONTENTS GLOSSARY INDEX Chapter 3 Scanning 21 5. To change a default setting before you preview, click the appropriate ScanGear CS-S settings tab and select the settings you need. For full information on each setting, see "Specifying How the Image is Previewed," later in this chapter. 6. On the Main tab, make sure you set the scan mode and resolution. If you want to change the mode after you preview - for example, to change from Color to Grayscale - the preview image clears, the preview area reverts to its default size, and you must preview the image again. Note: If necessary, you can cancel a preview or scan. During a preview, the Preview button becomes a Cancel button. During a scan, you can click Cancel on the progress dialog box. Calibration will automatically be performed before scanning. 7. To adjust the image in the preview area, do one or more of the following: • The Crop tool is selected automatically when you launch ScanGear CSS. If there is white space around your preview image, crop the image to eliminate the white space and any other unwanted part of the image. If you do not crop the image, the white space is included in the final scan. For details, see "Cropping Part of an Image" later in this chapter. • To view the image dimensions in the preview area, click the Rulers button to display the horizontal and vertical rulers. • Use the Zoom tool to zoom in before you crop. See "Zooming In and Out," later in this chapter. You can also use the Width and Height text boxes on the Main tab in conjunction with the Crop tool to make your selection more precise. If you want the acquired image to be larger or smaller than the current preview size, use the Scale setting to set a different percentage. For more information about zooming and scan resolution, see Chapter 5, "Scanning Techniques." • Adjust the Contrast/Brightness, Gamma, or other tone settings to adjust the image tone. When you adjust tone settings, you see the results immediately in the preview image. For more information, see the section "Setting Image Tone" later in this chapter. 21
-
 1
1 -
2
-
3
-
4
-
5
-
6
-
7
-
8
-
9
-
10
-
11
-
12
-
13
-
14
-
15
-
 16
16 -
 17
17 -
 18
18 -
 19
19 -
 20
20 -
 21
21 -
 22
22 -
 23
23 -
 24
24 -
 25
25 -
 26
26 -
27
-
28
-
29
-
30
-
31
-
32
-
33
-
34
-
35
-
36
-
37
-
38
-
39
-
40
-
41
-
42
-
43
-
44
-
45
-
46
-
47
-
48
-
49
-
50
-
51
-
52
-
53
-
54
-
55
-
56
-
57
-
58
-
59
-
60
-
61
-
62
-
63
-
64
-
65
-
66
-
67
-
68
-
69
-
70
-
71
-
72
-
73
-
74
-
75
-
76
-
77
-
78
-
79
-
80
-
81
-
82
-
83
-
84
-
85
-
86
-
87
-
88
-
89
-
90
-
91
-
92
-
93
-
94
-
95
-
96
-
97
-
98
-
99
-
100
-
101
-
102
-
103
-
104
-
105
-
106
-
107
-
108
-
109
-
110
-
111
-
112
-
113
-
114
-
115
 |
 |