Canon CanoScan FB 1200S Printing Guide - Page 43
Using Predefined Tone Curves, About the Curve Box, Using Custom Tone Curves
 |
View all Canon CanoScan FB 1200S manuals
Add to My Manuals
Save this manual to your list of manuals |
Page 43 highlights
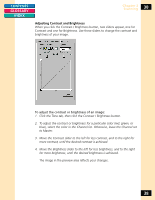
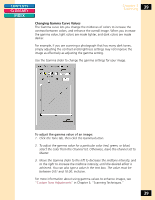
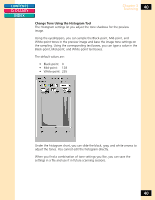
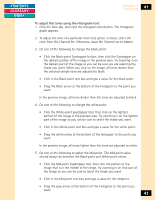
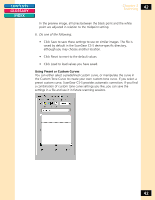
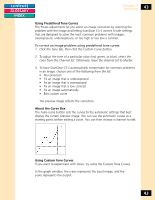
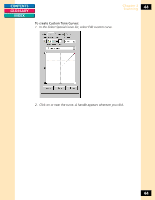
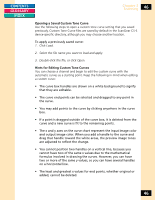
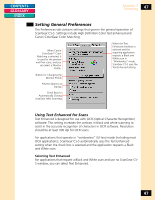
CONTENTS GLOSSARY INDEX Chapter 3 Scanning 43 Using Predefined Tone Curves The Preset adjustments let you select an image correction by selecting the problem with the image and letting ScanGear CS-S correct it with settings that are designed to solve the most common problems with images: overexposure, underexposure, or too high or too low a contrast. To correct an image problem using predefined tone curves: 1. Click the Tone tab, then click the Custom Curve button. 2. To adjust the tone of a particular color (red, green, or blue), select the color from the Channel list. Otherwise, leave the channel set to Master. 3. To have ScanGear CS-S automatically compensate for common problems in an image, choose one of the following from the list: • No correction • Fix an image that is underexposed • Fix an image that is overexposed • Fix an image that is low contrast • Fix an image automatically • Edit custom curve The preview image reflects the correction. About the Curve Box The Auto-curve button sets the curves to the automatic settings that best display the current preview image. You can use the automatic curves as a starting point, before editing a curve. You can then choose a channel to edit. Using Custom Tone Curves If you want to experiment with tones, try using the Custom Tone Curves. In the graph window, the x-axis represents the input image, and the y-axis represents the output. 43
-
 1
1 -
2
-
3
-
4
-
5
-
6
-
7
-
8
-
9
-
10
-
11
-
12
-
13
-
14
-
15
-
16
-
17
-
18
-
19
-
20
-
21
-
22
-
23
-
24
-
25
-
26
-
27
-
28
-
29
-
30
-
31
-
32
-
33
-
34
-
35
-
36
-
37
-
 38
38 -
 39
39 -
 40
40 -
 41
41 -
 42
42 -
 43
43 -
 44
44 -
 45
45 -
 46
46 -
 47
47 -
 48
48 -
49
-
50
-
51
-
52
-
53
-
54
-
55
-
56
-
57
-
58
-
59
-
60
-
61
-
62
-
63
-
64
-
65
-
66
-
67
-
68
-
69
-
70
-
71
-
72
-
73
-
74
-
75
-
76
-
77
-
78
-
79
-
80
-
81
-
82
-
83
-
84
-
85
-
86
-
87
-
88
-
89
-
90
-
91
-
92
-
93
-
94
-
95
-
96
-
97
-
98
-
99
-
100
-
101
-
102
-
103
-
104
-
105
-
106
-
107
-
108
-
109
-
110
-
111
-
112
-
113
-
114
-
115
 |
 |
