Epson PhotoPC 3000Z User Manual - Page 105
Installing for Windows, Insert the PhotoPC 3000Z CD-ROM in your
 |
View all Epson PhotoPC 3000Z manuals
Add to My Manuals
Save this manual to your list of manuals |
Page 105 highlights
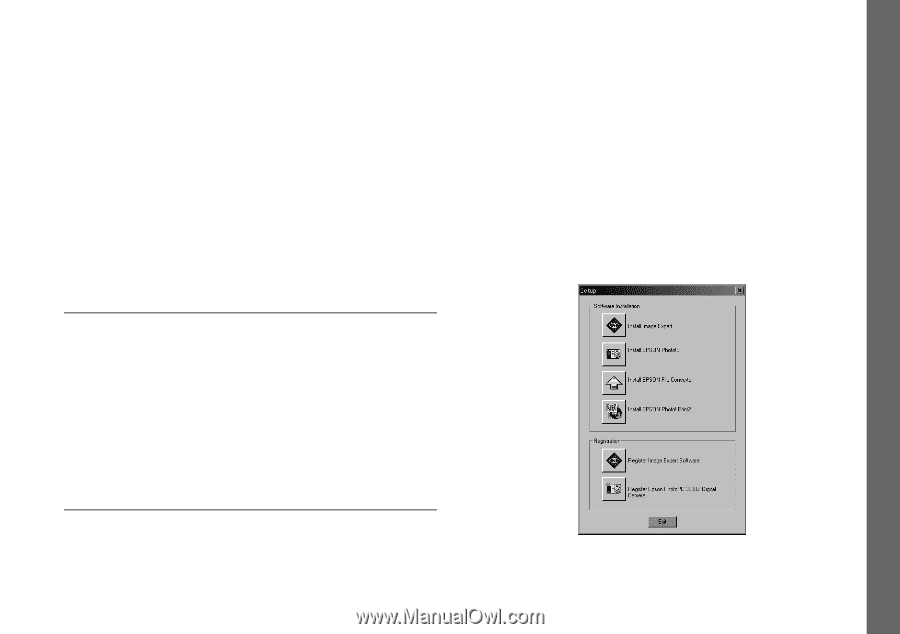
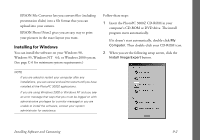
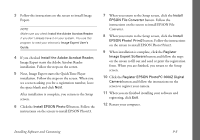
◗ EPSON File Converter lets you convert files (including presentation slides) into a file format that you can upload into your camera. ◗ EPSON Photo! Print2 gives you an easy way to print your pictures in the exact layout you want. Installing for Windows You can install the software on your Windows 98, Windows 95, Windows NT 4.0, or Windows 2000 system. (See page C-6 for minimum system requirements.) Follow these steps: 1 Insert the PhotoPC 3000Z CD-ROM in your computer's CD-ROM or DVD drive. The install program starts automatically. If it doesn't start automatically, double-click My Computer. Then double-click your CD-ROM icon. 2 When you see the following setup screen, click the Install Image Expert button. NOTE ◗ If you are asked to restart your computer after any installations, you can cancel and wait to restart until you have installed all the PhotoPC 3000Z applications. ◗ If you are using Windows 2000 or Windows NT and you see an error message that says that you must be logged on with administrative privileges (or a similar message) or you are unable to install the software, contact your system administrator for assistance. Installing Software and Connecting 9-2
-
 1
1 -
2
-
3
-
4
-
5
-
6
-
7
-
8
-
9
-
10
-
11
-
12
-
13
-
14
-
15
-
16
-
17
-
18
-
19
-
20
-
21
-
22
-
23
-
24
-
25
-
26
-
27
-
28
-
29
-
30
-
31
-
32
-
33
-
34
-
35
-
36
-
37
-
38
-
39
-
40
-
41
-
42
-
43
-
44
-
45
-
46
-
47
-
48
-
49
-
50
-
51
-
52
-
53
-
54
-
55
-
56
-
57
-
58
-
59
-
60
-
61
-
62
-
63
-
64
-
65
-
66
-
67
-
68
-
69
-
70
-
71
-
72
-
73
-
74
-
75
-
76
-
77
-
78
-
79
-
80
-
81
-
82
-
83
-
84
-
85
-
86
-
87
-
88
-
89
-
90
-
91
-
92
-
93
-
94
-
95
-
96
-
97
-
98
-
99
-
 100
100 -
 101
101 -
 102
102 -
 103
103 -
 104
104 -
 105
105 -
 106
106 -
 107
107 -
 108
108 -
 109
109 -
 110
110 -
111
-
112
-
113
-
114
-
115
-
116
-
117
-
118
-
119
-
120
-
121
-
122
-
123
-
124
-
125
-
126
-
127
-
128
-
129
-
130
-
131
-
132
-
133
-
134
-
135
-
136
-
137
-
138
-
139
-
140
-
141
-
142
-
143
-
144
-
145
-
146
-
147
-
148
-
149
-
150
-
151
-
152
-
153
-
154
-
155
-
156
-
157
-
158
-
159
-
160
-
161
-
162
-
163
-
164
-
165
-
166
-
167
-
168
-
169
-
170
-
171
-
172
-
173
-
174
-
175
-
176
-
177
-
178
-
179
-
180
-
181
-
182
-
183
-
184
-
185
-
186
-
187
-
188
-
189
-
190
-
191
-
192
-
193
-
194
-
195
-
196
-
197
-
198
-
199
-
200
-
201
-
202
-
203
-
204
-
205
-
206
-
207
-
208
-
209
-
210
-
211
-
212
-
213
-
214
-
215
-
216
-
217
-
218
-
219
-
220
-
221
-
222
-
223
-
224
 |
 |