Epson PhotoPC 3000Z User Manual - Page 109
Connecting the Camera, Connecting to a Windows PC
 |
View all Epson PhotoPC 3000Z manuals
Add to My Manuals
Save this manual to your list of manuals |
Page 109 highlights
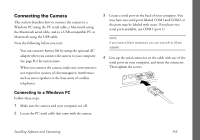
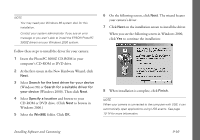
Connecting the Camera This section describes how to connect the camera to a Windows PC using the PC serial cable, a Macintosh using the Macintosh serial cable, and to a USB-compatible PC or Macintosh using the USB cable. Note the following before you start: ◗ You can conserve battery life by using the optional AC adapter when you connect the camera to your computer. See page B-2 for instructions. ◗ When you connect the camera, make sure your system is not exposed to sources of electromagnetic interference, such as stereo speakers or the base units of cordless telephones. 3 Locate a serial port on the back of your computer. You may have two serial ports labeled COM1 and COM2, or the ports may be labeled with icons. If you have two serial ports available, use COM1 (port 1). NOTE If you have a 25-pin serial port, you can use a 9- to 25-pin adapter. 4 Line up the serial connector on the cable with one of the serial ports on your computer, and insert the connector. Then tighten the screws. Connecting to a Windows PC Follow these steps: 1 Make sure the camera and your computer are off. 2 Locate the PC serial cable that came with the camera. Installing Software and Connecting 9-6
-
 1
1 -
2
-
3
-
4
-
5
-
6
-
7
-
8
-
9
-
10
-
11
-
12
-
13
-
14
-
15
-
16
-
17
-
18
-
19
-
20
-
21
-
22
-
23
-
24
-
25
-
26
-
27
-
28
-
29
-
30
-
31
-
32
-
33
-
34
-
35
-
36
-
37
-
38
-
39
-
40
-
41
-
42
-
43
-
44
-
45
-
46
-
47
-
48
-
49
-
50
-
51
-
52
-
53
-
54
-
55
-
56
-
57
-
58
-
59
-
60
-
61
-
62
-
63
-
64
-
65
-
66
-
67
-
68
-
69
-
70
-
71
-
72
-
73
-
74
-
75
-
76
-
77
-
78
-
79
-
80
-
81
-
82
-
83
-
84
-
85
-
86
-
87
-
88
-
89
-
90
-
91
-
92
-
93
-
94
-
95
-
96
-
97
-
98
-
99
-
100
-
101
-
102
-
103
-
 104
104 -
 105
105 -
 106
106 -
 107
107 -
 108
108 -
 109
109 -
 110
110 -
 111
111 -
 112
112 -
 113
113 -
 114
114 -
115
-
116
-
117
-
118
-
119
-
120
-
121
-
122
-
123
-
124
-
125
-
126
-
127
-
128
-
129
-
130
-
131
-
132
-
133
-
134
-
135
-
136
-
137
-
138
-
139
-
140
-
141
-
142
-
143
-
144
-
145
-
146
-
147
-
148
-
149
-
150
-
151
-
152
-
153
-
154
-
155
-
156
-
157
-
158
-
159
-
160
-
161
-
162
-
163
-
164
-
165
-
166
-
167
-
168
-
169
-
170
-
171
-
172
-
173
-
174
-
175
-
176
-
177
-
178
-
179
-
180
-
181
-
182
-
183
-
184
-
185
-
186
-
187
-
188
-
189
-
190
-
191
-
192
-
193
-
194
-
195
-
196
-
197
-
198
-
199
-
200
-
201
-
202
-
203
-
204
-
205
-
206
-
207
-
208
-
209
-
210
-
211
-
212
-
213
-
214
-
215
-
216
-
217
-
218
-
219
-
220
-
221
-
222
-
223
-
224
 |
 |
