Epson PhotoPC 3000Z User Manual - Page 134
Using Drag and Drop From an Album (Windows Only), Paste, Paste Special
 |
View all Epson PhotoPC 3000Z manuals
Add to My Manuals
Save this manual to your list of manuals |
Page 134 highlights
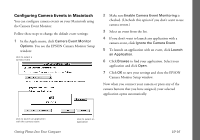
6 Open the document where you want to use the picture. 7 Choose Paste (or Paste Special) from your application's Edit menu. A copy of the picture appears in your document. Using Drag and Drop From an Album (Windows Only) Once you have transferred your photos into albums, you can easily drag and drop them into documents or other projects. NOTE Dragging and dropping an image into a document works only with OLE-2.0-compliant applications, such as Microsoft Word, PowerPoint, WordPerfect, or Lotus SmartSuite. Depending on how well your application supports OLE 2.0, your images may not look as good when you drag and drop them as when you import them. 2 Click View Pictures from an Existing Album, or click the Open Album button from the Image Expert screen. 3 Locate the album you want and double-click it to open it. 4 Start your word processor or other application and open the document where you want to use the picture. You should have both the Image Expert album and the document displayed on your screen, as shown: Follow these steps: 1 Start Image Expert as described on page 11-4. Getting Your Photos Into Documents 11-5
-
 1
1 -
2
-
3
-
4
-
5
-
6
-
7
-
8
-
9
-
10
-
11
-
12
-
13
-
14
-
15
-
16
-
17
-
18
-
19
-
20
-
21
-
22
-
23
-
24
-
25
-
26
-
27
-
28
-
29
-
30
-
31
-
32
-
33
-
34
-
35
-
36
-
37
-
38
-
39
-
40
-
41
-
42
-
43
-
44
-
45
-
46
-
47
-
48
-
49
-
50
-
51
-
52
-
53
-
54
-
55
-
56
-
57
-
58
-
59
-
60
-
61
-
62
-
63
-
64
-
65
-
66
-
67
-
68
-
69
-
70
-
71
-
72
-
73
-
74
-
75
-
76
-
77
-
78
-
79
-
80
-
81
-
82
-
83
-
84
-
85
-
86
-
87
-
88
-
89
-
90
-
91
-
92
-
93
-
94
-
95
-
96
-
97
-
98
-
99
-
100
-
101
-
102
-
103
-
104
-
105
-
106
-
107
-
108
-
109
-
110
-
111
-
112
-
113
-
114
-
115
-
116
-
117
-
118
-
119
-
120
-
121
-
122
-
123
-
124
-
125
-
126
-
127
-
128
-
 129
129 -
 130
130 -
 131
131 -
 132
132 -
 133
133 -
 134
134 -
 135
135 -
 136
136 -
 137
137 -
 138
138 -
 139
139 -
140
-
141
-
142
-
143
-
144
-
145
-
146
-
147
-
148
-
149
-
150
-
151
-
152
-
153
-
154
-
155
-
156
-
157
-
158
-
159
-
160
-
161
-
162
-
163
-
164
-
165
-
166
-
167
-
168
-
169
-
170
-
171
-
172
-
173
-
174
-
175
-
176
-
177
-
178
-
179
-
180
-
181
-
182
-
183
-
184
-
185
-
186
-
187
-
188
-
189
-
190
-
191
-
192
-
193
-
194
-
195
-
196
-
197
-
198
-
199
-
200
-
201
-
202
-
203
-
204
-
205
-
206
-
207
-
208
-
209
-
210
-
211
-
212
-
213
-
214
-
215
-
216
-
217
-
218
-
219
-
220
-
221
-
222
-
223
-
224
 |
 |
