Epson PhotoPC 3000Z User Manual - Page 148
Adjusting Camera Settings From Your Computer, Changing Settings With Image Expert
 |
View all Epson PhotoPC 3000Z manuals
Add to My Manuals
Save this manual to your list of manuals |
Page 148 highlights
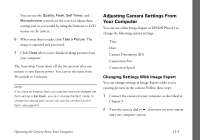
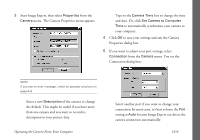
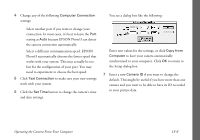
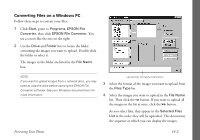
You can use the Quality, Flash, Self Timer, and Monochrome controls on the screen to adjust these settings just as you would by using the buttons or LCD menus on the camera. 6 When your shot is ready, click Take a Picture. The image is captured and processed. 7 Click Close when you're finished taking pictures from your computer. The Auto-Stop Timer shuts off the live preview after one minute to save battery power. You can set the timer from 30 seconds to 5 minutes. NOTE If you have an external flash unit attached and have changed the flash setting to Ext Flash, you can't change the flash mode. To change the setting back so you can use the camera's built-in flash, see page B-5. Adjusting Camera Settings From Your Computer You can use either Image Expert or EPSON Photo!3 to change the following camera settings: ◗ Time ◗ Date ◗ Camera Description (ID) ◗ Connection Port ◗ Connection Speed Changing Settings With Image Expert You can change settings in Image Expert while you're viewing pictures in the camera. Follow these steps: 1 Connect the camera to your computer as described in Chapter 9. 2 Turn the camera dial to , then turn on your camera and your computer system. Operating the Camera From Your Computer 13-5
-
 1
1 -
2
-
3
-
4
-
5
-
6
-
7
-
8
-
9
-
10
-
11
-
12
-
13
-
14
-
15
-
16
-
17
-
18
-
19
-
20
-
21
-
22
-
23
-
24
-
25
-
26
-
27
-
28
-
29
-
30
-
31
-
32
-
33
-
34
-
35
-
36
-
37
-
38
-
39
-
40
-
41
-
42
-
43
-
44
-
45
-
46
-
47
-
48
-
49
-
50
-
51
-
52
-
53
-
54
-
55
-
56
-
57
-
58
-
59
-
60
-
61
-
62
-
63
-
64
-
65
-
66
-
67
-
68
-
69
-
70
-
71
-
72
-
73
-
74
-
75
-
76
-
77
-
78
-
79
-
80
-
81
-
82
-
83
-
84
-
85
-
86
-
87
-
88
-
89
-
90
-
91
-
92
-
93
-
94
-
95
-
96
-
97
-
98
-
99
-
100
-
101
-
102
-
103
-
104
-
105
-
106
-
107
-
108
-
109
-
110
-
111
-
112
-
113
-
114
-
115
-
116
-
117
-
118
-
119
-
120
-
121
-
122
-
123
-
124
-
125
-
126
-
127
-
128
-
129
-
130
-
131
-
132
-
133
-
134
-
135
-
136
-
137
-
138
-
139
-
140
-
141
-
142
-
 143
143 -
 144
144 -
 145
145 -
 146
146 -
 147
147 -
 148
148 -
 149
149 -
 150
150 -
 151
151 -
 152
152 -
 153
153 -
154
-
155
-
156
-
157
-
158
-
159
-
160
-
161
-
162
-
163
-
164
-
165
-
166
-
167
-
168
-
169
-
170
-
171
-
172
-
173
-
174
-
175
-
176
-
177
-
178
-
179
-
180
-
181
-
182
-
183
-
184
-
185
-
186
-
187
-
188
-
189
-
190
-
191
-
192
-
193
-
194
-
195
-
196
-
197
-
198
-
199
-
200
-
201
-
202
-
203
-
204
-
205
-
206
-
207
-
208
-
209
-
210
-
211
-
212
-
213
-
214
-
215
-
216
-
217
-
218
-
219
-
220
-
221
-
222
-
223
-
224
 |
 |
