Epson PhotoPC 3000Z User Manual - Page 107
Installing on a Macintosh, Power Macintosh
 |
View all Epson PhotoPC 3000Z manuals
Add to My Manuals
Save this manual to your list of manuals |
Page 107 highlights
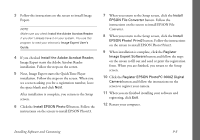
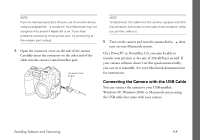
Installing on a Macintosh You can install all the software on your PowerPC,™ Power Macintosh, iMac,™ iBook,™ or PowerBook computer. (See page C-6 for minimum system requirements.) NOTE ◗ If your iMac is running OS 8.1, you'll need to upgrade your operating system to OS 8.5.1, or later, before installing your camera software. To find out which operating system your iMac is running, select About This Computer in the Apple menu. ◗ If you are asked to restart your computer after any installations, you can quit and wait to restart until you have installed all the PhotoPC 3000Z applications. Follow these steps: 1 Insert the CD-ROM in your computer's CD-ROM or DVD drive. 2 If necessary, double-click the PhotoPC 3000Z CD-ROM icon to open it. 3 Open the EPSON Photo!3 folder. 4 Double-click the Photo!3 Installer - Part 1 icon and follow the instructions on the screen. 5 Open the EPSON File Converter folder. 6 Double-click the EPSON File Converter Install icon and follow the instructions on the screen. 7 Open the EPSON Photo! Print2 folder. 8 Double-click the Photo! Print2 Installer (A) icon. Then click OK to install Photo! Print2. 9 Open the Adobe Acrobat folder. 10 Double-click the Reader Installer icon and follow the instructions on the screen. 11 Double-click the Install Image Expert icon. Click Continue and follow the instructions on the screen. 12 Click OK to install QuickTime and follow the instructions on the screen. When you see a screen asking for a registration number, leave that space blank and click Continue. 13 Restart your computer. Installing Software and Connecting 9-4
-
 1
1 -
2
-
3
-
4
-
5
-
6
-
7
-
8
-
9
-
10
-
11
-
12
-
13
-
14
-
15
-
16
-
17
-
18
-
19
-
20
-
21
-
22
-
23
-
24
-
25
-
26
-
27
-
28
-
29
-
30
-
31
-
32
-
33
-
34
-
35
-
36
-
37
-
38
-
39
-
40
-
41
-
42
-
43
-
44
-
45
-
46
-
47
-
48
-
49
-
50
-
51
-
52
-
53
-
54
-
55
-
56
-
57
-
58
-
59
-
60
-
61
-
62
-
63
-
64
-
65
-
66
-
67
-
68
-
69
-
70
-
71
-
72
-
73
-
74
-
75
-
76
-
77
-
78
-
79
-
80
-
81
-
82
-
83
-
84
-
85
-
86
-
87
-
88
-
89
-
90
-
91
-
92
-
93
-
94
-
95
-
96
-
97
-
98
-
99
-
100
-
101
-
 102
102 -
 103
103 -
 104
104 -
 105
105 -
 106
106 -
 107
107 -
 108
108 -
 109
109 -
 110
110 -
 111
111 -
 112
112 -
113
-
114
-
115
-
116
-
117
-
118
-
119
-
120
-
121
-
122
-
123
-
124
-
125
-
126
-
127
-
128
-
129
-
130
-
131
-
132
-
133
-
134
-
135
-
136
-
137
-
138
-
139
-
140
-
141
-
142
-
143
-
144
-
145
-
146
-
147
-
148
-
149
-
150
-
151
-
152
-
153
-
154
-
155
-
156
-
157
-
158
-
159
-
160
-
161
-
162
-
163
-
164
-
165
-
166
-
167
-
168
-
169
-
170
-
171
-
172
-
173
-
174
-
175
-
176
-
177
-
178
-
179
-
180
-
181
-
182
-
183
-
184
-
185
-
186
-
187
-
188
-
189
-
190
-
191
-
192
-
193
-
194
-
195
-
196
-
197
-
198
-
199
-
200
-
201
-
202
-
203
-
204
-
205
-
206
-
207
-
208
-
209
-
210
-
211
-
212
-
213
-
214
-
215
-
216
-
217
-
218
-
219
-
220
-
221
-
222
-
223
-
224
 |
 |