Epson T3270 User Manual - Page 138
The Maintenance Menu, Description, Manual
 |
View all Epson T3270 manuals
Add to My Manuals
Save this manual to your list of manuals |
Page 138 highlights
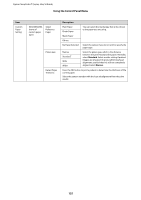
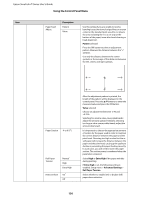
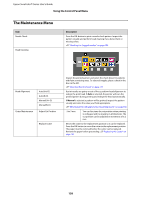
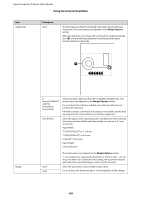
Epson SureColor T-Series User's Guide Using the Control Panel Menu The Maintenance Menu Item Nozzle Check Head Cleaning Description Press the Z button to print a nozzle check pattern. Inspect the pattern visually and perform head cleaning if you detect faint or missing colors. U"Checking for clogged nozzles" on page 156 Head Alignment Cutter Maintenance Auto(Uni-D) Auto(Bi-D) Manual(Uni-D) Manual(Bi-D) Adjust Cut Position Replace Cutter Inspect the printed pattern and select the check boxes for patterns with faint or missing areas. To select all nozzles, place a check in the box on the left. U"Cleaning the print head" on page 157 If print results are grainy or out of focus, perform head alignment to realign the print head. If Auto is selected, the printer will scan the printed pattern during printing and realign the head automatically. If Manual is selected, a pattern will be printed; inspect the pattern visually and enter the value you think appropriate. U"Minimizing Print Misalignments (Head Alignment)" on page 158 -3 to 3 mm You can fine tune the cut position when printing to roll paper with no margins in all directions. The cut position can be adjusted in increments of 0.2 mm. Moves the cutter to the replacement position so it can be replaced. Press the Z button to move the cutter to the replacement position. The paper must be removed before the cutter can be replaced. Remove the paper before proceeding. U"Replacing the Cutter" on page 163 138
-
 1
1 -
2
-
3
-
4
-
5
-
6
-
7
-
8
-
9
-
10
-
11
-
12
-
13
-
14
-
15
-
16
-
17
-
18
-
19
-
20
-
21
-
22
-
23
-
24
-
25
-
26
-
27
-
28
-
29
-
30
-
31
-
32
-
33
-
34
-
35
-
36
-
37
-
38
-
39
-
40
-
41
-
42
-
43
-
44
-
45
-
46
-
47
-
48
-
49
-
50
-
51
-
52
-
53
-
54
-
55
-
56
-
57
-
58
-
59
-
60
-
61
-
62
-
63
-
64
-
65
-
66
-
67
-
68
-
69
-
70
-
71
-
72
-
73
-
74
-
75
-
76
-
77
-
78
-
79
-
80
-
81
-
82
-
83
-
84
-
85
-
86
-
87
-
88
-
89
-
90
-
91
-
92
-
93
-
94
-
95
-
96
-
97
-
98
-
99
-
100
-
101
-
102
-
103
-
104
-
105
-
106
-
107
-
108
-
109
-
110
-
111
-
112
-
113
-
114
-
115
-
116
-
117
-
118
-
119
-
120
-
121
-
122
-
123
-
124
-
125
-
126
-
127
-
128
-
129
-
130
-
131
-
132
-
 133
133 -
 134
134 -
 135
135 -
 136
136 -
 137
137 -
 138
138 -
 139
139 -
 140
140 -
 141
141 -
 142
142 -
 143
143 -
144
-
145
-
146
-
147
-
148
-
149
-
150
-
151
-
152
-
153
-
154
-
155
-
156
-
157
-
158
-
159
-
160
-
161
-
162
-
163
-
164
-
165
-
166
-
167
-
168
-
169
-
170
-
171
-
172
-
173
-
174
-
175
-
176
-
177
-
178
-
179
-
180
-
181
-
182
-
183
-
184
-
185
-
186
-
187
-
188
-
189
-
190
-
191
-
192
-
193
-
194
-
195
-
196
-
197
-
198
-
199
-
200
-
201
-
202
-
203
-
204
-
205
-
206
-
207
-
208
-
209
-
210
-
211
-
212
-
213
 |
 |
