Epson T3270 User Manual - Page 160
Head Alignment, Manual, From the printer
 |
View all Epson T3270 manuals
Add to My Manuals
Save this manual to your list of manuals |
Page 160 highlights
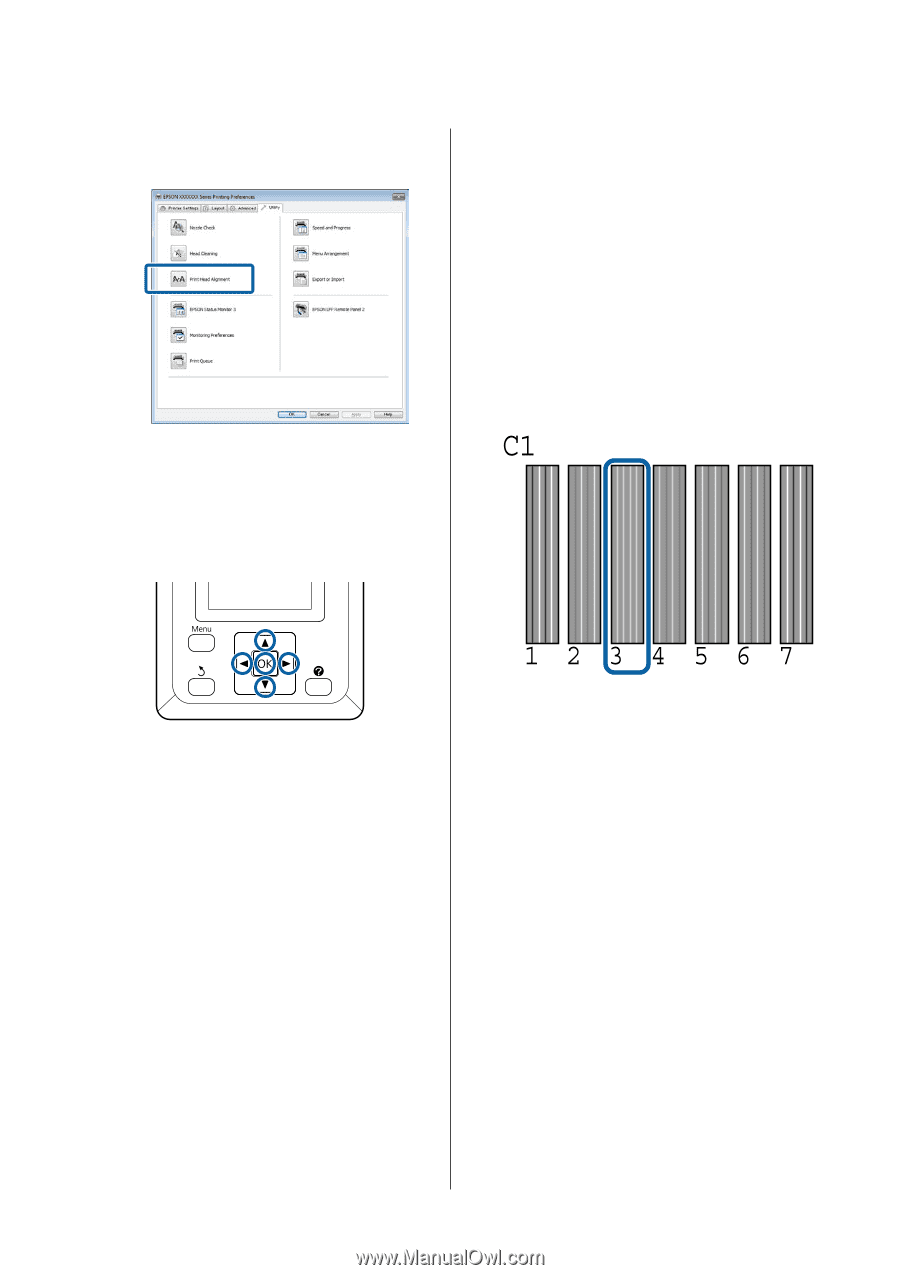
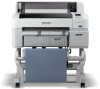
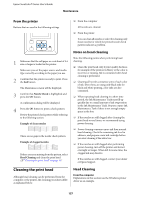
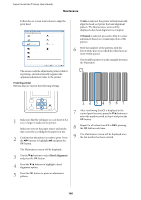
Epson SureColor T-Series User's Guide Maintenance Follow the on-screen instructions to align the print head. If Auto is selected, the printer will automatically align the head as it prints the head alignment pattern. The Maintenance menu will be displayed when head alignment is complete. If Manual is selected, proceed to Step 6 to enter adjustment based on a visual inspection of the pattern. 6 Note the numbers of the patterns with the fewest white lines or in which the white lines are most evenly spaced. This would be pattern 3 in the example shown in the illustration. The sensor reads the adjustment pattern while it is printing, and automatically registers the optimum adjustment value to the printer. From the printer Buttons that are used in the following settings 1 Make sure that the roll paper or a cut sheet of A4 size or larger is loaded in the printer. Make sure you set the paper source and media type correctly according to the paper you use. 2 Confirm that the printer is ready to print. Press the l/r buttons to highlight - and press the Z button. The Maintenance menu will be displayed. 3 Use the d/u buttons to select Head Alignment and press the Z button. 4 Press the d/u buttons to highlight a head alignment option. 5 Press the Z button to print an adjustment pattern. 7 After confirming that C1 is displayed in the control panel's screen, press the d/u buttons to select the number noted in Step 6 and press the Z button. 8 Repeat for all colors from C1 to BK2, pressing the Z button each time. 9 The Maintenance menu will be displayed once the last number has been entered. 160
-
 1
1 -
2
-
3
-
4
-
5
-
6
-
7
-
8
-
9
-
10
-
11
-
12
-
13
-
14
-
15
-
16
-
17
-
18
-
19
-
20
-
21
-
22
-
23
-
24
-
25
-
26
-
27
-
28
-
29
-
30
-
31
-
32
-
33
-
34
-
35
-
36
-
37
-
38
-
39
-
40
-
41
-
42
-
43
-
44
-
45
-
46
-
47
-
48
-
49
-
50
-
51
-
52
-
53
-
54
-
55
-
56
-
57
-
58
-
59
-
60
-
61
-
62
-
63
-
64
-
65
-
66
-
67
-
68
-
69
-
70
-
71
-
72
-
73
-
74
-
75
-
76
-
77
-
78
-
79
-
80
-
81
-
82
-
83
-
84
-
85
-
86
-
87
-
88
-
89
-
90
-
91
-
92
-
93
-
94
-
95
-
96
-
97
-
98
-
99
-
100
-
101
-
102
-
103
-
104
-
105
-
106
-
107
-
108
-
109
-
110
-
111
-
112
-
113
-
114
-
115
-
116
-
117
-
118
-
119
-
120
-
121
-
122
-
123
-
124
-
125
-
126
-
127
-
128
-
129
-
130
-
131
-
132
-
133
-
134
-
135
-
136
-
137
-
138
-
139
-
140
-
141
-
142
-
143
-
144
-
145
-
146
-
147
-
148
-
149
-
150
-
151
-
152
-
153
-
154
-
 155
155 -
 156
156 -
 157
157 -
 158
158 -
 159
159 -
 160
160 -
 161
161 -
 162
162 -
 163
163 -
 164
164 -
 165
165 -
166
-
167
-
168
-
169
-
170
-
171
-
172
-
173
-
174
-
175
-
176
-
177
-
178
-
179
-
180
-
181
-
182
-
183
-
184
-
185
-
186
-
187
-
188
-
189
-
190
-
191
-
192
-
193
-
194
-
195
-
196
-
197
-
198
-
199
-
200
-
201
-
202
-
203
-
204
-
205
-
206
-
207
-
208
-
209
-
210
-
211
-
212
-
213
 |
 |