Epson T3270 User Manual - Page 96
Paper Size, Auto Expand, Layout Settings, Expansion, Advanced, Auto Cut
 |
View all Epson T3270 manuals
Add to My Manuals
Save this manual to your list of manuals |
Page 96 highlights
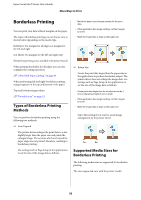
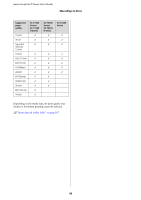
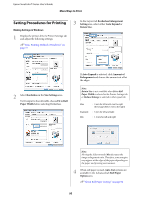
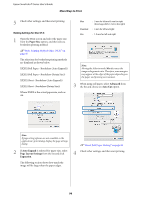
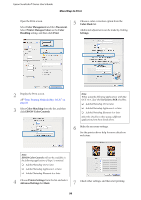
Epson SureColor T-Series User's Guide More Ways to Print 5 Check other settings, and then start printing. Making Settings for Mac OS X 1 Open the Print screen and select the paper size from the Paper Size option, and then select a borderless printing method. U"Basic Printing Methods (Mac OS X)" on page 60 The selections for borderless printing methods are displayed as shown below. XXXX (Roll Paper - Borderless (Auto Expand)) XXXX (Roll Paper - Borderless (Retain Size)) XXXX (Sheet - Borderless (Auto Expand)) XXXX (Sheet - Borderless (Retain Size)) Where XXXX is the actual paper size, such as A4. Max : 3 mm for left and 5 mm for right (the image shifts 1 mm to the right) Standard : 3 mm for left and right Min : 1.5 mm for left and right Note: Moving the slider towards Min decreases the image enlargement ratio. Therefore, some margins may appear at the edges of the paper depending on the paper and printing environment. 3 When using roll paper, select Advanced from the list and choose an Auto Cut option. Note: If page setting options are not available in the application's print dialog, display the page settings dialog. 2 If Auto Expand is selected for paper size, select Page Layout Settings from the list and click Expansion. The following section shows how much the image will be larger than the paper edges. U"About Roll Paper Cutting" on page 94 4 Check other settings, and then start printing. 96
-
 1
1 -
2
-
3
-
4
-
5
-
6
-
7
-
8
-
9
-
10
-
11
-
12
-
13
-
14
-
15
-
16
-
17
-
18
-
19
-
20
-
21
-
22
-
23
-
24
-
25
-
26
-
27
-
28
-
29
-
30
-
31
-
32
-
33
-
34
-
35
-
36
-
37
-
38
-
39
-
40
-
41
-
42
-
43
-
44
-
45
-
46
-
47
-
48
-
49
-
50
-
51
-
52
-
53
-
54
-
55
-
56
-
57
-
58
-
59
-
60
-
61
-
62
-
63
-
64
-
65
-
66
-
67
-
68
-
69
-
70
-
71
-
72
-
73
-
74
-
75
-
76
-
77
-
78
-
79
-
80
-
81
-
82
-
83
-
84
-
85
-
86
-
87
-
88
-
89
-
90
-
 91
91 -
 92
92 -
 93
93 -
 94
94 -
 95
95 -
 96
96 -
 97
97 -
 98
98 -
 99
99 -
 100
100 -
 101
101 -
102
-
103
-
104
-
105
-
106
-
107
-
108
-
109
-
110
-
111
-
112
-
113
-
114
-
115
-
116
-
117
-
118
-
119
-
120
-
121
-
122
-
123
-
124
-
125
-
126
-
127
-
128
-
129
-
130
-
131
-
132
-
133
-
134
-
135
-
136
-
137
-
138
-
139
-
140
-
141
-
142
-
143
-
144
-
145
-
146
-
147
-
148
-
149
-
150
-
151
-
152
-
153
-
154
-
155
-
156
-
157
-
158
-
159
-
160
-
161
-
162
-
163
-
164
-
165
-
166
-
167
-
168
-
169
-
170
-
171
-
172
-
173
-
174
-
175
-
176
-
177
-
178
-
179
-
180
-
181
-
182
-
183
-
184
-
185
-
186
-
187
-
188
-
189
-
190
-
191
-
192
-
193
-
194
-
195
-
196
-
197
-
198
-
199
-
200
-
201
-
202
-
203
-
204
-
205
-
206
-
207
-
208
-
209
-
210
-
211
-
212
-
213
 |
 |