HP Integrity rx2800 rx2800 i2 User Service Guide - Page 100
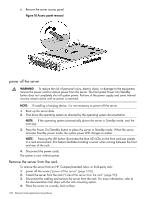
Unscrew the captive thumbscrews on the rear of the pedestal kit for the right side pedestal kit
 |
View all HP Integrity rx2800 manuals
Add to My Manuals
Save this manual to your list of manuals |
Page 100 highlights
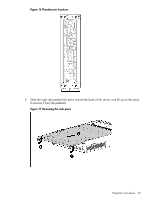
2. Remove the pedestal kit feet. Figure 15 Removing the pedestal kit feet 3. Lay the server on the left side (facing the front of the server). The right side of the pedestal kit (with the ventilation holes) should be facing up. 4. Unscrew the captive thumbscrews on the rear of the pedestal kit for the right side pedestal kit piece. 100 Removal and replacement procedures
-
 1
1 -
2
-
3
-
4
-
5
-
6
-
7
-
8
-
9
-
10
-
11
-
12
-
13
-
14
-
15
-
16
-
17
-
18
-
19
-
20
-
21
-
22
-
23
-
24
-
25
-
26
-
27
-
28
-
29
-
30
-
31
-
32
-
33
-
34
-
35
-
36
-
37
-
38
-
39
-
40
-
41
-
42
-
43
-
44
-
45
-
46
-
47
-
48
-
49
-
50
-
51
-
52
-
53
-
54
-
55
-
56
-
57
-
58
-
59
-
60
-
61
-
62
-
63
-
64
-
65
-
66
-
67
-
68
-
69
-
70
-
71
-
72
-
73
-
74
-
75
-
76
-
77
-
78
-
79
-
80
-
81
-
82
-
83
-
84
-
85
-
86
-
87
-
88
-
89
-
90
-
91
-
92
-
93
-
94
-
 95
95 -
 96
96 -
 97
97 -
 98
98 -
 99
99 -
 100
100 -
 101
101 -
 102
102 -
 103
103 -
 104
104 -
 105
105 -
106
-
107
-
108
-
109
-
110
-
111
-
112
-
113
-
114
-
115
-
116
-
117
-
118
-
119
-
120
-
121
-
122
-
123
-
124
-
125
-
126
-
127
-
128
-
129
-
130
-
131
-
132
-
133
-
134
-
135
-
136
-
137
-
138
-
139
-
140
-
141
-
142
-
143
-
144
-
145
-
146
-
147
-
148
-
149
-
150
-
151
 |
 |

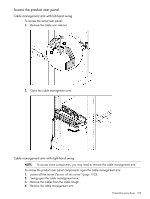
2.
Remove the pedestal kit feet.
Figure 15 Removing the pedestal kit feet
3.
Lay the server on the left side (facing the front of the server). The right side of the pedestal kit
(with the ventilation holes) should be facing up.
4.
Unscrew the captive thumbscrews on the rear of the pedestal kit for the right side pedestal kit
piece.
100
Removal and replacement procedures