HP Integrity rx2800 rx2800 i2 User Service Guide - Page 29
Installing a hot-swappable power supply, IMPORTANT, Power supply loading guidelines
 |
View all HP Integrity rx2800 manuals
Add to My Manuals
Save this manual to your list of manuals |
Page 29 highlights
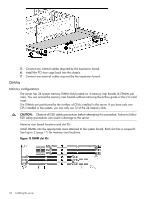
IMPORTANT: SAS hard drives are loaded in sequence, starting with slot 1. Save the hard drive filler for future use. For airflow purposes, place hard drive fillers in slots that do not contain hard drives. 1. Remove the hard drive filler, by squeezing the tab and pulling out the filler. 2. Install the hard drive, by pushing in the drive and closing the locking lever. Installing a hot-swappable power supply The server has at least one hot-swappable power supply installed before shipping. This power supply is located at the rear of the server. You can install a second, optional power supply to provide 1+1 capability. Figure 12 Power supply loading guidelines Installing additional components 29
-
 1
1 -
2
-
3
-
4
-
5
-
6
-
7
-
8
-
9
-
10
-
11
-
12
-
13
-
14
-
15
-
16
-
17
-
18
-
19
-
20
-
21
-
22
-
23
-
 24
24 -
 25
25 -
 26
26 -
 27
27 -
 28
28 -
 29
29 -
 30
30 -
 31
31 -
 32
32 -
 33
33 -
 34
34 -
35
-
36
-
37
-
38
-
39
-
40
-
41
-
42
-
43
-
44
-
45
-
46
-
47
-
48
-
49
-
50
-
51
-
52
-
53
-
54
-
55
-
56
-
57
-
58
-
59
-
60
-
61
-
62
-
63
-
64
-
65
-
66
-
67
-
68
-
69
-
70
-
71
-
72
-
73
-
74
-
75
-
76
-
77
-
78
-
79
-
80
-
81
-
82
-
83
-
84
-
85
-
86
-
87
-
88
-
89
-
90
-
91
-
92
-
93
-
94
-
95
-
96
-
97
-
98
-
99
-
100
-
101
-
102
-
103
-
104
-
105
-
106
-
107
-
108
-
109
-
110
-
111
-
112
-
113
-
114
-
115
-
116
-
117
-
118
-
119
-
120
-
121
-
122
-
123
-
124
-
125
-
126
-
127
-
128
-
129
-
130
-
131
-
132
-
133
-
134
-
135
-
136
-
137
-
138
-
139
-
140
-
141
-
142
-
143
-
144
-
145
-
146
-
147
-
148
-
149
-
150
-
151
 |
 |
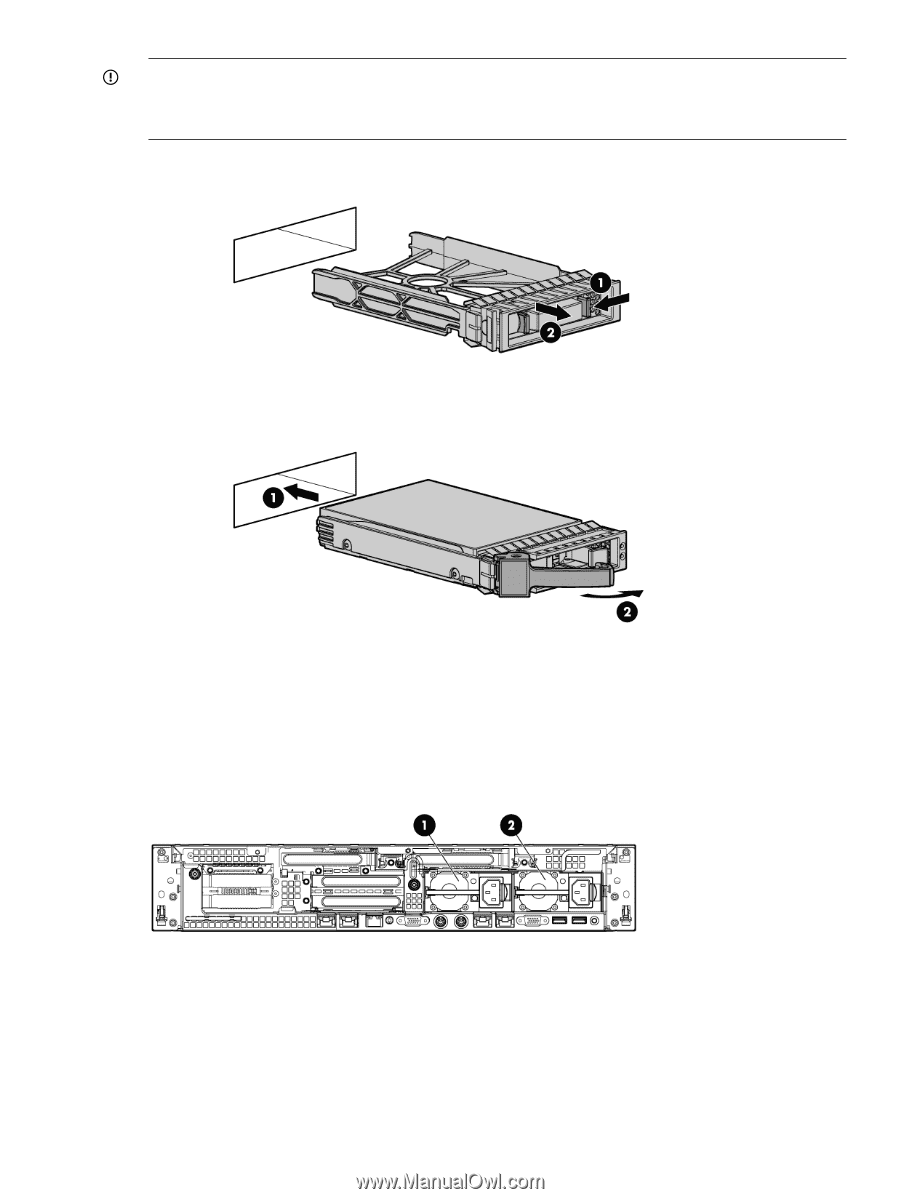
IMPORTANT:
SAS hard drives are loaded in sequence, starting with slot 1.
Save the hard drive filler for future use. For airflow purposes, place hard drive fillers in slots that
do not contain hard drives.
1.
Remove the hard drive filler, by squeezing the tab and pulling out the filler.
2.
Install the hard drive, by pushing in the drive and closing the locking lever.
Installing a hot-swappable power supply
The server has at least one hot-swappable power supply installed before shipping. This power
supply is located at the rear of the server. You can install a second, optional power supply to
provide 1+1 capability.
Figure 12 Power supply loading guidelines
Installing additional components
29