HP Integrity rx2800 rx2800 i2 User Service Guide - Page 124
sysset -prodnum <product number>, sysset -uuid <uuid>
 |
View all HP Integrity rx2800 manuals
Add to My Manuals
Save this manual to your list of manuals |
Page 124 highlights
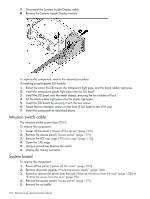
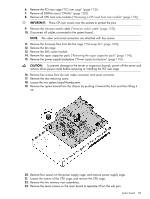
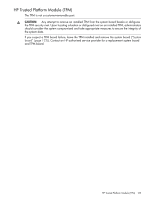
To migrate the CPU to the spare system board: 1. Take the iLO label off the system board toe tag and place it over the iLO toe tag on the front panel. 2. Install the spare system board. CAUTION: The pins on the CPU socket are very fragile. Any damage to them may require replacing the system board. 3. Install the CPUs and heat sink or CPU heat sink module the system board ("Installing a CPU" (page 37)). 4. Install all components removed from the failed system board. 5. Install the access panel ("Access panel" (page 107)). 6. Install the power supplies ("Hot-swap power supply" (page 106)). 7. Power up the server. NOTE: Install all components with the same configuration that was used on the failed system board. CAUTION: Replacement system boards are shipped with the RAID controller in HBA mode by default. When the original components are re-installed on the replacement board and the system is booted to UEFI, the saupdate utility must be used to re-enable the RAID configuration if the original server blade was using the RAID functionality. See "SAS disk setup" (page 132) for instructions on using the saupdate utility. After you replace the system board, you must to set the SAS mode to RAID if that was your previous configuration. 1. During the server startup, wait for UEFI Front Page, press S or s to launch the UEFI Shell. 2. Get the saupdate.efi utility tool. 3. Enter saupdate.efi set_mode 0:1:0:0 raid to change the SAS mode to RAID. 4. Enter saupdate.efi get_mode 0:1:0:0 to verify the SAS mode is set to RAID. After you replace the system board, you must port over the server serial number, product number and UUID. Labels on the server indicates these numbers. 1. Login to ILO 3 MP, by using SSH, for example. 2. Access the MP Main Menu. 3. Enter CM at the hpiLO-> prompt. 4. Enter sysset at the CM:hpiLO> prompt, and it will show the system information 5. To change the serial number: a. Enter sysset -serial at the CM:hpiLO-> prompt. b. Enter the associated password, and press Enter. 6. To change product number (default is for the data center server): a. Enter sysset -prodnum at the CM:hpiLO-> prompt. b. Enter the associated password, and press Enter. 7. To change the UUID: a. Enter sysset -uuid at the MP:CM -> prompt. b. Enter the associated password and press Enter 8. Reset iLO MP by entering xd -r -nc at the CM:hpiLO-> prompt. 124 Removal and replacement procedures
-
 1
1 -
2
-
3
-
4
-
5
-
6
-
7
-
8
-
9
-
10
-
11
-
12
-
13
-
14
-
15
-
16
-
17
-
18
-
19
-
20
-
21
-
22
-
23
-
24
-
25
-
26
-
27
-
28
-
29
-
30
-
31
-
32
-
33
-
34
-
35
-
36
-
37
-
38
-
39
-
40
-
41
-
42
-
43
-
44
-
45
-
46
-
47
-
48
-
49
-
50
-
51
-
52
-
53
-
54
-
55
-
56
-
57
-
58
-
59
-
60
-
61
-
62
-
63
-
64
-
65
-
66
-
67
-
68
-
69
-
70
-
71
-
72
-
73
-
74
-
75
-
76
-
77
-
78
-
79
-
80
-
81
-
82
-
83
-
84
-
85
-
86
-
87
-
88
-
89
-
90
-
91
-
92
-
93
-
94
-
95
-
96
-
97
-
98
-
99
-
100
-
101
-
102
-
103
-
104
-
105
-
106
-
107
-
108
-
109
-
110
-
111
-
112
-
113
-
114
-
115
-
116
-
117
-
118
-
 119
119 -
 120
120 -
 121
121 -
 122
122 -
 123
123 -
 124
124 -
 125
125 -
 126
126 -
 127
127 -
 128
128 -
 129
129 -
130
-
131
-
132
-
133
-
134
-
135
-
136
-
137
-
138
-
139
-
140
-
141
-
142
-
143
-
144
-
145
-
146
-
147
-
148
-
149
-
150
-
151
 |
 |