HP Integrity rx2800 rx2800 i2 User Service Guide - Page 44
Completing installation, Installing the server into a rack or pedestal, Rack installation, HP rack
 |
View all HP Integrity rx2800 manuals
Add to My Manuals
Save this manual to your list of manuals |
Page 44 highlights
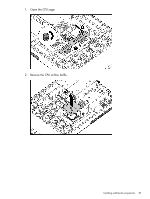
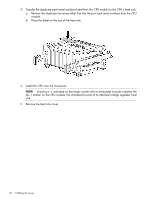
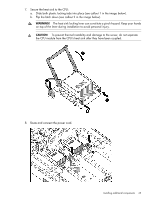
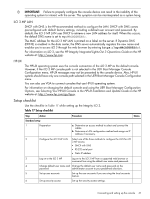
9. Tie wrap the CPU cable to the right tie point on the CPU assembly. CAUTION: When the CPU is installed, dress all slack in the power cable to the connector end of the cable. Failure to do so can result in pinched or damaged CPU power cables. NOTE: If you are adding an additional CPU to your server, the DIMMs in the server must be reconfigured to support both CPUs. See "Memory configurations" (page 34) for more information. Completing installation After all components are installed: 1. Close the CPU cage. 2. Install the PCI riser cage. 3. Install the access panel. 4. Install the server into the rack or pedestal. 5. Connect all cables. 6. power on the server. Installing the server into a rack or pedestal Rack installation HP rack HP servers that are installed into racks are shipped with equipment-mounting slides. An installation guide comes with each set of slides: HP 2U Quick Deploy Rail System Installation Instructions for HP Products. Follow the steps in this installation guide to determine where and how to install the server into the rack. Non-HP rack The Mounting in non-HP racks guide enables you to evaluate the installation of HP equipment into non-HP racks. Use this guide when you need to decide whether you can install, maintain, and service any HP equipment in a non-HP rack. The guide is located on the HP website at: http://www.hp.com/racksolutions on the HP Integrity and HP 9000 Servers infrastructure page. Click the Rack Systems/E link. 44 Installing the server
-
 1
1 -
2
-
3
-
4
-
5
-
6
-
7
-
8
-
9
-
10
-
11
-
12
-
13
-
14
-
15
-
16
-
17
-
18
-
19
-
20
-
21
-
22
-
23
-
24
-
25
-
26
-
27
-
28
-
29
-
30
-
31
-
32
-
33
-
34
-
35
-
36
-
37
-
38
-
 39
39 -
 40
40 -
 41
41 -
 42
42 -
 43
43 -
 44
44 -
 45
45 -
 46
46 -
 47
47 -
 48
48 -
 49
49 -
50
-
51
-
52
-
53
-
54
-
55
-
56
-
57
-
58
-
59
-
60
-
61
-
62
-
63
-
64
-
65
-
66
-
67
-
68
-
69
-
70
-
71
-
72
-
73
-
74
-
75
-
76
-
77
-
78
-
79
-
80
-
81
-
82
-
83
-
84
-
85
-
86
-
87
-
88
-
89
-
90
-
91
-
92
-
93
-
94
-
95
-
96
-
97
-
98
-
99
-
100
-
101
-
102
-
103
-
104
-
105
-
106
-
107
-
108
-
109
-
110
-
111
-
112
-
113
-
114
-
115
-
116
-
117
-
118
-
119
-
120
-
121
-
122
-
123
-
124
-
125
-
126
-
127
-
128
-
129
-
130
-
131
-
132
-
133
-
134
-
135
-
136
-
137
-
138
-
139
-
140
-
141
-
142
-
143
-
144
-
145
-
146
-
147
-
148
-
149
-
150
-
151
 |
 |
