HP Integrity rx2800 rx2800 i2 User Service Guide - Page 48
Preparation, Determining the physical iLO 3 MP access method
 |
View all HP Integrity rx2800 manuals
Add to My Manuals
Save this manual to your list of manuals |
Page 48 highlights
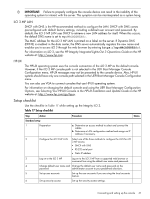
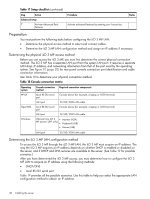
Table 17 Setup checklist (continued) Step Action Advanced setup 7 Activate Advanced Pack Features Procedure Activate advanced features by entering your license key. Status Preparation You must perform the following tasks before configuring the iLO 3 MP LAN: • Determine the physical access method to select and connect cables. • Determine the iLO 3 MP LAN configuration method and assign an IP address if necessary. Determining the physical iLO 3 MP access method Before you can access the iLO 3 MP, you must first determine the correct physical connection method. The iLO 3 MP has a separate LAN port from the system LAN port. It requires a separate LAN drop, IP address, and networking information from that of the port used by the operating system. See Figure 10 (page 20) for rear panel console connection port identification and cable connection information. Use Table 18 to determine your physical connection method. Table 18 Console connection matrix Operating system HP-UX OpenVMS Windows Console connection Required connection components method Local RS-232 serial port Console device (for example, a laptop or ASCII terminal) LAN port 10/100/1000 LAN cable Local RS-232 serial port Console device (for example, a laptop or ASCII terminal) LAN port 10/100/1000 LAN cable VGA port (no iLO 3 • Monitor (VGA) MP access; UEFI only) • Keyboard (USB) • Mouse (USB) LAN port 10/100/1000 LAN cable Determining the iLO 3 MP LAN configuration method To access the iLO 3 MP through the iLO 3 MP LAN, the iLO 3 MP must acquire an IP address. The way the iLO 3 MP acquires an IP address depends on whether DHCP is enabled or disabled on the server, and if DHCP and DNS services are available to the server. (See Table 19 for possible scenarios.) After you have determined the iLO 3 MP access, you must determine how to configure the iLO 3 MP LAN to acquire an IP address using the following methods: • DHCP/DNS • Local RS-232 serial port Table 19 provides all the possible scenarios. Use this table to help you select the appropriate LAN configuration method to obtain an IP address. 48 Installing the server
-
 1
1 -
2
-
3
-
4
-
5
-
6
-
7
-
8
-
9
-
10
-
11
-
12
-
13
-
14
-
15
-
16
-
17
-
18
-
19
-
20
-
21
-
22
-
23
-
24
-
25
-
26
-
27
-
28
-
29
-
30
-
31
-
32
-
33
-
34
-
35
-
36
-
37
-
38
-
39
-
40
-
41
-
42
-
 43
43 -
 44
44 -
 45
45 -
 46
46 -
 47
47 -
 48
48 -
 49
49 -
 50
50 -
 51
51 -
 52
52 -
 53
53 -
54
-
55
-
56
-
57
-
58
-
59
-
60
-
61
-
62
-
63
-
64
-
65
-
66
-
67
-
68
-
69
-
70
-
71
-
72
-
73
-
74
-
75
-
76
-
77
-
78
-
79
-
80
-
81
-
82
-
83
-
84
-
85
-
86
-
87
-
88
-
89
-
90
-
91
-
92
-
93
-
94
-
95
-
96
-
97
-
98
-
99
-
100
-
101
-
102
-
103
-
104
-
105
-
106
-
107
-
108
-
109
-
110
-
111
-
112
-
113
-
114
-
115
-
116
-
117
-
118
-
119
-
120
-
121
-
122
-
123
-
124
-
125
-
126
-
127
-
128
-
129
-
130
-
131
-
132
-
133
-
134
-
135
-
136
-
137
-
138
-
139
-
140
-
141
-
142
-
143
-
144
-
145
-
146
-
147
-
148
-
149
-
150
-
151
 |
 |