HP Integrity rx2800 rx2800 i2 User Service Guide - Page 43
WARNING, CAUTION, To prevent thermal instability and damage to the server, do not separate
 |
View all HP Integrity rx2800 manuals
Add to My Manuals
Save this manual to your list of manuals |
Page 43 highlights
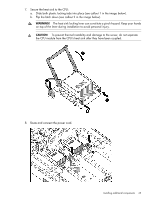
7. Secure the heat sink to the CPU: a. Slide both plastic locking tabs into place (see callout 1 in the image below). b. Flip the latch down (see callout 2 in the image below). WARNING! The heat sink locking lever can constitute a pinch hazard. Keep your hands on top of the lever during installation to avoid personal injury. CAUTION: To prevent thermal instability and damage to the server, do not separate the CPU module from the CPU's heat sink after they have been coupled. 8. Route and connect the power cord. Installing additional components 43
-
 1
1 -
2
-
3
-
4
-
5
-
6
-
7
-
8
-
9
-
10
-
11
-
12
-
13
-
14
-
15
-
16
-
17
-
18
-
19
-
20
-
21
-
22
-
23
-
24
-
25
-
26
-
27
-
28
-
29
-
30
-
31
-
32
-
33
-
34
-
35
-
36
-
37
-
 38
38 -
 39
39 -
 40
40 -
 41
41 -
 42
42 -
 43
43 -
 44
44 -
 45
45 -
 46
46 -
 47
47 -
 48
48 -
49
-
50
-
51
-
52
-
53
-
54
-
55
-
56
-
57
-
58
-
59
-
60
-
61
-
62
-
63
-
64
-
65
-
66
-
67
-
68
-
69
-
70
-
71
-
72
-
73
-
74
-
75
-
76
-
77
-
78
-
79
-
80
-
81
-
82
-
83
-
84
-
85
-
86
-
87
-
88
-
89
-
90
-
91
-
92
-
93
-
94
-
95
-
96
-
97
-
98
-
99
-
100
-
101
-
102
-
103
-
104
-
105
-
106
-
107
-
108
-
109
-
110
-
111
-
112
-
113
-
114
-
115
-
116
-
117
-
118
-
119
-
120
-
121
-
122
-
123
-
124
-
125
-
126
-
127
-
128
-
129
-
130
-
131
-
132
-
133
-
134
-
135
-
136
-
137
-
138
-
139
-
140
-
141
-
142
-
143
-
144
-
145
-
146
-
147
-
148
-
149
-
150
-
151
 |
 |
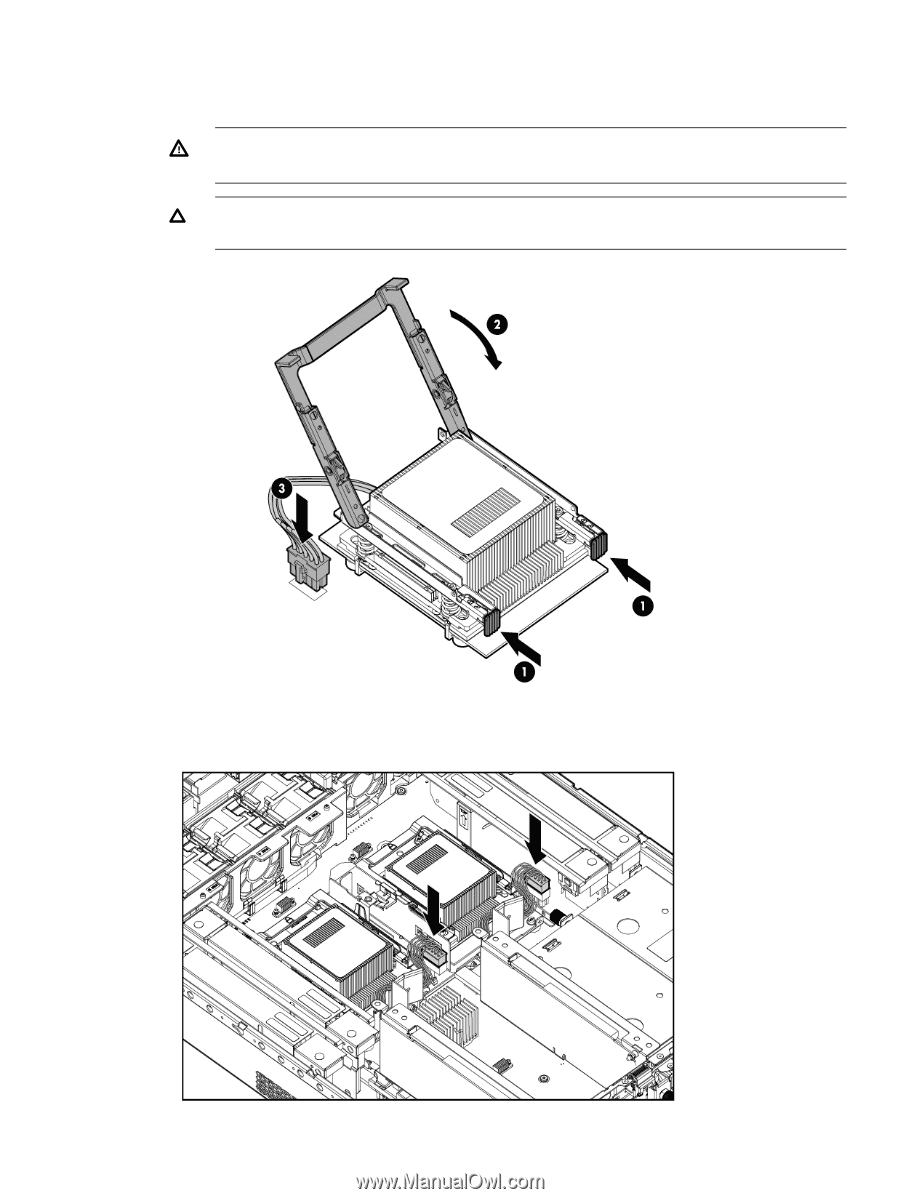
7.
Secure the heat sink to the CPU:
a.
Slide both plastic locking tabs into place (see callout 1 in the image below).
b.
Flip the latch down (see callout 2 in the image below).
WARNING!
The heat sink locking lever can constitute a pinch hazard. Keep your hands
on top of the lever during installation to avoid personal injury.
CAUTION:
To prevent thermal instability and damage to the server, do not separate
the CPU module from the CPU's heat sink after they have been coupled.
8.
Route and connect the power cord.
Installing additional components
43