HP Integrity rx2800 rx2800 i2 User Service Guide - Page 47
iLO 3 MP LAN, HP-UX, Setup checklist
 |
View all HP Integrity rx2800 manuals
Add to My Manuals
Save this manual to your list of manuals |
Page 47 highlights
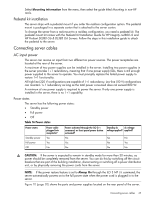
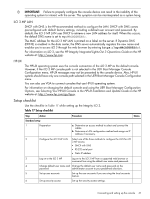
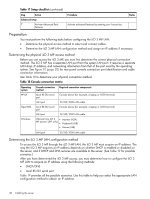
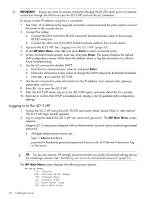
IMPORTANT: Failure to properly configure the console device can result in the inability of the operating system to interact with the server. This symptom can be misinterpreted as a system hang. iLO 3 MP LAN DHCP with DNS is the HP-recommended method to configure the LAN. DHCP with DNS comes preconfigured with default factory settings, including a default user account and password. By default, the iLO 3 MP LAN uses DHCP to retrieve a new LAN address for itself. When this occurs, the default DNS name is set to mp. The MAC address for the iLO 3 MP LAN is printed on a label on the server. If Dynamic DNS (DDNS) is enabled in the data center, the DNS server automatically registers the new name and enables you to access iLO 3 through the web browser by entering https://mp/. For information on iLO 3, see the HP Integrity Integrated Lights-Out 3 Operations Guide on the HP website at: http://www.hp.com. HP-UX The HP-UX operating system uses the console connection of the iLO 3 MP as the default console. However, if the iLO 3 MP console path is not selected in the UEFI Boot Manager Console Configuration menu, HP-UX messages may not be presented to the console device. Also, HP-UX systems should have only one console path selected in the UEFI Boot Manager Console Configuration menu. You can also use VGA to connect consoles that use HP-UX operating system. For information on changing the default console and using the UEFI Boot Manager Configuration Options, see Selecting Your HP-UX Console in the HP-UX Installation and Update Guide on the HP website at: http://www.hp.com/go/hpux. Setup checklist Use the checklist in Table 17 while setting up the Integrity iLO 3. Table 17 Setup checklist Step Action Standard setup 1 Preparation Procedure Status a. Determine an access method to select and connect the cables. b. Determine a LAN configuration method and assign an IP address if necessary. 2 Configure the iLO 3 MP LAN Select one of the three methods to configure the LAN for iLO 3 MP access: • DHCP with DNS • RS-232 serial port • Static IP address 3 Log on to the iLO 3 MP Log on to the iLO 3 MP from a supported web browser or command line using the default user name and password. 4 Change default user name and Change the default user name and password on the password administrator account to your predefined selections. 5 Set up user accounts Set up the user accounts if you are using the local accounts feature. 6 Set up security access Set up the security access settings. Connecting and setting up the console 47
-
 1
1 -
2
-
3
-
4
-
5
-
6
-
7
-
8
-
9
-
10
-
11
-
12
-
13
-
14
-
15
-
16
-
17
-
18
-
19
-
20
-
21
-
22
-
23
-
24
-
25
-
26
-
27
-
28
-
29
-
30
-
31
-
32
-
33
-
34
-
35
-
36
-
37
-
38
-
39
-
40
-
41
-
 42
42 -
 43
43 -
 44
44 -
 45
45 -
 46
46 -
 47
47 -
 48
48 -
 49
49 -
 50
50 -
 51
51 -
 52
52 -
53
-
54
-
55
-
56
-
57
-
58
-
59
-
60
-
61
-
62
-
63
-
64
-
65
-
66
-
67
-
68
-
69
-
70
-
71
-
72
-
73
-
74
-
75
-
76
-
77
-
78
-
79
-
80
-
81
-
82
-
83
-
84
-
85
-
86
-
87
-
88
-
89
-
90
-
91
-
92
-
93
-
94
-
95
-
96
-
97
-
98
-
99
-
100
-
101
-
102
-
103
-
104
-
105
-
106
-
107
-
108
-
109
-
110
-
111
-
112
-
113
-
114
-
115
-
116
-
117
-
118
-
119
-
120
-
121
-
122
-
123
-
124
-
125
-
126
-
127
-
128
-
129
-
130
-
131
-
132
-
133
-
134
-
135
-
136
-
137
-
138
-
139
-
140
-
141
-
142
-
143
-
144
-
145
-
146
-
147
-
148
-
149
-
150
-
151
 |
 |