HP Integrity rx2800 rx2800 i2 User Service Guide - Page 134
Determining the Driver ID and CTRL ID, Using the ORCA menu-driven interface, Creating a logical drive
 |
View all HP Integrity rx2800 manuals
Add to My Manuals
Save this manual to your list of manuals |
Page 134 highlights
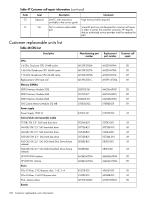
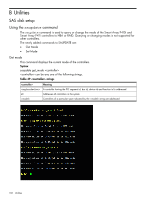
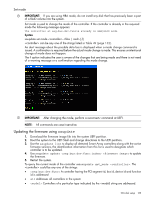
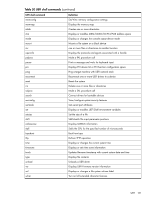
To change the mode of the controller use saupdate set_mode [-f]. NOTE: A system reset or a reconnect-r is required after changing from HBA to RAID mode. An alert message about the possible data loss is displayed when a mode change command is issued. A confirmation is required before the actual mode change is made. This ensures unintentional change of mode does not happen. The -f option indicates the user is aware of the changes that are being made and there is not need of a warning message or a confirmation regarding the mode change. NOTE: All commands are case-insensitive. A system reset or reconnect-r followed by map -r is required when changing from HBA mode to RAID mode. Determining the Driver ID and CTRL ID Use the drvcfg utility and EFI shell commands to find the Driver ID corresponding Ctrl ID for the SAS Host Bus Adapter. 1. At the EFI shell, use the drivers command. 2. Find the SAS Host Bus Adapter in the list of drivers, and make a note of the Driver ID from the left column. 3. Use the drvcfg command. 4. Find the SAS Host Bus Adapter's Driver ID in the list, and make a note of the corresponding Ctrl ID. Using the ORCA menu-driven interface From the EFI Shell, enter drvcfg -s . The ORCA main menu will appear. The ORCA main menu contains the following options: • Create Logical Drive • View Logical Drive • Delete Logical Drive Creating a logical drive 1. At the ORCA main menu, select Create Logical Drive. 2. Select the physical disks to be included in the logical drive in the Available Physical Drives section. 3. To select the Raid Configurations section and select the RAID type for the logical drive, press Tab. 4. To select the Spare section and assign spare disks, as needed, press Tab. 5. To create the logical drive, press Enter. A summary of your choices appears. 6. To save the configuration, press F8. 7. To acknowledge that the configuration was saved and return to the ORCA Main Menu, press Enter. Deleting a logical drive WARNING! Back up all necessary data before deleting the logical drive. When you delete a logical drive, data on the drive is not preserved. 1. At the ORCA main menu, select Delete Logical Drive. 2. Select a logical drive to be deleted. 134 Utilities
-
 1
1 -
2
-
3
-
4
-
5
-
6
-
7
-
8
-
9
-
10
-
11
-
12
-
13
-
14
-
15
-
16
-
17
-
18
-
19
-
20
-
21
-
22
-
23
-
24
-
25
-
26
-
27
-
28
-
29
-
30
-
31
-
32
-
33
-
34
-
35
-
36
-
37
-
38
-
39
-
40
-
41
-
42
-
43
-
44
-
45
-
46
-
47
-
48
-
49
-
50
-
51
-
52
-
53
-
54
-
55
-
56
-
57
-
58
-
59
-
60
-
61
-
62
-
63
-
64
-
65
-
66
-
67
-
68
-
69
-
70
-
71
-
72
-
73
-
74
-
75
-
76
-
77
-
78
-
79
-
80
-
81
-
82
-
83
-
84
-
85
-
86
-
87
-
88
-
89
-
90
-
91
-
92
-
93
-
94
-
95
-
96
-
97
-
98
-
99
-
100
-
101
-
102
-
103
-
104
-
105
-
106
-
107
-
108
-
109
-
110
-
111
-
112
-
113
-
114
-
115
-
116
-
117
-
118
-
119
-
120
-
121
-
122
-
123
-
124
-
125
-
126
-
127
-
128
-
 129
129 -
 130
130 -
 131
131 -
 132
132 -
 133
133 -
 134
134 -
 135
135 -
 136
136 -
 137
137 -
 138
138 -
 139
139 -
140
-
141
-
142
-
143
-
144
-
145
-
146
-
147
-
148
-
149
-
150
-
151
 |
 |