HP Integrity rx2800 rx2800 i2 User Service Guide - Page 62
Installing the OS using vMedia, Configuring system boot options
 |
View all HP Integrity rx2800 manuals
Add to My Manuals
Save this manual to your list of manuals |
Page 62 highlights
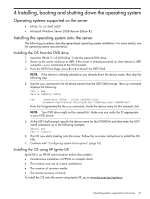
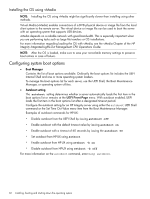
Installing the OS using vMedia NOTE: Installing the OS using vMedia might be significantly slower than installing using other methods. Virtual Media (vMedia) enables connections of a DVD physical device or image file from the local client system to the remote server. The virtual device or image file can be used to boot the server with an operating system that supports USB devices. vMedia depends on a reliable network with good bandwidth. This is especially important when you are performing tasks such as large file transfers or OS installations. For more information regarding loading the OS with vMedia, see the vMedia Chapter of the HP Integrity Integrated Lights-Out Management CPU Operations Guide. NOTE: After the OS is loaded, make sure to save your nonvolatile memory settings to preserve boot entries in case of failure. Configuring system boot options • Boot Manager Contains the list of boot options available. Ordinarily the boot options list includes the UEFI Internal Shell and one or more operating system loaders. To manage the boot options list for each server, use the UEFI Shell, the Boot Maintenance Manager, or operating system utilities. • Autoboot setting The autoboot setting determines whether a server automatically loads the first item in the boot options list or remains at the UEFI Front Page menu. With autoboot enabled, UEFI loads the first item in the boot options list after a designated timeout period. Configure the autoboot setting for an HP Integrity server using either the autoboot UEFI Shell command or the Set Time Out Value menu item from the Boot Maintenance Manager. Examples of autoboot commands for HP-UX: ◦ Disable autoboot from the UEFI Shell by issuing autoboot off ◦ Enable autoboot with the default timeout value by issuing autoboot on ◦ Enable autoboot with a timeout of 60 seconds by issuing the autoboot 60 ◦ Set autoboot from HP-UX using setboot ◦ Enable autoboot from HP-UX using setboot -b on ◦ Disable autoboot from HP-UX using setboot -b off For more information on the autoboot command, enter help autoboot. 62 Installing, booting and shutting down the operating system
-
 1
1 -
2
-
3
-
4
-
5
-
6
-
7
-
8
-
9
-
10
-
11
-
12
-
13
-
14
-
15
-
16
-
17
-
18
-
19
-
20
-
21
-
22
-
23
-
24
-
25
-
26
-
27
-
28
-
29
-
30
-
31
-
32
-
33
-
34
-
35
-
36
-
37
-
38
-
39
-
40
-
41
-
42
-
43
-
44
-
45
-
46
-
47
-
48
-
49
-
50
-
51
-
52
-
53
-
54
-
55
-
56
-
 57
57 -
 58
58 -
 59
59 -
 60
60 -
 61
61 -
 62
62 -
 63
63 -
 64
64 -
 65
65 -
 66
66 -
 67
67 -
68
-
69
-
70
-
71
-
72
-
73
-
74
-
75
-
76
-
77
-
78
-
79
-
80
-
81
-
82
-
83
-
84
-
85
-
86
-
87
-
88
-
89
-
90
-
91
-
92
-
93
-
94
-
95
-
96
-
97
-
98
-
99
-
100
-
101
-
102
-
103
-
104
-
105
-
106
-
107
-
108
-
109
-
110
-
111
-
112
-
113
-
114
-
115
-
116
-
117
-
118
-
119
-
120
-
121
-
122
-
123
-
124
-
125
-
126
-
127
-
128
-
129
-
130
-
131
-
132
-
133
-
134
-
135
-
136
-
137
-
138
-
139
-
140
-
141
-
142
-
143
-
144
-
145
-
146
-
147
-
148
-
149
-
150
-
151
 |
 |
