HP Integrity rx2800 rx2800 i2 User Service Guide - Page 102
power off the server, Remove the server from the rack, Access panel removal, WARNING
 |
View all HP Integrity rx2800 manuals
Add to My Manuals
Save this manual to your list of manuals |
Page 102 highlights
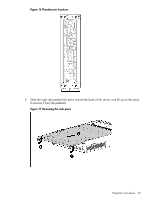
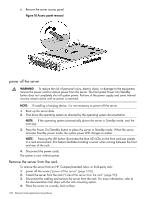
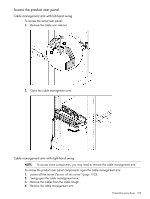
6. Remove the server access panel. Figure 18 Access panel removal power off the server WARNING! To reduce the risk of personal injury, electric shock, or damage to the equipment, remove the power cord to remove power from the server. The front panel Power On/Standby button does not completely shut off system power. Portions of the power supply and some internal circuitry remain active until ac power is removed. NOTE: If installing a hot-plug device, it is not necessary to power off the server. 1. Back up the server data. 2. Shut down the operating system as directed by the operating system documentation. NOTE: If the operating system automatically places the server in Standby mode, omit the next step. 3. Press the Power On/Standby button to place the server in Standby mode. When the server activates Standby power mode, the system power LED changes to amber. NOTE: Pressing the UID button illuminates the blue UID LEDs on the front and rear panels. In a rack environment, this feature facilitates locating a server when moving between the front and rear of the rack. 4. Disconnect the power cords. The system is now without power. Remove the server from the rack To remove the server from an HP, Compaq branded, telco, or third-party rack: 1. power off the server ("power off the server" (page 102)). 2. Extend the server from the rack ("Extend the server from the rack" (page 99)). 3. Disconnect the cabling and remove the server from the rack. For more information, refer to the documentation that ships with the rack mounting option. 4. Place the server on a sturdy, level surface. 102 Removal and replacement procedures
-
 1
1 -
2
-
3
-
4
-
5
-
6
-
7
-
8
-
9
-
10
-
11
-
12
-
13
-
14
-
15
-
16
-
17
-
18
-
19
-
20
-
21
-
22
-
23
-
24
-
25
-
26
-
27
-
28
-
29
-
30
-
31
-
32
-
33
-
34
-
35
-
36
-
37
-
38
-
39
-
40
-
41
-
42
-
43
-
44
-
45
-
46
-
47
-
48
-
49
-
50
-
51
-
52
-
53
-
54
-
55
-
56
-
57
-
58
-
59
-
60
-
61
-
62
-
63
-
64
-
65
-
66
-
67
-
68
-
69
-
70
-
71
-
72
-
73
-
74
-
75
-
76
-
77
-
78
-
79
-
80
-
81
-
82
-
83
-
84
-
85
-
86
-
87
-
88
-
89
-
90
-
91
-
92
-
93
-
94
-
95
-
96
-
 97
97 -
 98
98 -
 99
99 -
 100
100 -
 101
101 -
 102
102 -
 103
103 -
 104
104 -
 105
105 -
 106
106 -
 107
107 -
108
-
109
-
110
-
111
-
112
-
113
-
114
-
115
-
116
-
117
-
118
-
119
-
120
-
121
-
122
-
123
-
124
-
125
-
126
-
127
-
128
-
129
-
130
-
131
-
132
-
133
-
134
-
135
-
136
-
137
-
138
-
139
-
140
-
141
-
142
-
143
-
144
-
145
-
146
-
147
-
148
-
149
-
150
-
151
 |
 |
