HP Integrity rx2800 rx2800 i2 User Service Guide - Page 28
Unloading the server with a lifter, Installing additional components
 |
View all HP Integrity rx2800 manuals
Add to My Manuals
Save this manual to your list of manuals |
Page 28 highlights
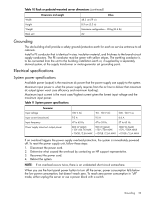
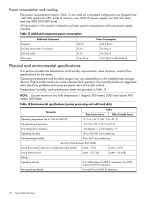
Unloading the server with a lifter WARNING! Use caution when using a lifter. Because of the weight of the server, you must center the server on the lifter forks before lifting it off the pallet, to avoid injury. NOTE: HP recommends that you follow your local guidelines when lifting equipment. 1. Unpack the server. 2. Unroll the bottom corrugated tray corresponding to the side on which the lifter is to be placed, and slide the server as close to that edge of the pallet as possible. 3. Break off any foam packaging that can prevent the lifter from being fully inserted under the server. Do not remove the foam packaging from the corners of the server. This foam is required to elevate the server and to enable the forks of the lifter to be placed under the server. 4. Insert the lifter forks under the server. 5. Carefully, roll the lifter forward until it is fully positioned against the side of the server. 6. Slowly raise the server off the pallet until it clears the pallet cushions. 7. Carefully, roll the lifter and server away from the pallet. Do not raise the server any higher than necessary when moving it over to the rack. Installing additional components This section describes how to install components into the server that are not factory-installed. If you have additional components to install, be sure to install the additional components before installing the server into your rack or pedestal configuration. Most servers are pre configured with all components installed before shipping from the HP factory. Externally accessible components: • SAS hard drives • Power supplies Internal components: • Memory DIMMs • CPUs • PCIe cards WARNING! Ensure that the system is powered off and all power sources are disconnected from the server prior to removing or installing server hardware (unless you are removing or installing a hot-swappable or hot-pluggable component). Voltages are present at various locations within the server whenever an ac power source is connected. This voltage is present even when the main power switch is turned off. Failure to observe this warning can result in personal injury or damage to the equipment. Installing a hot-pluggable SAS hard drive There are eight hot-plug SAS hard drive slots located at the front of the server. Slots without hard drives installed have slot fillers installed for cooling purposes. 28 Installing the server
-
 1
1 -
2
-
3
-
4
-
5
-
6
-
7
-
8
-
9
-
10
-
11
-
12
-
13
-
14
-
15
-
16
-
17
-
18
-
19
-
20
-
21
-
22
-
 23
23 -
 24
24 -
 25
25 -
 26
26 -
 27
27 -
 28
28 -
 29
29 -
 30
30 -
 31
31 -
 32
32 -
 33
33 -
34
-
35
-
36
-
37
-
38
-
39
-
40
-
41
-
42
-
43
-
44
-
45
-
46
-
47
-
48
-
49
-
50
-
51
-
52
-
53
-
54
-
55
-
56
-
57
-
58
-
59
-
60
-
61
-
62
-
63
-
64
-
65
-
66
-
67
-
68
-
69
-
70
-
71
-
72
-
73
-
74
-
75
-
76
-
77
-
78
-
79
-
80
-
81
-
82
-
83
-
84
-
85
-
86
-
87
-
88
-
89
-
90
-
91
-
92
-
93
-
94
-
95
-
96
-
97
-
98
-
99
-
100
-
101
-
102
-
103
-
104
-
105
-
106
-
107
-
108
-
109
-
110
-
111
-
112
-
113
-
114
-
115
-
116
-
117
-
118
-
119
-
120
-
121
-
122
-
123
-
124
-
125
-
126
-
127
-
128
-
129
-
130
-
131
-
132
-
133
-
134
-
135
-
136
-
137
-
138
-
139
-
140
-
141
-
142
-
143
-
144
-
145
-
146
-
147
-
148
-
149
-
150
-
151
 |
 |
