HP LaserJet Enterprise M5039 HP LaserJet M5039xs MFP - User Guide - Page 142
Send documents, Use the auto-complete function
 |
View all HP LaserJet Enterprise M5039 manuals
Add to My Manuals
Save this manual to your list of manuals |
Page 142 highlights
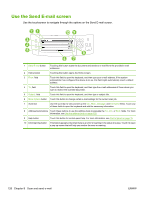
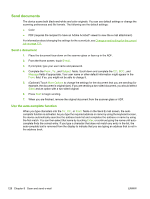
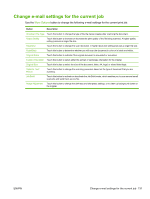
Send documents The device scans both black-and-white and color originals. You can use default settings or change the scanning preferences and file formats. The following are the default settings: ● Color ● PDF (requires the recipient to have an Adobe Acrobat® viewer to view the e-mail attachment) For information about changing the settings for the current job, see Change e-mail settings for the current job on page 131. Send a document 1. Place the document face-down on the scanner glass or face-up in the ADF. 2. From the Home screen, touch E-mail. 3. If prompted, type your user name and password. 4. Complete the From:, To:, and Subject: fields. Scroll down and complete the CC:, BCC:, and Message fields if appropriate. Your user name or other default information might appear in the From: field. If so, you might not be able to change it. 5. (Optional) Touch More Options to change the settings for the document that you are sending (for example, the document's original size). If you are sending a two-sided document, you should select Sides and an option with a two-sided original. 6. Press Start to begin sending. 7. When you are finished, remove the original document from the scanner glass or ADF. Use the auto-complete function When you type characters into the To:, CC:, or From: fields on the Send E-mail screen, the autocomplete function is activated. As you type the required address or name by using the keyboard screen, the device automatically searches the address book list and completes the address or name by using the first match. You can then select that name by touching Enter, or continue typing the name until autocomplete finds the correct entry. If you type a character that does not match any entry in the list, the auto-complete text is removed from the display to indicate that you are typing an address that is not in the address book. 128 Chapter 8 Scan and send e-mail ENWW
-
 1
1 -
2
-
3
-
4
-
5
-
6
-
7
-
8
-
9
-
10
-
11
-
12
-
13
-
14
-
15
-
16
-
17
-
18
-
19
-
20
-
21
-
22
-
23
-
24
-
25
-
26
-
27
-
28
-
29
-
30
-
31
-
32
-
33
-
34
-
35
-
36
-
37
-
38
-
39
-
40
-
41
-
42
-
43
-
44
-
45
-
46
-
47
-
48
-
49
-
50
-
51
-
52
-
53
-
54
-
55
-
56
-
57
-
58
-
59
-
60
-
61
-
62
-
63
-
64
-
65
-
66
-
67
-
68
-
69
-
70
-
71
-
72
-
73
-
74
-
75
-
76
-
77
-
78
-
79
-
80
-
81
-
82
-
83
-
84
-
85
-
86
-
87
-
88
-
89
-
90
-
91
-
92
-
93
-
94
-
95
-
96
-
97
-
98
-
99
-
100
-
101
-
102
-
103
-
104
-
105
-
106
-
107
-
108
-
109
-
110
-
111
-
112
-
113
-
114
-
115
-
116
-
117
-
118
-
119
-
120
-
121
-
122
-
123
-
124
-
125
-
126
-
127
-
128
-
129
-
130
-
131
-
132
-
133
-
134
-
135
-
136
-
 137
137 -
 138
138 -
 139
139 -
 140
140 -
 141
141 -
 142
142 -
 143
143 -
 144
144 -
 145
145 -
 146
146 -
 147
147 -
148
-
149
-
150
-
151
-
152
-
153
-
154
-
155
-
156
-
157
-
158
-
159
-
160
-
161
-
162
-
163
-
164
-
165
-
166
-
167
-
168
-
169
-
170
-
171
-
172
-
173
-
174
-
175
-
176
-
177
-
178
-
179
-
180
-
181
-
182
-
183
-
184
-
185
-
186
-
187
-
188
-
189
-
190
-
191
-
192
-
193
-
194
-
195
-
196
-
197
-
198
-
199
-
200
-
201
-
202
-
203
-
204
-
205
-
206
-
207
-
208
-
209
-
210
-
211
-
212
-
213
-
214
-
215
-
216
-
217
-
218
-
219
-
220
-
221
-
222
-
223
-
224
-
225
-
226
-
227
-
228
-
229
-
230
-
231
-
232
-
233
-
234
-
235
-
236
-
237
-
238
-
239
-
240
-
241
-
242
-
243
-
244
-
245
-
246
-
247
-
248
-
249
-
250
-
251
-
252
-
253
-
254
-
255
-
256
-
257
-
258
-
259
-
260
-
261
-
262
-
263
-
264
-
265
-
266
-
267
-
268
-
269
-
270
-
271
-
272
-
273
-
274
-
275
-
276
-
277
-
278
-
279
-
280
-
281
-
282
-
283
-
284
-
285
-
286
-
287
-
288
-
289
-
290
 |
 |