HP LaserJet Enterprise M5039 HP LaserJet M5039xs MFP - User Guide - Page 98
Load custom-size media into tray 1, Load custom-size media into trays 2 and 3 (and optional trays 4
 |
View all HP LaserJet Enterprise M5039 manuals
Add to My Manuals
Save this manual to your list of manuals |
Page 98 highlights
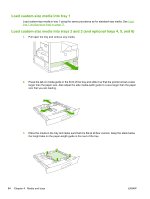
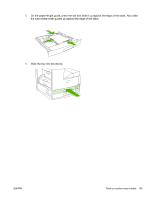
Load custom-size media into tray 1 Load custom-size media in tray 1 using the same procedures as for standard-size media. See Load tray 1 (multipurpose tray) on page 71. Load custom-size media into trays 2 and 3 (and optional trays 4, 5, and 6) 1. Pull open the tray and remove any media. 2. Press the tab on media guide in the front of the tray and slide it so that the pointer shows a size larger than the paper size. Also adjust the side media-width guide to a size larger than the paper size that you are loading. 3. Place the media in the tray and make sure that it is flat at all four corners. Keep the stack below the height tabs on the paper-length guide in the rear of the tray. 84 Chapter 4 Media and trays ENWW
-
 1
1 -
2
-
3
-
4
-
5
-
6
-
7
-
8
-
9
-
10
-
11
-
12
-
13
-
14
-
15
-
16
-
17
-
18
-
19
-
20
-
21
-
22
-
23
-
24
-
25
-
26
-
27
-
28
-
29
-
30
-
31
-
32
-
33
-
34
-
35
-
36
-
37
-
38
-
39
-
40
-
41
-
42
-
43
-
44
-
45
-
46
-
47
-
48
-
49
-
50
-
51
-
52
-
53
-
54
-
55
-
56
-
57
-
58
-
59
-
60
-
61
-
62
-
63
-
64
-
65
-
66
-
67
-
68
-
69
-
70
-
71
-
72
-
73
-
74
-
75
-
76
-
77
-
78
-
79
-
80
-
81
-
82
-
83
-
84
-
85
-
86
-
87
-
88
-
89
-
90
-
91
-
92
-
 93
93 -
 94
94 -
 95
95 -
 96
96 -
 97
97 -
 98
98 -
 99
99 -
 100
100 -
 101
101 -
 102
102 -
 103
103 -
104
-
105
-
106
-
107
-
108
-
109
-
110
-
111
-
112
-
113
-
114
-
115
-
116
-
117
-
118
-
119
-
120
-
121
-
122
-
123
-
124
-
125
-
126
-
127
-
128
-
129
-
130
-
131
-
132
-
133
-
134
-
135
-
136
-
137
-
138
-
139
-
140
-
141
-
142
-
143
-
144
-
145
-
146
-
147
-
148
-
149
-
150
-
151
-
152
-
153
-
154
-
155
-
156
-
157
-
158
-
159
-
160
-
161
-
162
-
163
-
164
-
165
-
166
-
167
-
168
-
169
-
170
-
171
-
172
-
173
-
174
-
175
-
176
-
177
-
178
-
179
-
180
-
181
-
182
-
183
-
184
-
185
-
186
-
187
-
188
-
189
-
190
-
191
-
192
-
193
-
194
-
195
-
196
-
197
-
198
-
199
-
200
-
201
-
202
-
203
-
204
-
205
-
206
-
207
-
208
-
209
-
210
-
211
-
212
-
213
-
214
-
215
-
216
-
217
-
218
-
219
-
220
-
221
-
222
-
223
-
224
-
225
-
226
-
227
-
228
-
229
-
230
-
231
-
232
-
233
-
234
-
235
-
236
-
237
-
238
-
239
-
240
-
241
-
242
-
243
-
244
-
245
-
246
-
247
-
248
-
249
-
250
-
251
-
252
-
253
-
254
-
255
-
256
-
257
-
258
-
259
-
260
-
261
-
262
-
263
-
264
-
265
-
266
-
267
-
268
-
269
-
270
-
271
-
272
-
273
-
274
-
275
-
276
-
277
-
278
-
279
-
280
-
281
-
282
-
283
-
284
-
285
-
286
-
287
-
288
-
289
-
290
 |
 |
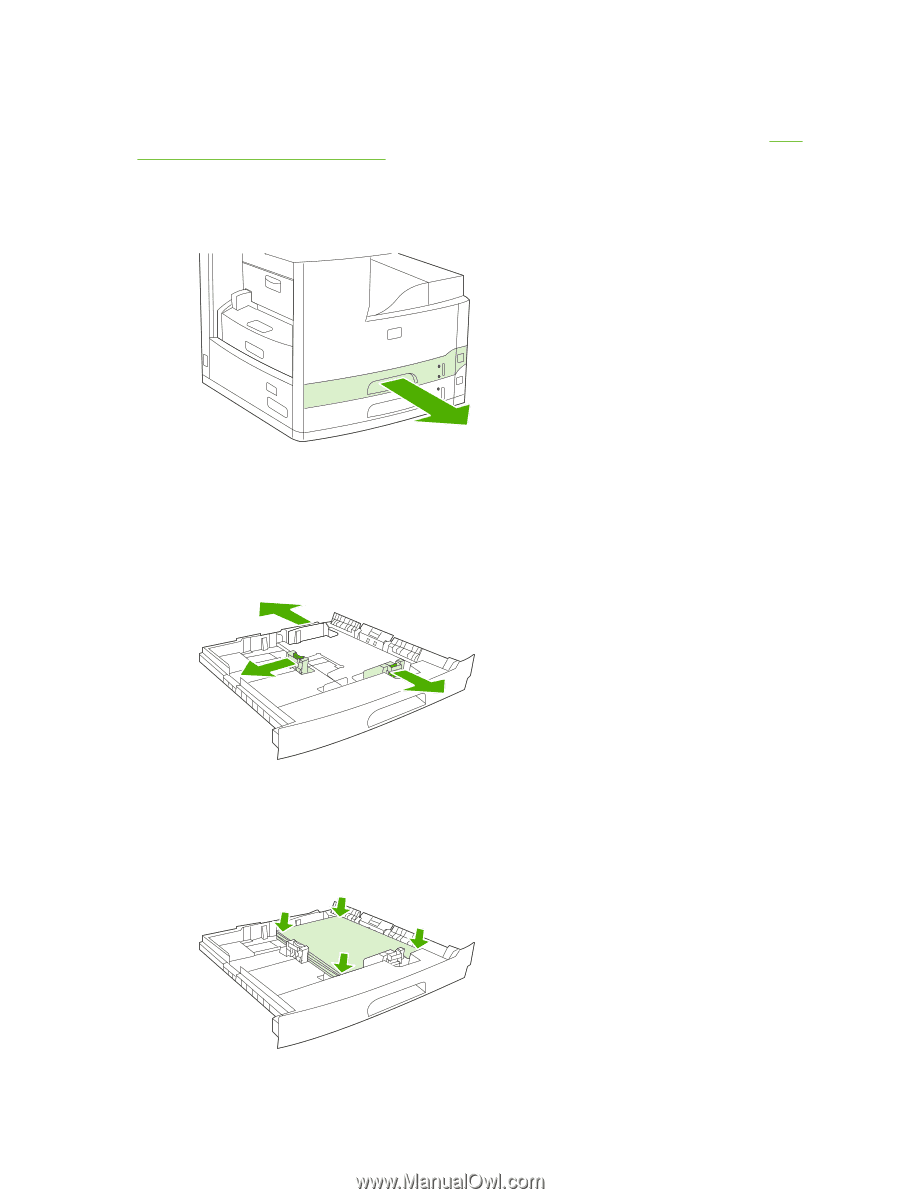
Load custom-size media into tray 1
Load custom-size media in tray 1 using the same procedures as for standard-size media. See
Load
tray 1 (multipurpose tray)
on page
71
.
Load custom-size media into trays 2 and 3 (and optional trays 4, 5, and 6)
1.
Pull open the tray and remove any media.
2.
Press the tab on media guide in the front of the tray and slide it so that the pointer shows a size
larger than the paper size. Also adjust the side media-width guide to a size larger than the paper
size that you are loading.
3.
Place the media in the tray and make sure that it is flat at all four corners. Keep the stack below
the height tabs on the paper-length guide in the rear of the tray.
84
Chapter 4
Media and trays
ENWW