HP LaserJet Enterprise M5039 HP LaserJet M5039xs MFP - User Guide - Page 207
Clear jams from the input-tray areas, Clear jams from the tray 1 input area
 |
View all HP LaserJet Enterprise M5039 manuals
Add to My Manuals
Save this manual to your list of manuals |
Page 207 highlights
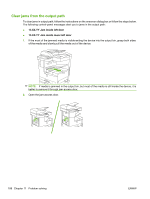
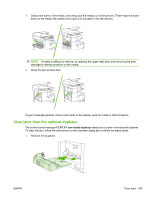
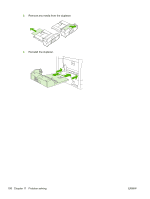
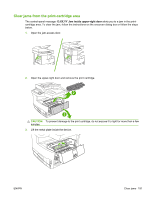
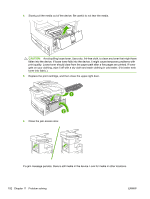
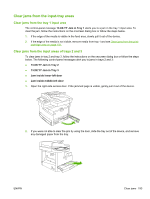
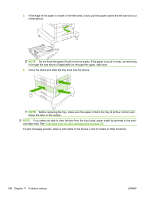
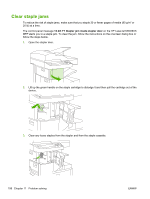
Clear jams from the input-tray areas Clear jams from the tray 1 input area The control-panel message 13.XX.YY Jam in Tray 1 alerts you to a jam in the tray 1 input area. To clear the jam, follow the instructions on the onscreen dialog box or follow the steps below. 1. If the edge of the media is visible in the feed area, slowly pull it out of the device. 2. If the edge of the media is not visible, remove media from tray 1 and see Clear jams from the print- cartridge area on page 191. Clear jams from the input areas of trays 2 and 3 To clear jams in tray 2 and tray 3, follow the instructions on the onscreen dialog box or follow the steps below. The following control-panel messages alert you to jams in trays 2 and 3: ● 13.XX.YY Jam in Tray 2 ● 13.XX.YY Jam in Tray 3 ● Jam inside lower-left door ● Jam inside middle-left door 1. Open the right-side access door. If the jammed page is visible, gently pull it out of the device. 2. If you were not able to clear the jam by using the door, slide the tray out of the device, and remove any damaged paper from the tray. ENWW Clear jams 193
-
 1
1 -
2
-
3
-
4
-
5
-
6
-
7
-
8
-
9
-
10
-
11
-
12
-
13
-
14
-
15
-
16
-
17
-
18
-
19
-
20
-
21
-
22
-
23
-
24
-
25
-
26
-
27
-
28
-
29
-
30
-
31
-
32
-
33
-
34
-
35
-
36
-
37
-
38
-
39
-
40
-
41
-
42
-
43
-
44
-
45
-
46
-
47
-
48
-
49
-
50
-
51
-
52
-
53
-
54
-
55
-
56
-
57
-
58
-
59
-
60
-
61
-
62
-
63
-
64
-
65
-
66
-
67
-
68
-
69
-
70
-
71
-
72
-
73
-
74
-
75
-
76
-
77
-
78
-
79
-
80
-
81
-
82
-
83
-
84
-
85
-
86
-
87
-
88
-
89
-
90
-
91
-
92
-
93
-
94
-
95
-
96
-
97
-
98
-
99
-
100
-
101
-
102
-
103
-
104
-
105
-
106
-
107
-
108
-
109
-
110
-
111
-
112
-
113
-
114
-
115
-
116
-
117
-
118
-
119
-
120
-
121
-
122
-
123
-
124
-
125
-
126
-
127
-
128
-
129
-
130
-
131
-
132
-
133
-
134
-
135
-
136
-
137
-
138
-
139
-
140
-
141
-
142
-
143
-
144
-
145
-
146
-
147
-
148
-
149
-
150
-
151
-
152
-
153
-
154
-
155
-
156
-
157
-
158
-
159
-
160
-
161
-
162
-
163
-
164
-
165
-
166
-
167
-
168
-
169
-
170
-
171
-
172
-
173
-
174
-
175
-
176
-
177
-
178
-
179
-
180
-
181
-
182
-
183
-
184
-
185
-
186
-
187
-
188
-
189
-
190
-
191
-
192
-
193
-
194
-
195
-
196
-
197
-
198
-
199
-
200
-
201
-
 202
202 -
 203
203 -
 204
204 -
 205
205 -
 206
206 -
 207
207 -
 208
208 -
 209
209 -
 210
210 -
 211
211 -
 212
212 -
213
-
214
-
215
-
216
-
217
-
218
-
219
-
220
-
221
-
222
-
223
-
224
-
225
-
226
-
227
-
228
-
229
-
230
-
231
-
232
-
233
-
234
-
235
-
236
-
237
-
238
-
239
-
240
-
241
-
242
-
243
-
244
-
245
-
246
-
247
-
248
-
249
-
250
-
251
-
252
-
253
-
254
-
255
-
256
-
257
-
258
-
259
-
260
-
261
-
262
-
263
-
264
-
265
-
266
-
267
-
268
-
269
-
270
-
271
-
272
-
273
-
274
-
275
-
276
-
277
-
278
-
279
-
280
-
281
-
282
-
283
-
284
-
285
-
286
-
287
-
288
-
289
-
290
 |
 |
