HP LaserJet Enterprise M5039 HP LaserJet M5039xs MFP - User Guide - Page 195

Jam locations

Page 195 highlights

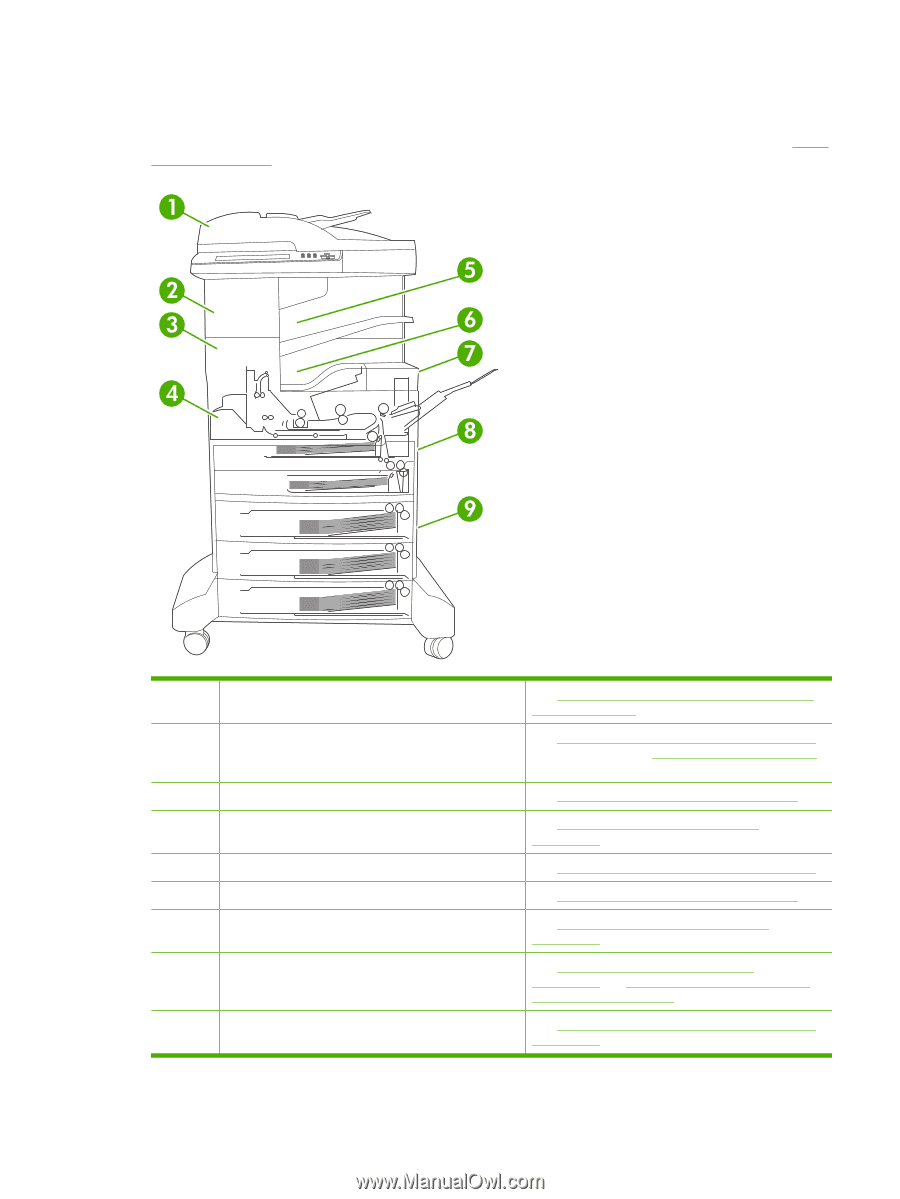
Jam locations Use this illustration to troubleshoot jams in the device. For instructions about clearing jams, see Clear jams on page 183. 1 ADF 2 Stapler/stacker 3 Output path 4 Duplex path (for two-sided printing) 5 Stapler/stacker output bin 6 Output bin 7 Print cartridge 8 Input trays 9 Optional input trays ENWW See Clear jams from the automatic document feeder (ADF) on page 183. See Clear jams from the stapler/stacker on page 186 for media jams or see Clear staple jams on page 198 for staple jams. See Clear jams from the output path on page 188. See Clear jams from the optional duplexer on page 189. See Clear jams from the stapler/stacker on page 186. See Clear jams from the output path on page 188. See Clear jams from the print-cartridge area on page 191. See Clear jams from the tray 1 input area on page 193 and Clear jams from the input areas of trays 2 and 3 on page 193. See Clear jams from the input areas of optional trays on page 195. Jam locations 181
  • 1
  • 2
  • 3
  • 4
  • 5
  • 6
  • 7
  • 8
  • 9
  • 10
  • 11
  • 12
  • 13
  • 14
  • 15
  • 16
  • 17
  • 18
  • 19
  • 20
  • 21
  • 22
  • 23
  • 24
  • 25
  • 26
  • 27
  • 28
  • 29
  • 30
  • 31
  • 32
  • 33
  • 34
  • 35
  • 36
  • 37
  • 38
  • 39
  • 40
  • 41
  • 42
  • 43
  • 44
  • 45
  • 46
  • 47
  • 48
  • 49
  • 50
  • 51
  • 52
  • 53
  • 54
  • 55
  • 56
  • 57
  • 58
  • 59
  • 60
  • 61
  • 62
  • 63
  • 64
  • 65
  • 66
  • 67
  • 68
  • 69
  • 70
  • 71
  • 72
  • 73
  • 74
  • 75
  • 76
  • 77
  • 78
  • 79
  • 80
  • 81
  • 82
  • 83
  • 84
  • 85
  • 86
  • 87
  • 88
  • 89
  • 90
  • 91
  • 92
  • 93
  • 94
  • 95
  • 96
  • 97
  • 98
  • 99
  • 100
  • 101
  • 102
  • 103
  • 104
  • 105
  • 106
  • 107
  • 108
  • 109
  • 110
  • 111
  • 112
  • 113
  • 114
  • 115
  • 116
  • 117
  • 118
  • 119
  • 120
  • 121
  • 122
  • 123
  • 124
  • 125
  • 126
  • 127
  • 128
  • 129
  • 130
  • 131
  • 132
  • 133
  • 134
  • 135
  • 136
  • 137
  • 138
  • 139
  • 140
  • 141
  • 142
  • 143
  • 144
  • 145
  • 146
  • 147
  • 148
  • 149
  • 150
  • 151
  • 152
  • 153
  • 154
  • 155
  • 156
  • 157
  • 158
  • 159
  • 160
  • 161
  • 162
  • 163
  • 164
  • 165
  • 166
  • 167
  • 168
  • 169
  • 170
  • 171
  • 172
  • 173
  • 174
  • 175
  • 176
  • 177
  • 178
  • 179
  • 180
  • 181
  • 182
  • 183
  • 184
  • 185
  • 186
  • 187
  • 188
  • 189
  • 190
  • 191
  • 192
  • 193
  • 194
  • 195
  • 196
  • 197
  • 198
  • 199
  • 200
  • 201
  • 202
  • 203
  • 204
  • 205
  • 206
  • 207
  • 208
  • 209
  • 210
  • 211
  • 212
  • 213
  • 214
  • 215
  • 216
  • 217
  • 218
  • 219
  • 220
  • 221
  • 222
  • 223
  • 224
  • 225
  • 226
  • 227
  • 228
  • 229
  • 230
  • 231
  • 232
  • 233
  • 234
  • 235
  • 236
  • 237
  • 238
  • 239
  • 240
  • 241
  • 242
  • 243
  • 244
  • 245
  • 246
  • 247
  • 248
  • 249
  • 250
  • 251
  • 252
  • 253
  • 254
  • 255
  • 256
  • 257
  • 258
  • 259
  • 260
  • 261
  • 262
  • 263
  • 264
  • 265
  • 266
  • 267
  • 268
  • 269
  • 270
  • 271
  • 272
  • 273
  • 274
  • 275
  • 276
  • 277
  • 278
  • 279
  • 280
  • 281
  • 282
  • 283
  • 284
  • 285
  • 286
  • 287
  • 288
  • 289
  • 290

Jam locations
Use this illustration to troubleshoot jams in the device. For instructions about clearing jams, see
Clear
jams
on page
183
.
1
ADF
See
Clear jams from the automatic document feeder
(ADF)
on page
183
.
2
Stapler/stacker
See
Clear jams from the stapler/stacker
on page
186
for media jams or see
Clear staple jams
on page
198
for staple jams.
3
Output path
See
Clear jams from the output path
on page
188
.
4
Duplex path (for two-sided printing)
See
Clear jams from the optional duplexer
on page
189
.
5
Stapler/stacker output bin
See
Clear jams from the stapler/stacker
on page
186
.
6
Output bin
See
Clear jams from the output path
on page
188
.
7
Print cartridge
See
Clear jams from the print-cartridge area
on page
191
.
8
Input trays
See
Clear jams from the tray 1 input area
on page
193
and
Clear jams from the input areas of
trays 2 and 3
on page
193
.
9
Optional input trays
See
Clear jams from the input areas of optional trays
on page
195
.
ENWW
Jam locations
181