Lantronix X300 Series X300 Series User Guide Rev B - Page 66
SSH-Keys, Software
 |
View all Lantronix X300 Series manuals
Add to My Manuals
Save this manual to your list of manuals |
Page 66 highlights
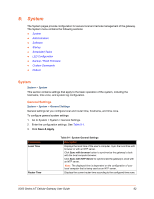
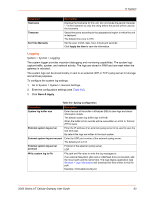
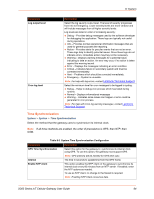
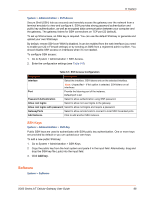
8: System System > Administration > SSH Access Secure Shell (SSH) lets you securely and remotely access the gateway over the network from a terminal emulator to view and configure it. SSH provides strong password authentication and public key authentication, as well as encrypted data communication between your computer and the gateway. The gateway listens for SSH connections on TCP port 22 (default). To set up SSH access, an SSH key is required. You can use the default SSH key or generate and upload your own SSH keys. By default, remote SSH over WAN is disabled. It can be enabled from the web interface (you need to enable port 22 in Firewall settings) or by sending an SMS from a registered admin number. You should disable SSH access on interfaces when it's not needed. To configure SSH access: 1. Go to System > Administration > SSH Access. 2. Enter the configuration settings (see Table 8-5). Table 8-5 SSH Access Configuration Parameters Description Interface Select the interface. SSH listens only on the selected interface. Note: Unspecified - If this option is selected, SSH listens on all interfaces. Port Provide the listening port of the instance. Default port is 22. Password Authentication Select to allow authentication using SSH password. Allow root logins Select to allow root user logins to the gateway. Allow root logins with password Select to allow root logins and require a password. GatewayPorts Add Instance Select to allow remote hosts to connect to local SSH forwarded ports. Click to add another SSH instance. SSH-Keys System > Administration > SSH-Key Public SSH keys are used to authenticate with SSH public key authentication. One or more keys are provided by default or you can upload your own keys. To add a new public SSH key: 1. Go to System > Administration > SSH-Keys. 2. Copy the public key from the host system and paste it in the input field. Alternatively, drag and drop the SSH key file (.pub) into the input field. 3. Click Add key. Software System > Software X300 Series IoT Cellular Gateway User Guide 66
-
 1
1 -
2
-
3
-
4
-
5
-
6
-
7
-
8
-
9
-
10
-
11
-
12
-
13
-
14
-
15
-
16
-
17
-
18
-
19
-
20
-
21
-
22
-
23
-
24
-
25
-
26
-
27
-
28
-
29
-
30
-
31
-
32
-
33
-
34
-
35
-
36
-
37
-
38
-
39
-
40
-
41
-
42
-
43
-
44
-
45
-
46
-
47
-
48
-
49
-
50
-
51
-
52
-
53
-
54
-
55
-
56
-
57
-
58
-
59
-
60
-
 61
61 -
 62
62 -
 63
63 -
 64
64 -
 65
65 -
 66
66 -
 67
67 -
 68
68 -
 69
69 -
 70
70 -
 71
71 -
72
-
73
-
74
-
75
-
76
-
77
-
78
-
79
-
80
-
81
-
82
-
83
-
84
-
85
-
86
-
87
-
88
-
89
-
90
-
91
-
92
-
93
-
94
-
95
-
96
-
97
-
98
-
99
-
100
-
101
-
102
-
103
-
104
-
105
-
106
-
107
-
108
-
109
-
110
-
111
-
112
-
113
-
114
-
115
-
116
-
117
-
118
-
119
-
120
-
121
-
122
-
123
-
124
-
125
-
126
-
127
-
128
-
129
-
130
-
131
-
132
-
133
-
134
-
135
-
136
-
137
-
138
-
139
-
140
-
141
-
142
-
143
-
144
-
145
-
146
-
147
-
148
-
149
-
150
-
151
-
152
-
153
-
154
-
155
-
156
-
157
-
158
-
159
-
160
-
161
-
162
-
163
-
164
-
165
-
166
-
167
-
168
-
169
-
170
-
171
-
172
-
173
-
174
-
175
-
176
-
177
-
178
-
179
-
180
-
181
-
182
-
183
-
184
-
185
-
186
-
187
-
188
-
189
-
190
-
191
-
192
-
193
-
194
-
195
-
196
-
197
-
198
-
199
-
200
-
201
-
202
-
203
-
204
-
205
-
206
-
207
-
208
-
209
-
210
-
211
-
212
-
213
-
214
-
215
-
216
 |
 |
