Netgear PS110 PS110 Reference Manual - Page 169
Creating an NDPS Printer Agent
 |
UPC - 606449002218
View all Netgear PS110 manuals
Add to My Manuals
Save this manual to your list of manuals |
Page 169 highlights
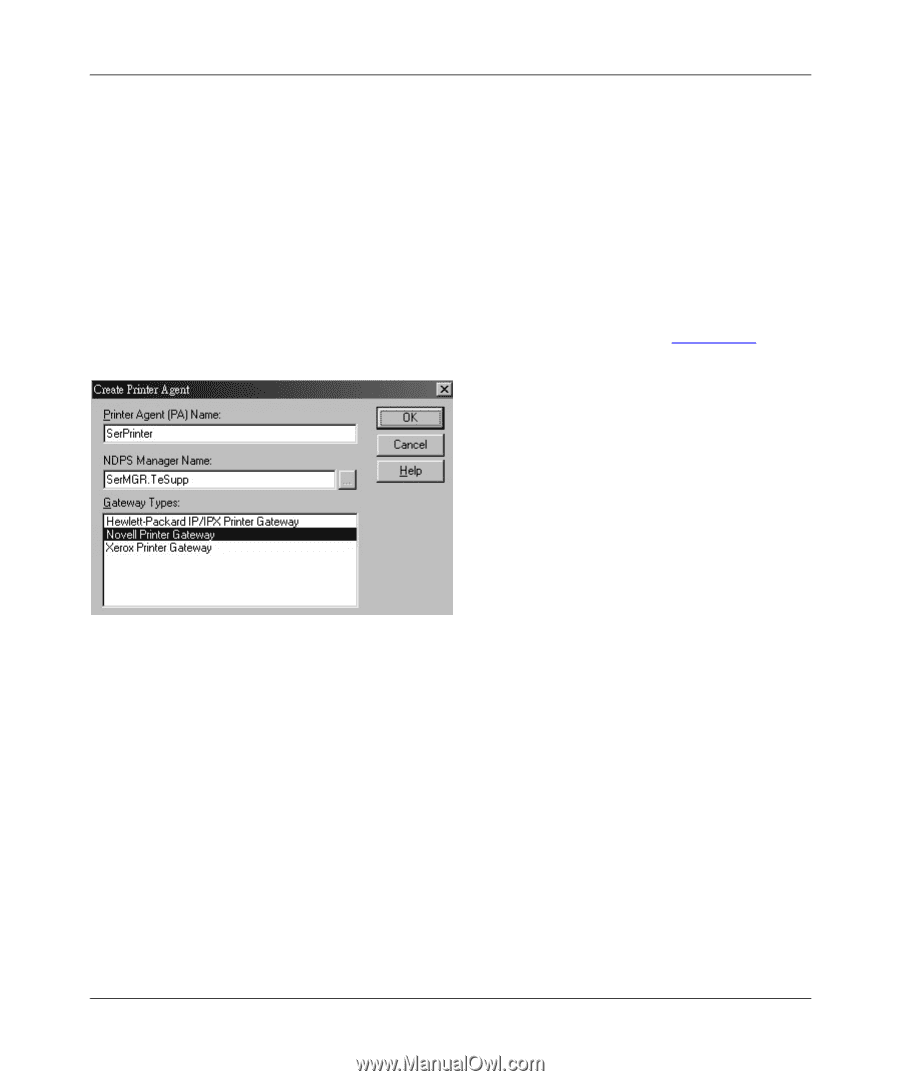
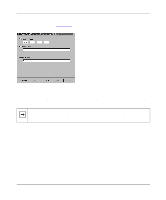
Installation and Reference for the Model PS104/PS110 Print Server Creating an NDPS Printer Agent To create Public Access Printers using the NDPS Manager Object in NetWare Administrator, follow these instructions. You will need to repeat the procedure for any other ports on the print server or for any other logical printers you want to use. To create an NDPS printer agent: 1. Start the NDPS Manager object you will be using to control the Printer Agent. 2. At the Identification page, click on the Printer Agent List. 3. Click on New to see the Create Printer Agent window, as illustrated in Figure D-2. Figure D-2. Create Printer Agent Window 4. Enter the name you want for the Printer Agent (PA) Name. The NDPS Manager will be the NDPS Manager object you are using. 5. Select Novell Printer Gateway In the Gateway Type. 6. Click on OK, and then select the available printer. 7. Select Remote (LPR on IP) in the Connection Type. 8. Click on Next to view the Configure Port Handler Screen. Using NetWare 5 NDPS D-3
-
 1
1 -
2
-
3
-
4
-
5
-
6
-
7
-
8
-
9
-
10
-
11
-
12
-
13
-
14
-
15
-
16
-
17
-
18
-
19
-
20
-
21
-
22
-
23
-
24
-
25
-
26
-
27
-
28
-
29
-
30
-
31
-
32
-
33
-
34
-
35
-
36
-
37
-
38
-
39
-
40
-
41
-
42
-
43
-
44
-
45
-
46
-
47
-
48
-
49
-
50
-
51
-
52
-
53
-
54
-
55
-
56
-
57
-
58
-
59
-
60
-
61
-
62
-
63
-
64
-
65
-
66
-
67
-
68
-
69
-
70
-
71
-
72
-
73
-
74
-
75
-
76
-
77
-
78
-
79
-
80
-
81
-
82
-
83
-
84
-
85
-
86
-
87
-
88
-
89
-
90
-
91
-
92
-
93
-
94
-
95
-
96
-
97
-
98
-
99
-
100
-
101
-
102
-
103
-
104
-
105
-
106
-
107
-
108
-
109
-
110
-
111
-
112
-
113
-
114
-
115
-
116
-
117
-
118
-
119
-
120
-
121
-
122
-
123
-
124
-
125
-
126
-
127
-
128
-
129
-
130
-
131
-
132
-
133
-
134
-
135
-
136
-
137
-
138
-
139
-
140
-
141
-
142
-
143
-
144
-
145
-
146
-
147
-
148
-
149
-
150
-
151
-
152
-
153
-
154
-
155
-
156
-
157
-
158
-
159
-
160
-
161
-
162
-
163
-
 164
164 -
 165
165 -
 166
166 -
 167
167 -
 168
168 -
 169
169 -
 170
170 -
 171
171 -
 172
172 -
 173
173 -
 174
174 -
175
-
176
-
177
-
178
 |
 |