Netgear PS110 PS110 Reference Manual - Page 98
Select Remote Parallel, LPT1 in the Printer Types window and press [Enter].
 |
UPC - 606449002218
View all Netgear PS110 manuals
Add to My Manuals
Save this manual to your list of manuals |
Page 98 highlights
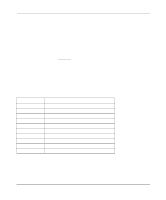
Installation and Reference for the Model PS104/PS105/PS110 Print Server To associate a NetWare printer object with each printer port of the print server: a. Select the print server you added in step 3. b. Select Print Server Configuration. c. Select Printer Configuration. d. Select the entry with printer number 0 on the Configured Printers submenu to open the Printer 0 Configuration window. e. Type the predetermined print server name in the Name entry field, using the convention shown in Table 5-2. When referring to the table, assume that PSxxxxxx is the predetermined name of the print server. You can provide a name different from the one presently in the print server, and then you can change the name of the device when you execute the PSCONFIG program for the RPRINTER setup. The factory default name for the print server is PSxxxxxx as shown on the label on the bottom of the device. Table 5-2. RPRINTER Mode Printer Name Mapping Print Server Port Printer port 1 Printer port 2 Logical port 1 Logical port 2 Logical port 3 Logical port 4 Logical port 5 Logical port 6 Logical port 7 Logical port 8 Printer Name in File Server PSxxxxxx PSxxxxxx_P2 PSxxxxxx_L1 PSxxxxxx_L2 PSxxxxxx_L3 PSxxxxxx_L4 PSxxxxxx_L5 PSxxxxxx_L6 PSxxxxxx_L7 PSxxxxxx_L8 f. Select the Type entry field to open the Printer Types window. g. Select Remote Parallel, LPT1 in the Printer Types window and press [Enter]. h. Press [Esc]. i. Select Yes to save the changes. 5-8 Novell NetWare Printing
-
 1
1 -
2
-
3
-
4
-
5
-
6
-
7
-
8
-
9
-
10
-
11
-
12
-
13
-
14
-
15
-
16
-
17
-
18
-
19
-
20
-
21
-
22
-
23
-
24
-
25
-
26
-
27
-
28
-
29
-
30
-
31
-
32
-
33
-
34
-
35
-
36
-
37
-
38
-
39
-
40
-
41
-
42
-
43
-
44
-
45
-
46
-
47
-
48
-
49
-
50
-
51
-
52
-
53
-
54
-
55
-
56
-
57
-
58
-
59
-
60
-
61
-
62
-
63
-
64
-
65
-
66
-
67
-
68
-
69
-
70
-
71
-
72
-
73
-
74
-
75
-
76
-
77
-
78
-
79
-
80
-
81
-
82
-
83
-
84
-
85
-
86
-
87
-
88
-
89
-
90
-
91
-
92
-
 93
93 -
 94
94 -
 95
95 -
 96
96 -
 97
97 -
 98
98 -
 99
99 -
 100
100 -
 101
101 -
 102
102 -
 103
103 -
104
-
105
-
106
-
107
-
108
-
109
-
110
-
111
-
112
-
113
-
114
-
115
-
116
-
117
-
118
-
119
-
120
-
121
-
122
-
123
-
124
-
125
-
126
-
127
-
128
-
129
-
130
-
131
-
132
-
133
-
134
-
135
-
136
-
137
-
138
-
139
-
140
-
141
-
142
-
143
-
144
-
145
-
146
-
147
-
148
-
149
-
150
-
151
-
152
-
153
-
154
-
155
-
156
-
157
-
158
-
159
-
160
-
161
-
162
-
163
-
164
-
165
-
166
-
167
-
168
-
169
-
170
-
171
-
172
-
173
-
174
-
175
-
176
-
177
-
178
 |
 |
