Netgear PS110 PS110 Reference Manual - Page 68
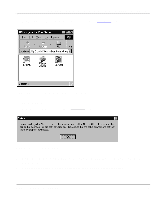
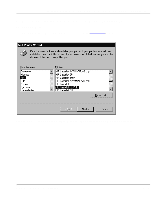
Click on OK., Click on the printer port you want to use with the print server and click on Add
 |
UPC - 606449002218
View all Netgear PS110 manuals
Add to My Manuals
Save this manual to your list of manuals |
Page 68 highlights
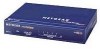
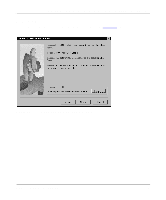
Installation and Reference for the Model PS104/PS105/PS110 Print Server 5. Click on OK. The Printer Select window, as illustrated in Figure 4-10, opens. The Printer Select window will stay in the background while you work through subsequent setup windows because you will use this window to complete the setup process. Figure 4-10. Printer Select Window (Add Port) Note: If the cables are not properly connected, your PC screen will appear empty when the Printer Select window opens. If so, check the cable connections and click on the Refresh button, which will initiate the PC to browse again for a port. 6. Click on the printer port you want to use with the print server and click on Add. The ADDPORT window for Epson printer connection, as illustrated in Figure 4-11, opens. Figure 4-11. ADDPORT Window (Epson Connection) 4-10 Microsoft Windows NT Printing
-
 1
1 -
2
-
3
-
4
-
5
-
6
-
7
-
8
-
9
-
10
-
11
-
12
-
13
-
14
-
15
-
16
-
17
-
18
-
19
-
20
-
21
-
22
-
23
-
24
-
25
-
26
-
27
-
28
-
29
-
30
-
31
-
32
-
33
-
34
-
35
-
36
-
37
-
38
-
39
-
40
-
41
-
42
-
43
-
44
-
45
-
46
-
47
-
48
-
49
-
50
-
51
-
52
-
53
-
54
-
55
-
56
-
57
-
58
-
59
-
60
-
61
-
62
-
 63
63 -
 64
64 -
 65
65 -
 66
66 -
 67
67 -
 68
68 -
 69
69 -
 70
70 -
 71
71 -
 72
72 -
 73
73 -
74
-
75
-
76
-
77
-
78
-
79
-
80
-
81
-
82
-
83
-
84
-
85
-
86
-
87
-
88
-
89
-
90
-
91
-
92
-
93
-
94
-
95
-
96
-
97
-
98
-
99
-
100
-
101
-
102
-
103
-
104
-
105
-
106
-
107
-
108
-
109
-
110
-
111
-
112
-
113
-
114
-
115
-
116
-
117
-
118
-
119
-
120
-
121
-
122
-
123
-
124
-
125
-
126
-
127
-
128
-
129
-
130
-
131
-
132
-
133
-
134
-
135
-
136
-
137
-
138
-
139
-
140
-
141
-
142
-
143
-
144
-
145
-
146
-
147
-
148
-
149
-
150
-
151
-
152
-
153
-
154
-
155
-
156
-
157
-
158
-
159
-
160
-
161
-
162
-
163
-
164
-
165
-
166
-
167
-
168
-
169
-
170
-
171
-
172
-
173
-
174
-
175
-
176
-
177
-
178
 |
 |