TASCAM SS-R200 100 SS-R200 SS-CDR200 Owners Manual - Page 46
Creating a new track manually, Setting the pause mode, Using the remote control to change
 |
View all TASCAM SS-R200 manuals
Add to My Manuals
Save this manual to your list of manuals |
Page 46 highlights
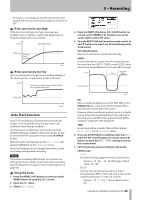
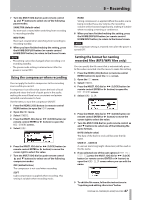
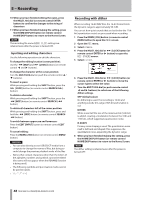
5 - Recording If set to a negative value, that amount of audio prior to triggering will also be included in the new track. NOTE When the setting range is converted to seconds, it is equivalent to ±1.00 seconds. DD (digital direct) mode • DELAY Sets the time in frames until a new track is started from a point detected in DD mode (one frame is = 1/75 seconds). Options: -75 f - +75 f (frame) (default value: 0 f) TIME mode • INTERVAL Sets the frequency of new track creation. Options: 1 min - 10min, 5 min, 30min, 1 hour, 2 hour, 6 hour, 8 hour, 12hour, 24hour (default value: 5 min) 8 When you have finished making the setting, press the HOME/DISPLAY button (or remote control HOME/DISP button) to return to the Home Screen. NOTE The Auto Track function setting is retained even after the power is turned OFF. 88 Using the remote control to change the Auto Track mode Press the remote control A.TRACK button to open the Auto Track pop-up window on the Home Screen, and change the Auto Track mode. Pressing the buttons cycles through the modes in this order: OFF q LEVEL q DD q TIME q OFF. Creating a new track manually When recording, press the front panel or remote control RECORD button, to create a new track (with a higher number) without interrupting recording. You cannot, however, create a track of 4 seconds or less. NOTE If you have recorded in WAV format, you can also use editing functions to divide or join tracks after recording. (See "Dividing files" on page 57 and "Combining files" on page 58.) CAUTION Depending on the USB/SD/CF media used in the unit, when recording in MP3 format, creating many tracks in a short time period can cause recording to stop. An OVER FLOW error message will appear on the screen when this occurs. To avoid this, wait some time between uses of this function. Setting the pause mode Set whether or not a new track is created when switching from recording to recording standby. 1 Press the MENU [JOG] button (or remote control MENU button) to open the MENU screen. 2 Open the REC menu. 3 Select OTHERS. 4 Press the MULTI JOG dial or , [LOCK] button (or remote control ENTER or t button) to open the REC OTHERS screen. 5 Select PAUSE MODE. 6 Press the MULTI JOG dial or , [LOCK] button (or remote control ENTER or t button) to move the cursor right to select the value. 46 TASCAM SS-CDR200/SS-R200/SS-R100
-
 1
1 -
2
-
3
-
4
-
5
-
6
-
7
-
8
-
9
-
10
-
11
-
12
-
13
-
14
-
15
-
16
-
17
-
18
-
19
-
20
-
21
-
22
-
23
-
24
-
25
-
26
-
27
-
28
-
29
-
30
-
31
-
32
-
33
-
34
-
35
-
36
-
37
-
38
-
39
-
40
-
 41
41 -
 42
42 -
 43
43 -
 44
44 -
 45
45 -
 46
46 -
 47
47 -
 48
48 -
 49
49 -
 50
50 -
 51
51 -
52
-
53
-
54
-
55
-
56
-
57
-
58
-
59
-
60
-
61
-
62
-
63
-
64
-
65
-
66
-
67
-
68
-
69
-
70
-
71
-
72
-
73
-
74
-
75
-
76
-
77
-
78
-
79
-
80
-
81
-
82
-
83
-
84
 |
 |
