TRENDnet TEW-829DRU Users Guide - Page 32
Enabled, Apply, Network/VID, Under DHCP Server, click
 |
View all TRENDnet TEW-829DRU manuals
Add to My Manuals
Save this manual to your list of manuals |
Page 32 highlights
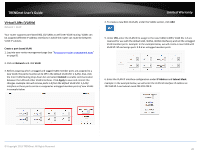
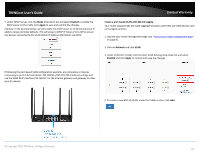
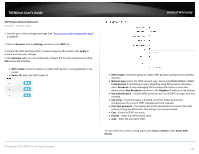
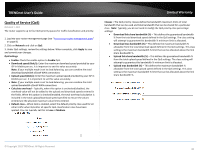
TRENDnet User's Guide 7. Under DHCP Server, click the Mode drop-down list and select Enabled to enable the DHCP server on the VLAN. Click Apply to save and commit the changes. Example: In the example below, we will enable the DHCP server on VLAN 50 and leave IP address range and lease defaults. This will assign a DHCP IP range of 101-199 to ensure any devices connected to this VLAN obtain IP address information via DHCP. Limited Warranty If following the 802.1Q VLAN configuration example, a managed/web smart switch with 802.1Q VLAN support can be connected and pass VLAN 50 traffic between the router and switch and 2.4GHz wireless SSID. Any computers or devices connecting to the untagged VLAN ports (PVID: 50) on the managed/web smart will obtain 192.168.50.x/255.255.255.0 address settings and use the VLAN 50 IP interface 192.168.50.1 as the Internet gateway and gateway to other local IP subnets. Any wireless computers or devices connecting to the 2.4GHz wireless SSID will also obtain 192.168.50.x/255.255.255.0 address settings while connecting to 5GHz1 or 5GHz2 SSIDs will remain on the LAN network. Additional VLANs can be created on the router and switch in which 802.1Q VLAN traffic can pass through the same single 802.1Q VLAN tag/trunk link. Multiple SSIDs will appear in this section when enabled and configured. Guest network SSID does not apply. 8. Under Reassign SSID to VLAN, next to the SSID you would like to assign the new VLAN ID, click the Network/VID drop-down list and select the VLAN ID. Click Apply to save and commit the changes. © Copyright 2019 TRENDnet. All Rights Reserved. 25
-
 1
1 -
2
-
3
-
4
-
5
-
6
-
7
-
8
-
9
-
10
-
11
-
12
-
13
-
14
-
15
-
16
-
17
-
18
-
19
-
20
-
21
-
22
-
23
-
24
-
25
-
26
-
 27
27 -
 28
28 -
 29
29 -
 30
30 -
 31
31 -
 32
32 -
 33
33 -
 34
34 -
 35
35 -
 36
36 -
 37
37 -
38
-
39
-
40
-
41
-
42
-
43
-
44
-
45
-
46
-
47
-
48
-
49
-
50
-
51
-
52
-
53
-
54
-
55
-
56
-
57
-
58
-
59
-
60
-
61
-
62
-
63
-
64
-
65
-
66
-
67
-
68
-
69
-
70
-
71
-
72
-
73
-
74
-
75
-
76
-
77
-
78
-
79
-
80
-
81
-
82
-
83
-
84
-
85
-
86
-
87
-
88
-
89
-
90
-
91
-
92
-
93
-
94
-
95
-
96
-
97
-
98
-
99
-
100
-
101
-
102
-
103
-
104
-
105
-
106
-
107
-
108
-
109
-
110
-
111
-
112
-
113
-
114
-
115
-
116
-
117
-
118
-
119
 |
 |
