TRENDnet TEW-829DRU Users Guide - Page 70
PPTP VPN Server, Setting up the PPTP VPN server, Network, Enable, Local IP, Client IP, Authentication
 |
View all TRENDnet TEW-829DRU manuals
Add to My Manuals
Save this manual to your list of manuals |
Page 70 highlights
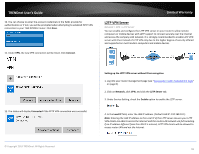
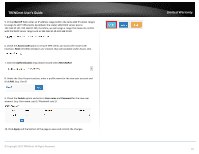
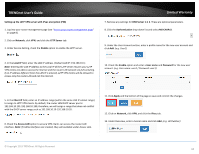
TRENDnet User's Guide PPTP VPN Server Network > VPN > PPTP Server You can enable and configure the PPTP VPN server on your router to allow remote computers or mobile devices with PPTP VPN support to connect securely over the Internet and access the company LAN network. Limited Warranty 5. In the Client IP field, enter an IP address range (within the same LAN IP subnet range) to assign to PPTP VPN clients. By default, the router LAN DHCP server pool is 192.168.10.101-192.168.10.199, therefore, we will assign a range that does not conflict with the DHCP server range such as 192.168.10.10-192.168.10.20. 6. Click the Authentication drop-down list and select MS-CHAPv2. Setting up the PPTP VPN server 1. Log into your router management page (see "Access your router management page" on page 8). 2. Click on Network, click VPN, and click the PPTP Server tab. 3. Under Service Setting, check the Enable option to enable the PPTP server. 7. Under the User Account section, enter a profile name for the new user account and click Add. (e.g. User1) 8. Check the Enable option and enter a User name and Password for the new user account. (e.g. User name: user1 / Password: user1) 4. In the Local IP field, enter the LAN IP address. (Default LAN IP: 192.168.10.1) Note: Entering the LAN IP address as the Local IP of the PPTP server ensures your PPTP VPN clients are able to access the Internet and the router LAN network via full tunneling. If an IP address different from the LAN IP is entered, PPTP VPN clients will be allowed to access router LAN and not the Internet. © Copyright 2019 TRENDnet. All Rights Reserved. 9. Click Apply and the bottom of the page so save and commit the changes. 10. Click on the Status > Overview page and under the Network section, make note of your WAN IPv4 addresses to configure the PPTP VPN clients. You can also configure dynamic DNS to use a dynamic DNS hostname instead of dynamic WAN IP address. 63
-
 1
1 -
2
-
3
-
4
-
5
-
6
-
7
-
8
-
9
-
10
-
11
-
12
-
13
-
14
-
15
-
16
-
17
-
18
-
19
-
20
-
21
-
22
-
23
-
24
-
25
-
26
-
27
-
28
-
29
-
30
-
31
-
32
-
33
-
34
-
35
-
36
-
37
-
38
-
39
-
40
-
41
-
42
-
43
-
44
-
45
-
46
-
47
-
48
-
49
-
50
-
51
-
52
-
53
-
54
-
55
-
56
-
57
-
58
-
59
-
60
-
61
-
62
-
63
-
64
-
 65
65 -
 66
66 -
 67
67 -
 68
68 -
 69
69 -
 70
70 -
 71
71 -
 72
72 -
 73
73 -
 74
74 -
 75
75 -
76
-
77
-
78
-
79
-
80
-
81
-
82
-
83
-
84
-
85
-
86
-
87
-
88
-
89
-
90
-
91
-
92
-
93
-
94
-
95
-
96
-
97
-
98
-
99
-
100
-
101
-
102
-
103
-
104
-
105
-
106
-
107
-
108
-
109
-
110
-
111
-
112
-
113
-
114
-
115
-
116
-
117
-
118
-
119
 |
 |
