TRENDnet TEW-829DRU Users Guide - Page 83
Local, Local subnet, Assign IP range, Apply, Pre-Shared Key, User name, Password, Under XAUTH Account
 |
View all TRENDnet TEW-829DRU manuals
Add to My Manuals
Save this manual to your list of manuals |
Page 83 highlights
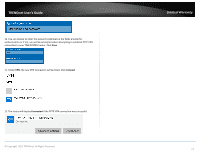
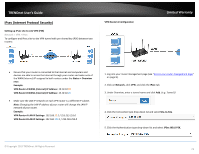
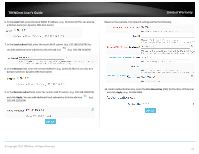
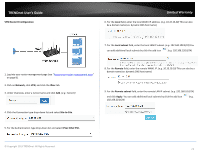
TRENDnet User's Guide 6. For the Local field, enter the local WAN1 IP address. (e.g. 10.10.10.10) This can also be a domain name (ex: dynamic DNS host name) Limited Warranty 10. Under XAUTH Account, enter the User name and Password for the account, then click Add. Click Apply to save and commit the changes. 7. In the Local subnet field, enter the local LAN IP subnet. (e.g. 192.168.10.0/24) You can add additional local subnets by click the add icon (e.g. 192.168.20.0/24) Note: For the VPN client computer, you will require a third party IPsec VPN software to be installed configured matching the IPsec VPN settings on your router. Please refer to your third party IPsec VPN User's Guide/Manual for configuring the VPN settings. 8. In the Assign IP range field, enter the IP address subnet to assign the IPsec VPN client devices upon connectivity and click Apply. (e.g. 192.168.30.0/24). The IP address range/subnet should be different from the local LAN IP subnets and also different from the remote client side. 9. Under Authentication Key, enter the Pre-Shared Key (PSK) for the IPsec VPN tunnel. (e.g. 1234567890) © Copyright 2019 TRENDnet. All Rights Reserved. 76
-
 1
1 -
2
-
3
-
4
-
5
-
6
-
7
-
8
-
9
-
10
-
11
-
12
-
13
-
14
-
15
-
16
-
17
-
18
-
19
-
20
-
21
-
22
-
23
-
24
-
25
-
26
-
27
-
28
-
29
-
30
-
31
-
32
-
33
-
34
-
35
-
36
-
37
-
38
-
39
-
40
-
41
-
42
-
43
-
44
-
45
-
46
-
47
-
48
-
49
-
50
-
51
-
52
-
53
-
54
-
55
-
56
-
57
-
58
-
59
-
60
-
61
-
62
-
63
-
64
-
65
-
66
-
67
-
68
-
69
-
70
-
71
-
72
-
73
-
74
-
75
-
76
-
77
-
 78
78 -
 79
79 -
 80
80 -
 81
81 -
 82
82 -
 83
83 -
 84
84 -
 85
85 -
 86
86 -
 87
87 -
 88
88 -
89
-
90
-
91
-
92
-
93
-
94
-
95
-
96
-
97
-
98
-
99
-
100
-
101
-
102
-
103
-
104
-
105
-
106
-
107
-
108
-
109
-
110
-
111
-
112
-
113
-
114
-
115
-
116
-
117
-
118
-
119
 |
 |
