TRENDnet TEW-829DRU Users Guide - Page 77
Setting up the L2TP VPN client (Windows) with IPsec encryption (PSK), Network & Internet
 |
View all TRENDnet TEW-829DRU manuals
Add to My Manuals
Save this manual to your list of manuals |
Page 77 highlights
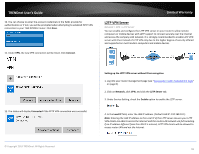
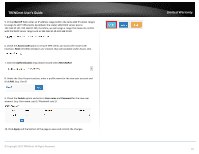
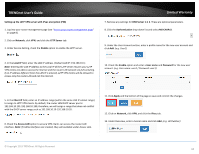
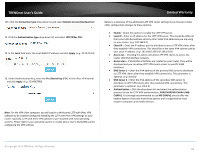
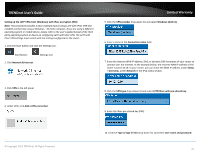
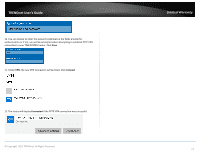
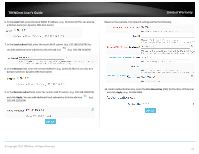
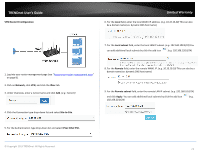
TRENDnet User's Guide Setting up the L2TP VPN client (Windows) with IPsec encryption (PSK) Note: This procedure provides a basic example how to setup L2TP with IPsec VPN and establish connectivity using a Windows® 10 client computer. If you are using a different operating system or mobile device, please refer to the user's guide/manual of the third party operating system or device on configuring L2TP with IPsec VPN. The L2TP with IPsec VPN settings must match with the settings configured on the router. 1. Click the Start button and click the Settings icon. Start Button 2. Click Network & Internet. Settings icon Limited Warranty 5. Click the VPN provider drop-down list and select Windows (built-in). 6. Enter a name in the Connection name field. 7. Enter the Internet WAN IP address, DNS, or dynamic DNS hostname of your router to connect over the Internet. In the example below, the Internet WAN IP address of the router is 10.10.10.10. In your router, you can check the WAN IP address under Status > Overview, under Network in the IPv4 status section. 3. Click VPN in the left panel. 4. Under VPN, click Add a VPN connection. 8. Click the VPN type drop-down list and select L2TP/IPsec with pre-shared key. 9. Enter the IPsec pre-shared key (PSK). © Copyright 2019 TRENDnet. All Rights Reserved. 10. Click the Type of sign-in info drop-down list and select User name and password. 70
-
 1
1 -
2
-
3
-
4
-
5
-
6
-
7
-
8
-
9
-
10
-
11
-
12
-
13
-
14
-
15
-
16
-
17
-
18
-
19
-
20
-
21
-
22
-
23
-
24
-
25
-
26
-
27
-
28
-
29
-
30
-
31
-
32
-
33
-
34
-
35
-
36
-
37
-
38
-
39
-
40
-
41
-
42
-
43
-
44
-
45
-
46
-
47
-
48
-
49
-
50
-
51
-
52
-
53
-
54
-
55
-
56
-
57
-
58
-
59
-
60
-
61
-
62
-
63
-
64
-
65
-
66
-
67
-
68
-
69
-
70
-
71
-
 72
72 -
 73
73 -
 74
74 -
 75
75 -
 76
76 -
 77
77 -
 78
78 -
 79
79 -
 80
80 -
 81
81 -
 82
82 -
83
-
84
-
85
-
86
-
87
-
88
-
89
-
90
-
91
-
92
-
93
-
94
-
95
-
96
-
97
-
98
-
99
-
100
-
101
-
102
-
103
-
104
-
105
-
106
-
107
-
108
-
109
-
110
-
111
-
112
-
113
-
114
-
115
-
116
-
117
-
118
-
119
 |
 |
