TRENDnet TEW-829DRU Users Guide - Page 76
Pap/chap/ms-chapv1/ms, L2tp/ipsec Psk.
 |
View all TRENDnet TEW-829DRU manuals
Add to My Manuals
Save this manual to your list of manuals |
Page 76 highlights
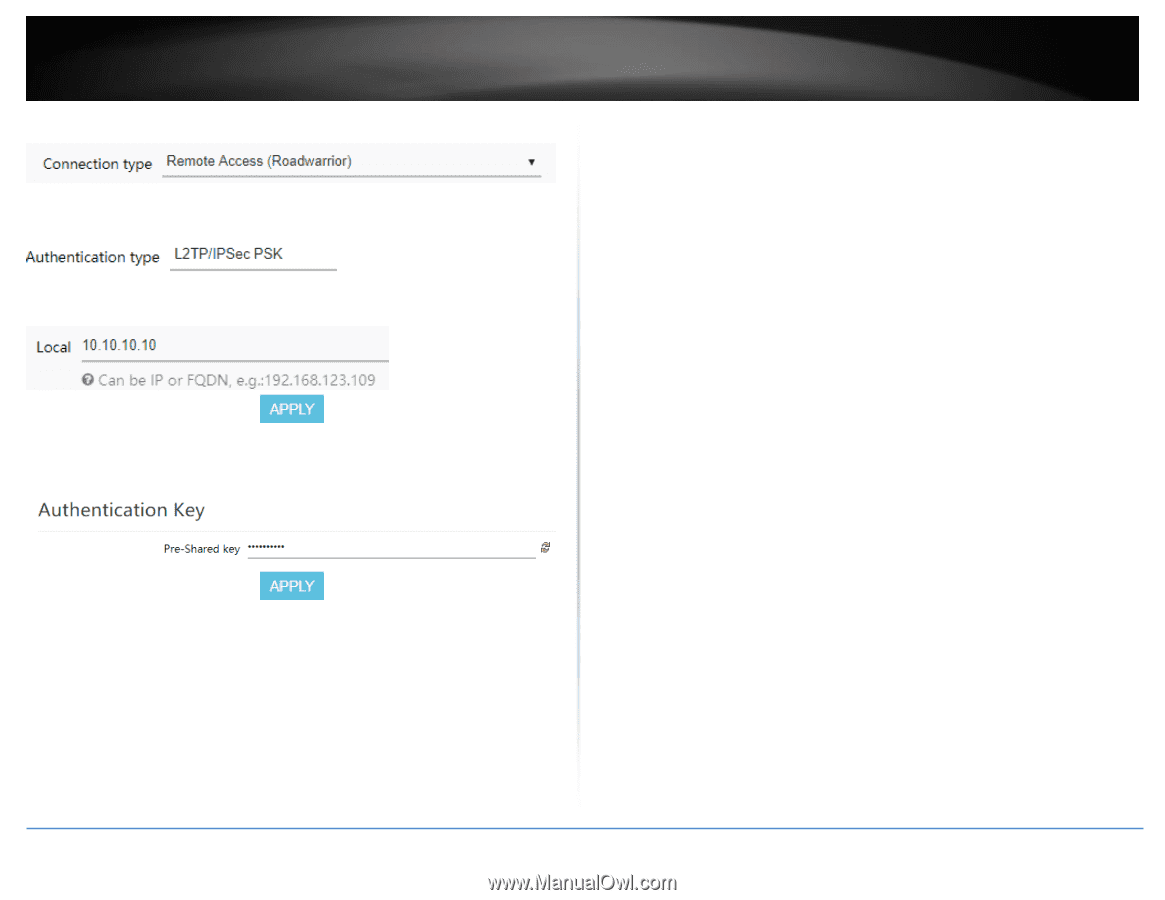
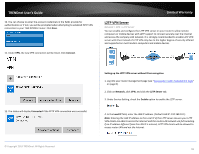
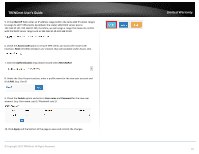
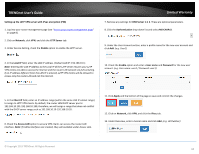
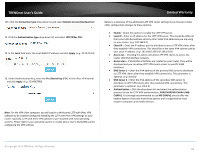
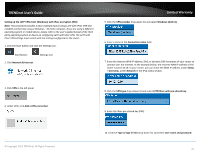
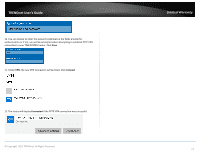
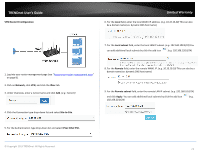
TRENDnet User's Guide 143. Click the Connection type drop-down list and select Remote Access (Roadwarrior). 14. Click the Authentication type drop-down list and select L2TP/IPSec PSK. 15. In the Local field enter the local WAN1 IP address and click Apply. (e.g. 10.10.10.10) 16. Under Authentication Key, enter the Pre-Shared Key (PSK) for the IPsec VPN tunnel and click Apply. (e.g. 1234567890) Limited Warranty Below is a reference of the additional L2TP VPN server settings if you choose to make other configuration changes to these sections. Enable - Check this option to enable the L2TP VPN server. Local IP - Enter an IP address for the L2TP VPN server. This should be different from your LAN IPv4 address and any other VLAN IPv4 addresses you are using on your router. (e.g. 192.168.0.1) Client IP - Enter the IP address pool to distribute to your L2TP VPN clients after they establish VPN connectivity. This should be in the same IPv4 subnet used as your Local IP address. (e.g. 192.168.0.100-192.168.0.254) Access lan - Checking this option will allow L2TP VPN clients to access the router LAN IPv4 interface network. Access vlan - If VLAN IPv4 interfaces are created on your router, they will be displayed and you can allow L2TP VPN clients access to specific VLAN interfaces. DNS Server 1 - Enter the IPv4 address of the primary DNS server to distribute to L2TP VPN clients after they establish VPN connectivity. This parameter is optional. (e.g. 8.8.8.8) DNS Server 2 - Enter the IPv4 address of the secondary DNS server to distribute to L2TP VPN clients after they establish VPN connectivity. This parameter is optional. (e.g. 8.8.4.4) Authentication - Click the drop-down list and select the authentication protocol to use for L2TP VPN authentication, PAP/CHAP/MS-CHAPv1/MSCHAPv2. It is strongly recommended to use MS-CHAPv2 since it offer the highest degree of security from these options and is supported by most modern computers and mobile devices. Note: For the VPN client computer, you will require a third party L2TP with IPsec VPN software to be installed configured matching the L2TP with IPsec VPN settings on your router. Typically, L2TP with IPsec VPN software is pre-installed with most operating systems. Please refer to your operating system or mobile device User's Guide/Manual for configuring the VPN settings. © Copyright 2019 TRENDnet. All Rights Reserved. 69
-
 1
1 -
2
-
3
-
4
-
5
-
6
-
7
-
8
-
9
-
10
-
11
-
12
-
13
-
14
-
15
-
16
-
17
-
18
-
19
-
20
-
21
-
22
-
23
-
24
-
25
-
26
-
27
-
28
-
29
-
30
-
31
-
32
-
33
-
34
-
35
-
36
-
37
-
38
-
39
-
40
-
41
-
42
-
43
-
44
-
45
-
46
-
47
-
48
-
49
-
50
-
51
-
52
-
53
-
54
-
55
-
56
-
57
-
58
-
59
-
60
-
61
-
62
-
63
-
64
-
65
-
66
-
67
-
68
-
69
-
70
-
 71
71 -
 72
72 -
 73
73 -
 74
74 -
 75
75 -
 76
76 -
 77
77 -
 78
78 -
 79
79 -
 80
80 -
 81
81 -
82
-
83
-
84
-
85
-
86
-
87
-
88
-
89
-
90
-
91
-
92
-
93
-
94
-
95
-
96
-
97
-
98
-
99
-
100
-
101
-
102
-
103
-
104
-
105
-
106
-
107
-
108
-
109
-
110
-
111
-
112
-
113
-
114
-
115
-
116
-
117
-
118
-
119
 |
 |