Brother International MD-611 Instruction Manual - English - Page 14
brother
 |
View all Brother International MD-611 manuals
Add to My Manuals
Save this manual to your list of manuals |
Page 14 highlights
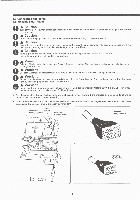
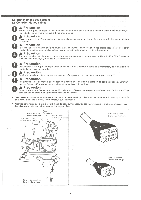
O brother MFM * Insert the bolts 0 into holes A, B, and C in the work table 0 and then secure the motor 0 to the work table 0 by tightening the motor mounting brackets 0 to the work table 0 with the plain washers 0, spring washer 0 and nuts 0 shown in the illustration. * The dimensional relation of the holes A, B and C in the work table 0 are as shown below. * Stecken Sie die Schrauben 0 in die Locher A, B und C des Nahtisches 0 und befestigen Sie den Motor 0 an dem Nahtisch 0, indem die Motorhalterung 0 mit den Unterlegscheiben 0, Federscheiben 0 und Muttern 0 wie in der Abbildung gezeigt am Nahtisch 0 angebracht wird. * Der maBliche Zusammenhang der Locher A, B und C im Nahtisch 0 ist nachfolgend gezeigt. * Inserer les boulons 0 dans les trous A, B et C de la table de travail 0, puis fixer le moteur 0 sur la table de travail 0 en serrant les supports 0 de montage du moteur sur la table de travail 0 a l'aide des rondelles plates 0, de la rondelle ressort 0 et des ecrous 0, comme indique sur ('illustration. * Les rapports de dimensions des trous A, B et C de la table de travail 0 sont indiquas ci-dessous. * Colocar los pernos 0 en los orificios A, B y C en la mesa de trabajo 0 y asegurar el motor 0 en la mesa de trabajo 0 apretando las abrazaderas 0 de montaje de motor a la mesa de trabajo 0 utilizando las arandelas planas 0, arandela de resorte 0 y tuercas 0 tal como se indica en la figura. * La relacion entre los tamarios de los orificios A, B y C en la mesa de trabajo 0 es la que aparece en la figura a continuaci6n. 57 159 3 +8.5 - 2-
-
 1
1 -
2
-
3
-
4
-
5
-
6
-
7
-
8
-
 9
9 -
 10
10 -
 11
11 -
 12
12 -
 13
13 -
 14
14 -
 15
15 -
 16
16 -
 17
17 -
 18
18 -
 19
19 -
20
-
21
-
22
-
23
-
24
-
25
-
26
-
27
-
28
-
29
-
30
-
31
-
32
-
33
-
34
-
35
-
36
-
37
-
38
-
39
-
40
-
41
-
42
-
43
-
44
-
45
-
46
-
47
-
48
-
49
-
50
-
51
-
52
-
53
-
54
-
55
-
56
-
57
-
58
-
59
 |
 |
