Brother International MD-611 Instruction Manual - English - Page 22
Connecting, operation, panel, Anschlief3en, Bedienungstafel
 |
View all Brother International MD-611 manuals
Add to My Manuals
Save this manual to your list of manuals |
Page 22 highlights
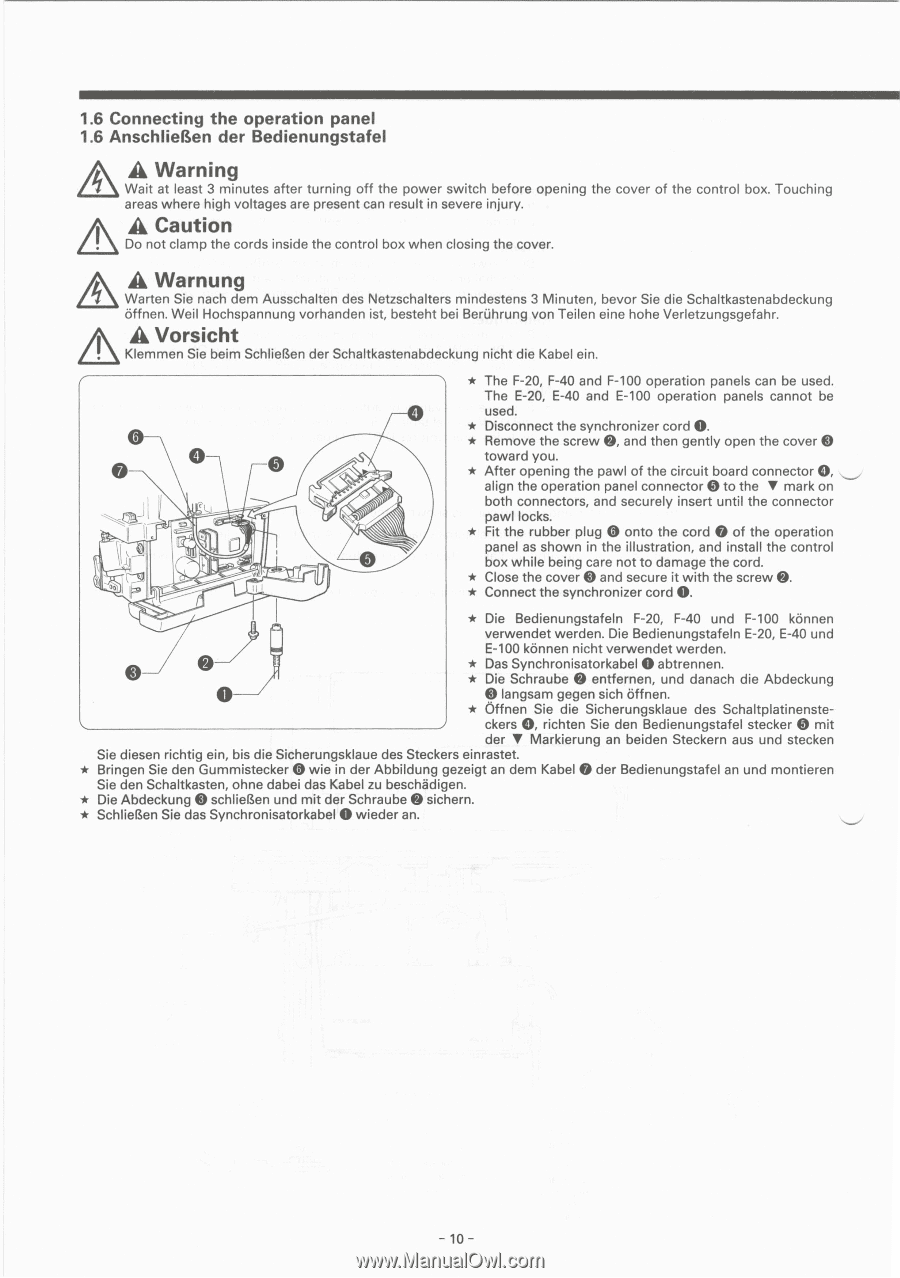
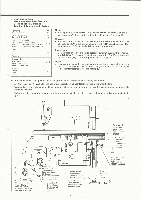
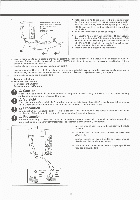
1.6 Connecting the operation panel 1.6 Anschlief3en der Bedienungstafel A Warning Wait at least 3 minutes after turning off the power switch before opening the cover of the control box. Touching areas where high voltages are present can result in severe injury. A A Caution Do not clamp the cords inside the control box when closing the cover. A Warnung Warten Sie nach dem Ausschalten des Netzschalters mindestens 3 Minuten, bevor Sie die Schaltkastenabdeckung offnen. Weil Hochspannung vorhanden ist, besteht bei Beruhrung von Teilen eine hohe Verletzungsgefahr. A Vorsicht Klemmen Sie beim SchlieRen der Schaltkastenabdeckung nicht die Kabel ein. 0 0 nI * The F-20, F-40 and F-100 operation panels can be used. The E-20, E-40 and E-100 operation panels cannot be used. * Disconnect the synchronizer cord 0. * Remove the screw 0, and then gently open the cover 0 toward you. * After opening the pawl of the circuit board connector 0, align the operation panel connector 0 to the • mark on both connectors, and securely insert until the connector pawl locks. * Fit the rubber plug 0 onto the cord 0 of the operation panel as shown in the illustration, and install the control box while being care not to damage the cord. * Close the cover 0 and secure it with the screw 0. * Connect the synchronizer cord 0. * Die Bedienungstafeln F-20, F-40 und F-100 konnen verwendet werden. Die Bedienungstafeln E-20, E-40 und E-100 konnen nicht verwendet werden. * Das Synchronisatorkabel 0 abtrennen. * Die Schraube 0 entfernen, und danach die Abdeckung 0 langsam gegen sich offnen. * Offnen Sie die Sicherungsklaue des Schaltplatinenste- ▪ ckers 0, richten Sie den Bedienungstafel stecker 0 mit der • Markierung an beiden Steckern aus und stecken Sie diesen richtig ein, bis die Sicherungsklaue des Steckers einrastet. Bringen Sie den Gummistecker 0 wie in der Abbildung gezeigt an dem Kabel 0 der Bedienungstafel an und montieren Sie den Schaltkasten, ohne dabei das Kabel zu beschadigen. Die Abdeckung 0 schlieRen und mit der Schraube 0 sichern. SchlieRen Sie das Synchronisatorkabel 0 wieder an. - 10 -
-
 1
1 -
2
-
3
-
4
-
5
-
6
-
7
-
8
-
9
-
10
-
11
-
12
-
13
-
14
-
15
-
16
-
 17
17 -
 18
18 -
 19
19 -
 20
20 -
 21
21 -
 22
22 -
 23
23 -
 24
24 -
 25
25 -
 26
26 -
 27
27 -
28
-
29
-
30
-
31
-
32
-
33
-
34
-
35
-
36
-
37
-
38
-
39
-
40
-
41
-
42
-
43
-
44
-
45
-
46
-
47
-
48
-
49
-
50
-
51
-
52
-
53
-
54
-
55
-
56
-
57
-
58
-
59
 |
 |