Canon imageCLASS MF4270 imageCLASS MF4270 Reference Guide - Page 145
Device Custom Settings
 |
View all Canon imageCLASS MF4270 manuals
Add to My Manuals
Save this manual to your list of manuals |
Page 145 highlights
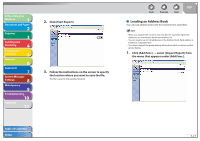
Before Using the Machine 1 Document and Paper 2 Copying 3 Sending and Receiving 4 Printing and Scanning 5 Network 6 Remote UI 7 System Manager Settings 8 Maintenance 9 Troubleshooting 10 Appendix 11 Device Custom Settings The Remote UI enables you to edit the machine's custom settings. You can also access these setting menus from the Operation Panel of the machine. For details, see "Machine Settings," on p. 11-3. 1. Click [Add.Func.] → select [Custom Settings] from the menu that appears under [Add.Func.] → click the type of custom setting that you want to specify. Back Previous Next TOP 2. Specify all the necessary fields → click [OK]. The above screen shot shows [Custom Settings]. Table of Contents Index 7-19
-
 1
1 -
2
-
3
-
4
-
5
-
6
-
7
-
8
-
9
-
10
-
11
-
12
-
13
-
14
-
15
-
16
-
17
-
18
-
19
-
20
-
21
-
22
-
23
-
24
-
25
-
26
-
27
-
28
-
29
-
30
-
31
-
32
-
33
-
34
-
35
-
36
-
37
-
38
-
39
-
40
-
41
-
42
-
43
-
44
-
45
-
46
-
47
-
48
-
49
-
50
-
51
-
52
-
53
-
54
-
55
-
56
-
57
-
58
-
59
-
60
-
61
-
62
-
63
-
64
-
65
-
66
-
67
-
68
-
69
-
70
-
71
-
72
-
73
-
74
-
75
-
76
-
77
-
78
-
79
-
80
-
81
-
82
-
83
-
84
-
85
-
86
-
87
-
88
-
89
-
90
-
91
-
92
-
93
-
94
-
95
-
96
-
97
-
98
-
99
-
100
-
101
-
102
-
103
-
104
-
105
-
106
-
107
-
108
-
109
-
110
-
111
-
112
-
113
-
114
-
115
-
116
-
117
-
118
-
119
-
120
-
121
-
122
-
123
-
124
-
125
-
126
-
127
-
128
-
129
-
130
-
131
-
132
-
133
-
134
-
135
-
136
-
137
-
138
-
139
-
 140
140 -
 141
141 -
 142
142 -
 143
143 -
 144
144 -
 145
145 -
 146
146 -
 147
147 -
 148
148 -
 149
149 -
 150
150 -
151
-
152
-
153
-
154
-
155
-
156
-
157
-
158
-
159
-
160
-
161
-
162
-
163
-
164
-
165
-
166
-
167
-
168
-
169
-
170
-
171
-
172
-
173
-
174
-
175
-
176
-
177
-
178
-
179
-
180
-
181
-
182
-
183
-
184
-
185
-
186
-
187
-
188
-
189
-
190
-
191
-
192
-
193
-
194
-
195
-
196
-
197
-
198
-
199
-
200
-
201
-
202
-
203
-
204
-
205
-
206
-
207
-
208
-
209
-
210
-
211
-
212
-
213
-
214
-
215
-
216
-
217
-
218
-
219
-
220
-
221
-
222
-
223
-
224
-
225
-
226
-
227
-
228
-
229
-
230
-
231
-
232
-
233
-
234
-
235
-
236
-
237
-
238
-
239
-
240
-
241
-
242
-
243
-
244
-
245
-
246
-
247
-
248
-
249
-
250
-
251
-
252
-
253
-
254
-
255
-
256
-
257
-
258
-
259
-
260
-
261
-
262
-
263
-
264
-
265
-
266
-
267
-
268
-
269
-
270
-
271
-
272
 |
 |
1
2
3
4
5
6
7
8
9
10
11
Back
Next
Previous
TOP
7-19
Before Using the
Machine
Document and Paper
Copying
Sending and
Receiving
Printing and
Scanning
Network
Remote UI
System Manager
Settings
Maintenance
Troubleshooting
Appendix
Index
Table of Contents
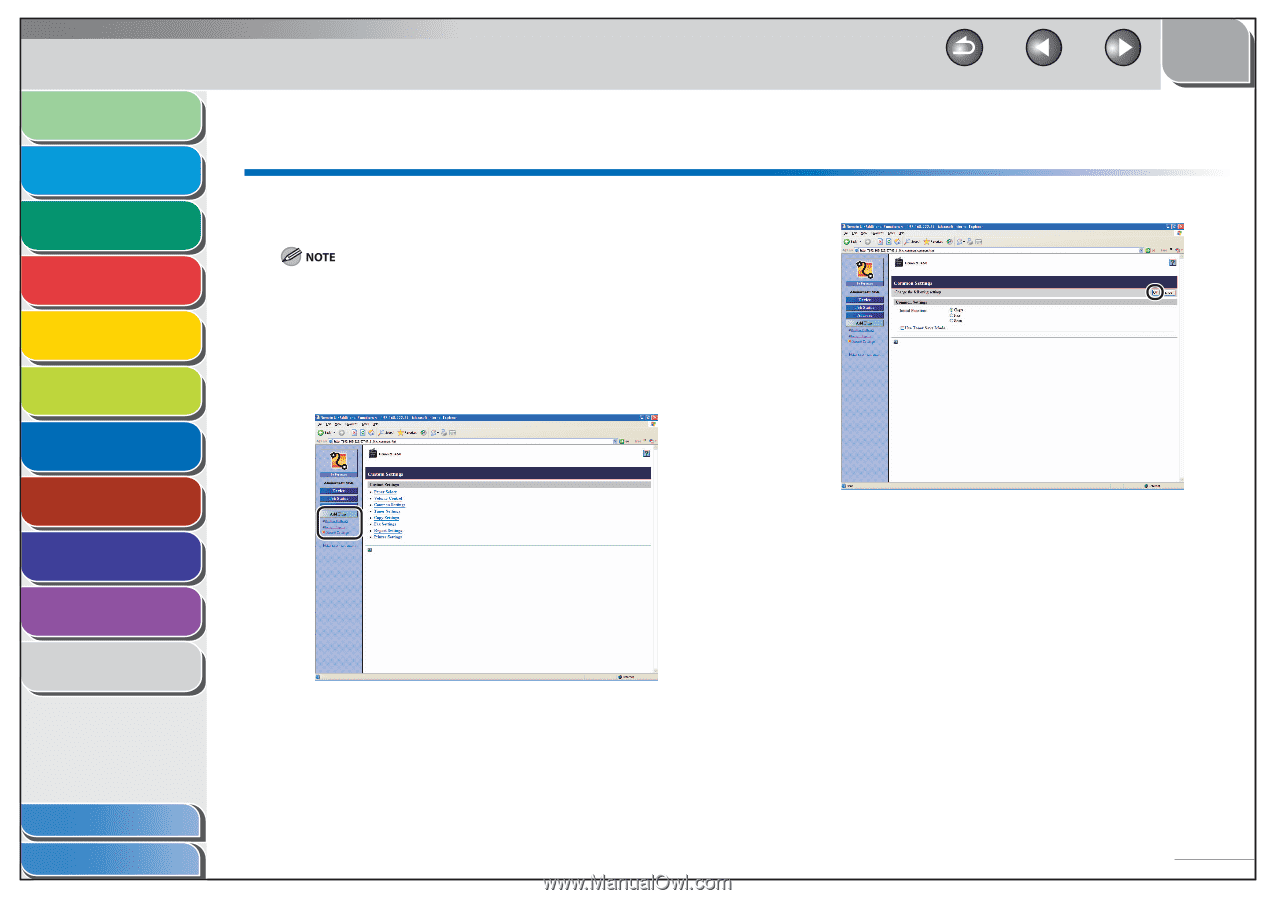
Device Custom Settings
The Remote UI enables you to edit the machine’s custom
settings.
You can also access these setting menus from the Operation Panel of the
machine. For details, see “Machine Settings,” on p. 11-3.
1.
Click [Add.Func.]
±
select [Custom Settings]
from the menu that appears under [Add.Func.]
±
click the type of custom setting that you want
to specify.
2.
Specify all the necessary fields
±
click [OK].
The above screen shot shows [Custom Settings].