Canon imageCLASS MF4270 imageCLASS MF4270 Reference Guide - Page 54
Setting Paper Size and Type
 |
View all Canon imageCLASS MF4270 manuals
Add to My Manuals
Save this manual to your list of manuals |
Page 54 highlights
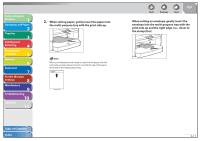
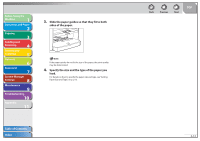
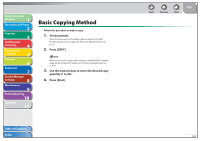
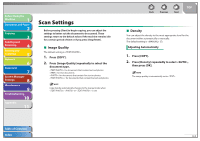
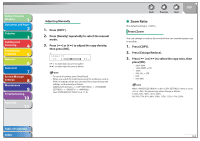
Before Using the Machine 1 Document and Paper 2 Copying 3 Sending and Receiving 4 Printing and Scanning 5 Network 6 Remote UI 7 System Manager Settings 8 Maintenance 9 Troubleshooting 10 Appendix 11 Setting Paper Size and Type The default setting is and . When you place other sizes and/or types of paper, follow this procedure to change the settings. The procedure is same for the paper cassette and multipurpose tray except for selecting the paper cassette or multipurpose tray in step 3 and 6. 1. Press [Additional Functions]. 2. Press [ ] or [ ] to select , then press [OK]. 3. Press [ ] or [ ] to select or , then press [OK]. 4. Press [ ] or [ ] to select , then press [OK]. Back Previous Next TOP 5. Press [ ] or [ ] to select the paper size, then press [OK]. You can select from the following paper sizes: , , , , , , , , , , , , , , , , The available paper sizes will vary depending on the country where the unit was purchased. 6. Press [ ] or [ ] to select or , then press [OK]. 7. Press [ ] or [ ] to select , then press [OK]. If you have selected , , , , , or for the paper size in step 5, is not displayed. Skip to step 9. Table of Contents Index 2-13
-
 1
1 -
2
-
3
-
4
-
5
-
6
-
7
-
8
-
9
-
10
-
11
-
12
-
13
-
14
-
15
-
16
-
17
-
18
-
19
-
20
-
21
-
22
-
23
-
24
-
25
-
26
-
27
-
28
-
29
-
30
-
31
-
32
-
33
-
34
-
35
-
36
-
37
-
38
-
39
-
40
-
41
-
42
-
43
-
44
-
45
-
46
-
47
-
48
-
 49
49 -
 50
50 -
 51
51 -
 52
52 -
 53
53 -
 54
54 -
 55
55 -
 56
56 -
 57
57 -
 58
58 -
 59
59 -
60
-
61
-
62
-
63
-
64
-
65
-
66
-
67
-
68
-
69
-
70
-
71
-
72
-
73
-
74
-
75
-
76
-
77
-
78
-
79
-
80
-
81
-
82
-
83
-
84
-
85
-
86
-
87
-
88
-
89
-
90
-
91
-
92
-
93
-
94
-
95
-
96
-
97
-
98
-
99
-
100
-
101
-
102
-
103
-
104
-
105
-
106
-
107
-
108
-
109
-
110
-
111
-
112
-
113
-
114
-
115
-
116
-
117
-
118
-
119
-
120
-
121
-
122
-
123
-
124
-
125
-
126
-
127
-
128
-
129
-
130
-
131
-
132
-
133
-
134
-
135
-
136
-
137
-
138
-
139
-
140
-
141
-
142
-
143
-
144
-
145
-
146
-
147
-
148
-
149
-
150
-
151
-
152
-
153
-
154
-
155
-
156
-
157
-
158
-
159
-
160
-
161
-
162
-
163
-
164
-
165
-
166
-
167
-
168
-
169
-
170
-
171
-
172
-
173
-
174
-
175
-
176
-
177
-
178
-
179
-
180
-
181
-
182
-
183
-
184
-
185
-
186
-
187
-
188
-
189
-
190
-
191
-
192
-
193
-
194
-
195
-
196
-
197
-
198
-
199
-
200
-
201
-
202
-
203
-
204
-
205
-
206
-
207
-
208
-
209
-
210
-
211
-
212
-
213
-
214
-
215
-
216
-
217
-
218
-
219
-
220
-
221
-
222
-
223
-
224
-
225
-
226
-
227
-
228
-
229
-
230
-
231
-
232
-
233
-
234
-
235
-
236
-
237
-
238
-
239
-
240
-
241
-
242
-
243
-
244
-
245
-
246
-
247
-
248
-
249
-
250
-
251
-
252
-
253
-
254
-
255
-
256
-
257
-
258
-
259
-
260
-
261
-
262
-
263
-
264
-
265
-
266
-
267
-
268
-
269
-
270
-
271
-
272
 |
 |