Cisco 7925G Administration Guide - Page 231
Configuration Step and Purpose, For More Information, Table D-2
 |
UPC - 882658201943
View all Cisco 7925G manuals
Add to My Manuals
Save this manual to your list of manuals |
Page 231 highlights
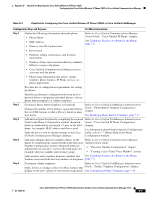
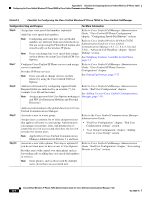
Appendix D Checklist for Deploying the Cisco Unified Wireless IP Phone 7925G Configuring the Cisco Unified Wireless IP Phone 7925G in Cisco Unified Communications Manager Table D-2 Checklist for Configuring the Cisco Unified Wireless IP Phone 7925G in Cisco Unified CallManager Configuration Step and Purpose For More Information Step 1 Gather the following information about the phone: • Phone Model • MAC address • Name or user ID of phone user Refer to Cisco Unified Communications Manager System Guide, "Cisco Unified IP Phone" chapter. See Telephony Features Available for the Phone, page 7-2. • Device pool • Partition, calling search space, and location information • Number of lines and associated directory numbers (DNs) to assign to the phone • Cisco Unified Communications Manager user to associate with the phone • Phone usage information that affects softkey template, phone features, IP Phone services, or phone applications Provides list of configuration requirements for setting up phones. Identifies preliminary configuration that you need to perform before configuring individual phones, such as phone button templates or softkey templates. Step 2 Customize phone button templates (if required). Changes the number of line buttons, speed-dial buttons, Service URL buttons or adds a Privacy button to meet user needs. Refer to Cisco Unified CallManager Administration Guide, "Phone Button Template Configuration" chapter. See Modifying Phone Button Templates, page 7-17. Step 3 Add and configure the phone by completing the required fields in the Phone Configuration window. Required fields are indicated by an asterisk (*) next to the field name; for example, MAC address and device pool. Adds the device with its default settings to the Cisco Unified Communications Manager database. Refer to Cisco Unified CallManager Administration Guide, "Cisco Unified IP Phone Configuration" chapter. For information about Product Specific Configuration fields, refer to "?" Button Help in the Phone Configuration window. Step 4 Add and configure directory numbers (lines) on the phone by completing the required fields in the Directory Number Configuration window. Required fields are indicated by an asterisk (*) next to the field name; for example, directory number and presence group. Refer to Cisco Unified Communications Manager Administration Guide: • "Directory Number Configuration" chapter • "Creating a Cisco Unity Voice Mailbox" section. Adds primary and secondary directory numbers and See Telephony Features Available for the Phone, features associated with directory numbers to the phone. page 7-2. Step 5 Customize softkey templates. Refer to Cisco Unified CallManager Administration Adds, deletes, or changes order of softkey features that Guide, "Softkey Template Configuration" chapter. display on the user's phone to meet feature usage needs. See Configuring Softkey Templates, page 7-16. OL-15984-01 Cisco Unified Wireless IP Phone 7925G Administration Guide for Cisco Unified Communications Manager 7.0(1) D-5
-
 1
1 -
2
-
3
-
4
-
5
-
6
-
7
-
8
-
9
-
10
-
11
-
12
-
13
-
14
-
15
-
16
-
17
-
18
-
19
-
20
-
21
-
22
-
23
-
24
-
25
-
26
-
27
-
28
-
29
-
30
-
31
-
32
-
33
-
34
-
35
-
36
-
37
-
38
-
39
-
40
-
41
-
42
-
43
-
44
-
45
-
46
-
47
-
48
-
49
-
50
-
51
-
52
-
53
-
54
-
55
-
56
-
57
-
58
-
59
-
60
-
61
-
62
-
63
-
64
-
65
-
66
-
67
-
68
-
69
-
70
-
71
-
72
-
73
-
74
-
75
-
76
-
77
-
78
-
79
-
80
-
81
-
82
-
83
-
84
-
85
-
86
-
87
-
88
-
89
-
90
-
91
-
92
-
93
-
94
-
95
-
96
-
97
-
98
-
99
-
100
-
101
-
102
-
103
-
104
-
105
-
106
-
107
-
108
-
109
-
110
-
111
-
112
-
113
-
114
-
115
-
116
-
117
-
118
-
119
-
120
-
121
-
122
-
123
-
124
-
125
-
126
-
127
-
128
-
129
-
130
-
131
-
132
-
133
-
134
-
135
-
136
-
137
-
138
-
139
-
140
-
141
-
142
-
143
-
144
-
145
-
146
-
147
-
148
-
149
-
150
-
151
-
152
-
153
-
154
-
155
-
156
-
157
-
158
-
159
-
160
-
161
-
162
-
163
-
164
-
165
-
166
-
167
-
168
-
169
-
170
-
171
-
172
-
173
-
174
-
175
-
176
-
177
-
178
-
179
-
180
-
181
-
182
-
183
-
184
-
185
-
186
-
187
-
188
-
189
-
190
-
191
-
192
-
193
-
194
-
195
-
196
-
197
-
198
-
199
-
200
-
201
-
202
-
203
-
204
-
205
-
206
-
207
-
208
-
209
-
210
-
211
-
212
-
213
-
214
-
215
-
216
-
217
-
218
-
219
-
220
-
221
-
222
-
223
-
224
-
225
-
 226
226 -
 227
227 -
 228
228 -
 229
229 -
 230
230 -
 231
231 -
 232
232 -
 233
233 -
 234
234 -
 235
235 -
 236
236 -
237
-
238
-
239
-
240
-
241
-
242
-
243
-
244
 |
 |