Cisco 7925G Administration Guide - Page 81
Accessing the Configuration Web for a Phone, Device >, Phone, Allow Admin, Device > Phone - setup guide
 |
UPC - 882658201943
View all Cisco 7925G manuals
Add to My Manuals
Save this manual to your list of manuals |
Page 81 highlights
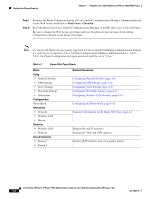
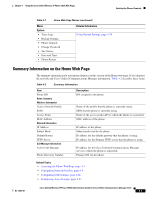
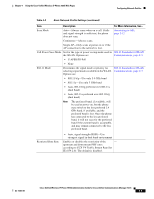
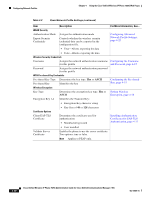
Chapter 4 Using the Cisco Unified Wireless IP Phone 7925G Web Pages Updating the Phones Remotely Step 2 Step 3 Step 4 Step 5 Step 6 Search for the phone in Cisco Unified Communications Manager Administration by choosing Device > Phone and enter search information such as the DN. Click on the DN of the phone that you want to set the privileges. Open the Phone Configuration window, scroll down to Product Specific Configuration Layout, and enable these privileges: • In the Web Access field, select Full from the drop-down menu. • In the Phone Book Web Access field, select Allow Admin. Click Save to make the change. You must reset the phone to enable configuration privileges on the web pages for this phone. Accessing the Configuration Web Page for a Phone You can access the web page for any Cisco Unified Wireless IP Phone 7925G that is connected to the WLAN. Be sure the phone is powered on, connected and registered to a Cisco Unified Communications Manager server. To access the web page for the Cisco Unified Wireless IP Phone 7925G follow these steps: Procedure Step 1 Step 2 Step 3 Step 4 Step 5 Step 6 Log into the Cisco Unified Communications Manager Administration. Go to Device > Phone. Click Find. All of the phones display. If the phone is registered with a Cisco Unified Communications Manager Administration, the IP address displays. The phone IP address is linked to the Home web page. Click on the Description field in the Phone Configuration window of Cisco Unified Communications Manager Administration. The Device Information section displays. Go to the Web Access field in the Product Specific Configuration Layout and change the parameter to Full. This will give you full access to all of the web pages. From the Phone Configuration window, click on the linked IP address. The Home web page displays. There are two sections displayed on the Home web page: setup menus (left) and summary information (right). Table 4-1 shows the available Home web page menus, from which you can configure network profiles, USB settings, trace settings, Wavelink settings, and certificates. Table 4-2 contains the phone summary information. Or if you already know the IP address, you can open a web browser and enter the following URL. The IP_address variable is the IP address of the Cisco Unified IP Phone: https:///index.html Note When the Security Alert dialog box displays a notice to accept the Trust Certificate, click Yes or Always to accept the application. Step 7 Step 8 Log into the Home web page with the default username: admin and enter the default password: Cisco. You may need to log into additional windows to configure other options. Make changes to configurable pages as needed. OL-15984-01 Cisco Unified Wireless IP Phone 7925G Administration Guide for Cisco Unified Communications Manager 7.0(1) 4-5
-
 1
1 -
2
-
3
-
4
-
5
-
6
-
7
-
8
-
9
-
10
-
11
-
12
-
13
-
14
-
15
-
16
-
17
-
18
-
19
-
20
-
21
-
22
-
23
-
24
-
25
-
26
-
27
-
28
-
29
-
30
-
31
-
32
-
33
-
34
-
35
-
36
-
37
-
38
-
39
-
40
-
41
-
42
-
43
-
44
-
45
-
46
-
47
-
48
-
49
-
50
-
51
-
52
-
53
-
54
-
55
-
56
-
57
-
58
-
59
-
60
-
61
-
62
-
63
-
64
-
65
-
66
-
67
-
68
-
69
-
70
-
71
-
72
-
73
-
74
-
75
-
 76
76 -
 77
77 -
 78
78 -
 79
79 -
 80
80 -
 81
81 -
 82
82 -
 83
83 -
 84
84 -
 85
85 -
 86
86 -
87
-
88
-
89
-
90
-
91
-
92
-
93
-
94
-
95
-
96
-
97
-
98
-
99
-
100
-
101
-
102
-
103
-
104
-
105
-
106
-
107
-
108
-
109
-
110
-
111
-
112
-
113
-
114
-
115
-
116
-
117
-
118
-
119
-
120
-
121
-
122
-
123
-
124
-
125
-
126
-
127
-
128
-
129
-
130
-
131
-
132
-
133
-
134
-
135
-
136
-
137
-
138
-
139
-
140
-
141
-
142
-
143
-
144
-
145
-
146
-
147
-
148
-
149
-
150
-
151
-
152
-
153
-
154
-
155
-
156
-
157
-
158
-
159
-
160
-
161
-
162
-
163
-
164
-
165
-
166
-
167
-
168
-
169
-
170
-
171
-
172
-
173
-
174
-
175
-
176
-
177
-
178
-
179
-
180
-
181
-
182
-
183
-
184
-
185
-
186
-
187
-
188
-
189
-
190
-
191
-
192
-
193
-
194
-
195
-
196
-
197
-
198
-
199
-
200
-
201
-
202
-
203
-
204
-
205
-
206
-
207
-
208
-
209
-
210
-
211
-
212
-
213
-
214
-
215
-
216
-
217
-
218
-
219
-
220
-
221
-
222
-
223
-
224
-
225
-
226
-
227
-
228
-
229
-
230
-
231
-
232
-
233
-
234
-
235
-
236
-
237
-
238
-
239
-
240
-
241
-
242
-
243
-
244
 |
 |