Dell PowerVault MD3200 Owner's Manual - Page 73
Changing the Cache Settings on the Storage Array, Changing Expansion Enclosure ID Number - default password
 |
View all Dell PowerVault MD3200 manuals
Add to My Manuals
Save this manual to your list of manuals |
Page 73 highlights
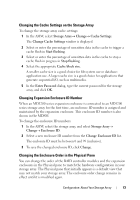
Changing the Cache Settings on the Storage Array To change the storage array cache settings: 1 In the AMW, select Storage Array Change Cache Settings. The Change Cache Settings window is displayed. 2 Select or enter the percentage of unwritten data in the cache to trigger a cache flush in Start flushing. 3 Select or enter the percentage of unwritten data in the cache to stop a cache flush in progress in Stop flushing. 4 Select the appropriate Cache block size. A smaller cache size is a good choice for file-system use or databaseapplication use. A larger cache size is a good choice for applications that generate sequential I/O, such as multimedia. 5 In the Enter Password dialog, type the current password for the storage array, and click OK. Changing Expansion Enclosure ID Number When an MD1200 series expansion enclosure is connected to an MD3200 series storage array for the first time, an enclosure ID number is assigned and maintained by the expansion enclosure. This enclosure ID number is also shown in the MDSM. To change the enclosure ID numbers: 1 In the AMW, select the storage array, and select Storage Array Change Enclosure ID. 2 Select a new enclosure ID number from the Change Enclosure ID list. The enclosure ID must be between 0 and 99 (inclusive). 3 To save the changed enclosure ID, click Change. Changing the Enclosure Order in the Physical Pane You can change the order of the RAID controller modules and the expansion enclosures in the Physical pane to match the hardware configuration in your storage array. The Physical pane that initially appears is a default view that may not match your storage array. The enclosure order change remains in effect until it is modified again. Configuration: About Your Storage Array 73
-
 1
1 -
2
-
3
-
4
-
5
-
6
-
7
-
8
-
9
-
10
-
11
-
12
-
13
-
14
-
15
-
16
-
17
-
18
-
19
-
20
-
21
-
22
-
23
-
24
-
25
-
26
-
27
-
28
-
29
-
30
-
31
-
32
-
33
-
34
-
35
-
36
-
37
-
38
-
39
-
40
-
41
-
42
-
43
-
44
-
45
-
46
-
47
-
48
-
49
-
50
-
51
-
52
-
53
-
54
-
55
-
56
-
57
-
58
-
59
-
60
-
61
-
62
-
63
-
64
-
65
-
66
-
67
-
 68
68 -
 69
69 -
 70
70 -
 71
71 -
 72
72 -
 73
73 -
 74
74 -
 75
75 -
 76
76 -
 77
77 -
 78
78 -
79
-
80
-
81
-
82
-
83
-
84
-
85
-
86
-
87
-
88
-
89
-
90
-
91
-
92
-
93
-
94
-
95
-
96
-
97
-
98
-
99
-
100
-
101
-
102
-
103
-
104
-
105
-
106
-
107
-
108
-
109
-
110
-
111
-
112
-
113
-
114
-
115
-
116
-
117
-
118
-
119
-
120
-
121
-
122
-
123
-
124
-
125
-
126
-
127
-
128
-
129
-
130
-
131
-
132
-
133
-
134
-
135
-
136
-
137
-
138
-
139
-
140
-
141
-
142
-
143
-
144
-
145
-
146
-
147
-
148
-
149
-
150
-
151
-
152
-
153
-
154
-
155
-
156
-
157
-
158
-
159
-
160
-
161
-
162
-
163
-
164
-
165
-
166
-
167
-
168
-
169
-
170
-
171
-
172
-
173
-
174
-
175
-
176
-
177
-
178
-
179
-
180
-
181
-
182
-
183
-
184
-
185
-
186
-
187
-
188
-
189
-
190
-
191
-
192
-
193
-
194
-
195
-
196
-
197
-
198
-
199
-
200
-
201
-
202
-
203
-
204
-
205
-
206
-
207
-
208
-
209
-
210
-
211
-
212
-
213
-
214
-
215
-
216
-
217
-
218
-
219
-
220
-
221
-
222
-
223
-
224
-
225
-
226
-
227
-
228
-
229
-
230
-
231
-
232
-
233
-
234
-
235
-
236
-
237
-
238
-
239
-
240
-
241
-
242
-
243
-
244
-
245
-
246
-
247
-
248
-
249
-
250
-
251
-
252
-
253
-
254
-
255
-
256
-
257
-
258
-
259
-
260
 |
 |