HP 450c Service Manual - Page 146
Removing the PinchĆArm Mechanism, Removal, PinchĆarm Mechanism
 |
View all HP 450c manuals
Add to My Manuals
Save this manual to your list of manuals |
Page 146 highlights
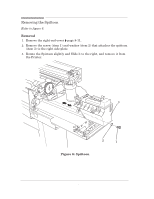
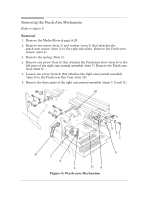
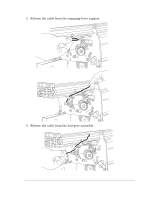
Removing the PinchĆArm Mechanism Refer to figure 9. Removal 1. Remove the Media Motor ' page 8Ć23. 2. Remove one screw (item 1) and washer (item 2) that attaches the pinchĆarm sensor (item 3) to the right side plate. Remove the PinchĆarm sensor (item 3). 3. Remove the spring (Item 4). 4. Remove one screw (item 5) that attaches the PinchĆarm lever (item 6) to the left piece of the right cam journal assembly (item 7). Remove the PinchĆarm lever (item 6). 5. Loosen one screw (item 8) that attaches the right cam journal assembly (item 9) to the PinchĆarm Bar Cam (item 10). 6. Remove the three parts of the right cam journal assembly (items 7, 9 and 11). 10 6 8-24 3 2 1 8 7 5 4 11 9 Figure 9: PinchĆarm Mechanism HP DesignJet 430, 450C and 455CA Printers Removal and Installation
-
 1
1 -
2
-
3
-
4
-
5
-
6
-
7
-
8
-
9
-
10
-
11
-
12
-
13
-
14
-
15
-
16
-
17
-
18
-
19
-
20
-
21
-
22
-
23
-
24
-
25
-
26
-
27
-
28
-
29
-
30
-
31
-
32
-
33
-
34
-
35
-
36
-
37
-
38
-
39
-
40
-
41
-
42
-
43
-
44
-
45
-
46
-
47
-
48
-
49
-
50
-
51
-
52
-
53
-
54
-
55
-
56
-
57
-
58
-
59
-
60
-
61
-
62
-
63
-
64
-
65
-
66
-
67
-
68
-
69
-
70
-
71
-
72
-
73
-
74
-
75
-
76
-
77
-
78
-
79
-
80
-
81
-
82
-
83
-
84
-
85
-
86
-
87
-
88
-
89
-
90
-
91
-
92
-
93
-
94
-
95
-
96
-
97
-
98
-
99
-
100
-
101
-
102
-
103
-
104
-
105
-
106
-
107
-
108
-
109
-
110
-
111
-
112
-
113
-
114
-
115
-
116
-
117
-
118
-
119
-
120
-
121
-
122
-
123
-
124
-
125
-
126
-
127
-
128
-
129
-
130
-
131
-
132
-
133
-
134
-
135
-
136
-
137
-
138
-
139
-
140
-
 141
141 -
 142
142 -
 143
143 -
 144
144 -
 145
145 -
 146
146 -
 147
147 -
 148
148 -
 149
149 -
 150
150 -
 151
151 -
152
-
153
-
154
-
155
-
156
-
157
-
158
-
159
-
160
-
161
-
162
-
163
-
164
-
165
-
166
-
167
-
168
-
169
-
170
-
171
-
172
-
173
-
174
-
175
-
176
-
177
-
178
-
179
-
180
-
181
-
182
-
183
-
184
-
185
-
186
-
187
-
188
-
189
-
190
-
191
-
192
-
193
-
194
-
195
-
196
-
197
-
198
-
199
-
200
-
201
-
202
-
203
-
204
-
205
-
206
-
207
-
208
 |
 |