HP 450c Service Manual - Page 73
Adjusting the CarriageĆtoĆMedia Distance, Gauge, NO GO
 |
View all HP 450c manuals
Add to My Manuals
Save this manual to your list of manuals |
Page 73 highlights
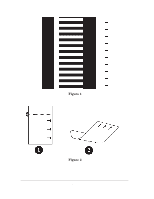
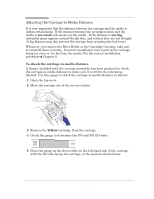
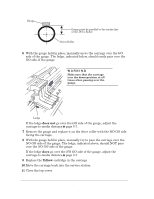
Adjusting the CarriageĆtoĆMedia Distance It is very important that the distance between the carriage and the media is within certain limits. If the distance between the cartridge nozzles and the media is too small, ink smears on the media. If the distance is too big, unwanted spray appears around the ink dots, and vertical lines are not straight. (A big distance may also prevent the carriage from actuating the bail lever.) Whenever you remove the Drive Roller or the Cartridge Carriage, take care to reinstall them correctly. Incorrect installation may result in the carriage being too close or too far from the media. For the correct installation procedure ' Chapter 8. To check the carriageĆtoĆmedia distance A Gauge (included with the carriage assembly) has been produced to check the carriageĆtoĆmedia distance to make sure it is within the tolerances allowed. Use this gauge to check the carriageĆtoĆmedia distance as follows: 1 Open the top cover. 2 Move the carriage out of the service station. 3 Remove the Yellow cartridge from the carriage. 4 Check the gauge to determine the GO and NO GO sides: NO GO GO 5 Place the gauge on the drive roller on the leftĆhand side of the carriage, with the GO side facing the carriage, in the position shown below: Service Calibrations HP DesignJet 430, 450C and 455CA Printers 5-5
-
 1
1 -
2
-
3
-
4
-
5
-
6
-
7
-
8
-
9
-
10
-
11
-
12
-
13
-
14
-
15
-
16
-
17
-
18
-
19
-
20
-
21
-
22
-
23
-
24
-
25
-
26
-
27
-
28
-
29
-
30
-
31
-
32
-
33
-
34
-
35
-
36
-
37
-
38
-
39
-
40
-
41
-
42
-
43
-
44
-
45
-
46
-
47
-
48
-
49
-
50
-
51
-
52
-
53
-
54
-
55
-
56
-
57
-
58
-
59
-
60
-
61
-
62
-
63
-
64
-
65
-
66
-
67
-
 68
68 -
 69
69 -
 70
70 -
 71
71 -
 72
72 -
 73
73 -
 74
74 -
 75
75 -
 76
76 -
 77
77 -
 78
78 -
79
-
80
-
81
-
82
-
83
-
84
-
85
-
86
-
87
-
88
-
89
-
90
-
91
-
92
-
93
-
94
-
95
-
96
-
97
-
98
-
99
-
100
-
101
-
102
-
103
-
104
-
105
-
106
-
107
-
108
-
109
-
110
-
111
-
112
-
113
-
114
-
115
-
116
-
117
-
118
-
119
-
120
-
121
-
122
-
123
-
124
-
125
-
126
-
127
-
128
-
129
-
130
-
131
-
132
-
133
-
134
-
135
-
136
-
137
-
138
-
139
-
140
-
141
-
142
-
143
-
144
-
145
-
146
-
147
-
148
-
149
-
150
-
151
-
152
-
153
-
154
-
155
-
156
-
157
-
158
-
159
-
160
-
161
-
162
-
163
-
164
-
165
-
166
-
167
-
168
-
169
-
170
-
171
-
172
-
173
-
174
-
175
-
176
-
177
-
178
-
179
-
180
-
181
-
182
-
183
-
184
-
185
-
186
-
187
-
188
-
189
-
190
-
191
-
192
-
193
-
194
-
195
-
196
-
197
-
198
-
199
-
200
-
201
-
202
-
203
-
204
-
205
-
206
-
207
-
208
 |
 |
