HP 450c Service Manual - Page 174
Removing the Entry Platen, Remove the Overdrive Assembly
 |
View all HP 450c manuals
Add to My Manuals
Save this manual to your list of manuals |
Page 174 highlights
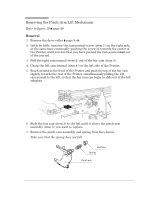
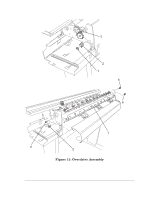
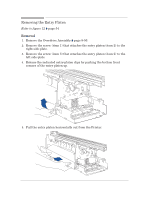
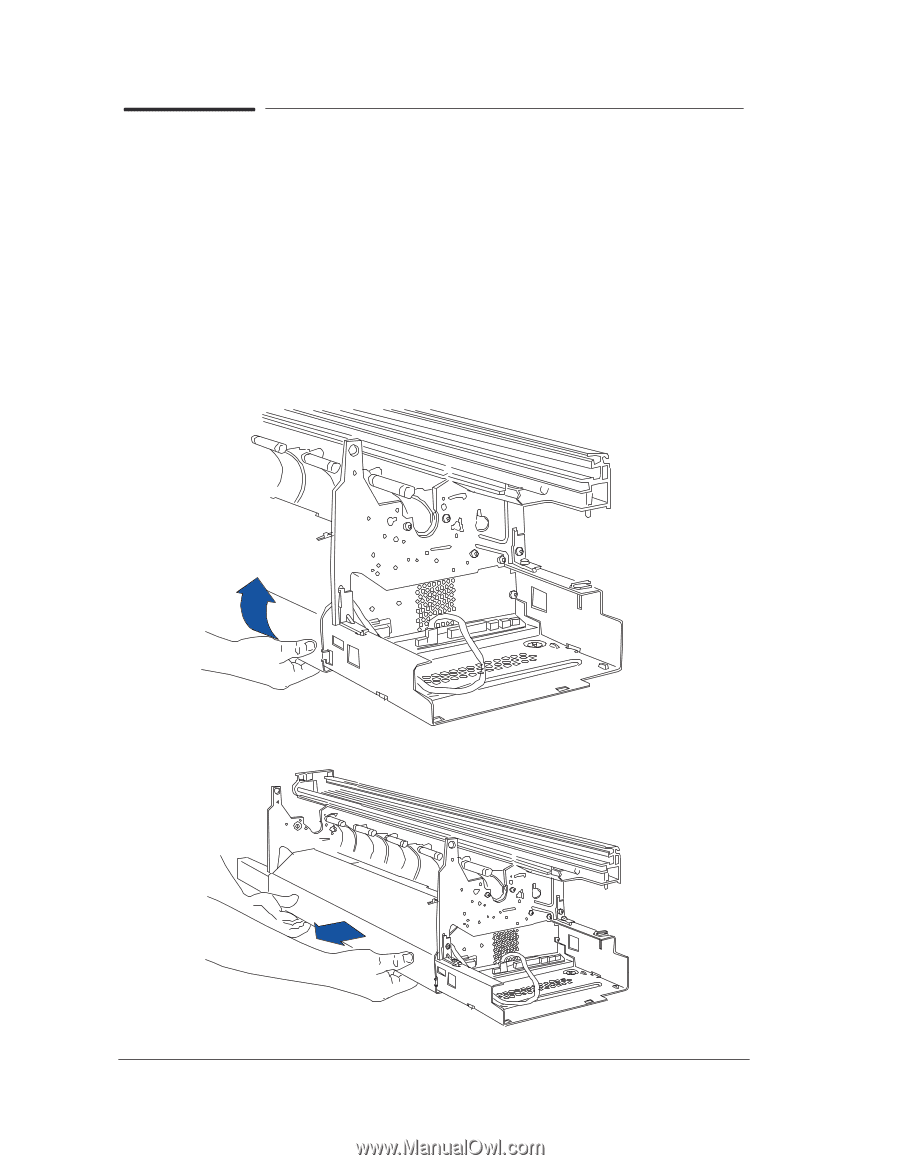
Removing the Entry Platen Refer to figure 12 ' page 54 Removal 1. Remove the Overdrive Assembly ' page 8Ć50. 2. Remove the screw (item 1) that attaches the entry platen (item 2) to the right sideĆplate. 3. Remove the screw (item 3) that attaches the entry platen (item 2) to the left sideĆplate. 4. Release the indicated entryĆplaten clips by pushing the bottom front corners of the entry platen up. 5. Pull the entry platen horizontally out from the Printer. 8-52 HP DesignJet 430, 450C and 455CA Printers Removal and Installation
-
 1
1 -
2
-
3
-
4
-
5
-
6
-
7
-
8
-
9
-
10
-
11
-
12
-
13
-
14
-
15
-
16
-
17
-
18
-
19
-
20
-
21
-
22
-
23
-
24
-
25
-
26
-
27
-
28
-
29
-
30
-
31
-
32
-
33
-
34
-
35
-
36
-
37
-
38
-
39
-
40
-
41
-
42
-
43
-
44
-
45
-
46
-
47
-
48
-
49
-
50
-
51
-
52
-
53
-
54
-
55
-
56
-
57
-
58
-
59
-
60
-
61
-
62
-
63
-
64
-
65
-
66
-
67
-
68
-
69
-
70
-
71
-
72
-
73
-
74
-
75
-
76
-
77
-
78
-
79
-
80
-
81
-
82
-
83
-
84
-
85
-
86
-
87
-
88
-
89
-
90
-
91
-
92
-
93
-
94
-
95
-
96
-
97
-
98
-
99
-
100
-
101
-
102
-
103
-
104
-
105
-
106
-
107
-
108
-
109
-
110
-
111
-
112
-
113
-
114
-
115
-
116
-
117
-
118
-
119
-
120
-
121
-
122
-
123
-
124
-
125
-
126
-
127
-
128
-
129
-
130
-
131
-
132
-
133
-
134
-
135
-
136
-
137
-
138
-
139
-
140
-
141
-
142
-
143
-
144
-
145
-
146
-
147
-
148
-
149
-
150
-
151
-
152
-
153
-
154
-
155
-
156
-
157
-
158
-
159
-
160
-
161
-
162
-
163
-
164
-
165
-
166
-
167
-
168
-
 169
169 -
 170
170 -
 171
171 -
 172
172 -
 173
173 -
 174
174 -
 175
175 -
 176
176 -
 177
177 -
 178
178 -
 179
179 -
180
-
181
-
182
-
183
-
184
-
185
-
186
-
187
-
188
-
189
-
190
-
191
-
192
-
193
-
194
-
195
-
196
-
197
-
198
-
199
-
200
-
201
-
202
-
203
-
204
-
205
-
206
-
207
-
208
 |
 |
8-52
Removal and Installation
HP DesignJet 430, 450C and 455CA Printers
Removing the Entry Platen
Refer to figure 12
'
page 54
Removal
1.
Remove the Overdrive Assembly
'
page 8Ć50.
2.
Remove the screw (item 1) that attaches the entry platen (item 2) to the
right sideĆplate.
3.
Remove the screw (item 3) that attaches the entry platen (item 2) to the
left sideĆplate.
4.
Release the indicated entryĆplaten clips by pushing the bottom front
corners of the entry platen up.
5.
Pull the entry platen horizontally out from the Printer.