HP 450c Service Manual - Page 36
Introduction, PowerĆOn, Self Test and Normal Initialization
 |
View all HP 450c manuals
Add to My Manuals
Save this manual to your list of manuals |
Page 36 highlights
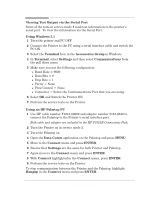
Introduction This chapter explains how to use the builtĆin Service Tests (Diagnostics) and what to do if the tests fail. If possible, always perform a Service Test on the component that you are about to replace, just to make sure that is the component that has failed. If the test on that component passes, there is no need to replace it. PowerĆOn The Printers automatically perform a series of internal self tests and mechanical initialization sequences whenever the user switches the Printer on. If a failure occurs, an error is indicated on the frontĆpanel LEDs. You can perform a failure analysis by interpreting the LED error code. (Details ' Chapter 2.) Self Test and Normal Initialization The powerĆon self test and initialization procedure does the following: 1 Initializes the servo processor. 2 Initializes the main processor. 3 Tests communication between the main processor and the servo processor. 4 Tests the EEROM checksum. 5 Tests the servoĆprocessor transfer buffer and interrupt tracking. 6 Tests the ROM checksum. 7 Causes the main processor to initialize certain firmware modules. 8 Performs a subset of the electrical service test. 9 Checks the cover sensor. If the cover is open, nothing further happens until you close it. 10 Initializes the carriage axis (YĆaxis). 11 Uses the mark encoder to check the start of the drive roller. 12 Ejects any loaded sheet. Does not eject roll media if loaded. 13 Checks the media sensor. 14 Sets the Printer to accept media. 4-2 HP DesignJet 430, 450C and 455CA Printers Service Tests
-
 1
1 -
2
-
3
-
4
-
5
-
6
-
7
-
8
-
9
-
10
-
11
-
12
-
13
-
14
-
15
-
16
-
17
-
18
-
19
-
20
-
21
-
22
-
23
-
24
-
25
-
26
-
27
-
28
-
29
-
30
-
 31
31 -
 32
32 -
 33
33 -
 34
34 -
 35
35 -
 36
36 -
 37
37 -
 38
38 -
 39
39 -
 40
40 -
 41
41 -
42
-
43
-
44
-
45
-
46
-
47
-
48
-
49
-
50
-
51
-
52
-
53
-
54
-
55
-
56
-
57
-
58
-
59
-
60
-
61
-
62
-
63
-
64
-
65
-
66
-
67
-
68
-
69
-
70
-
71
-
72
-
73
-
74
-
75
-
76
-
77
-
78
-
79
-
80
-
81
-
82
-
83
-
84
-
85
-
86
-
87
-
88
-
89
-
90
-
91
-
92
-
93
-
94
-
95
-
96
-
97
-
98
-
99
-
100
-
101
-
102
-
103
-
104
-
105
-
106
-
107
-
108
-
109
-
110
-
111
-
112
-
113
-
114
-
115
-
116
-
117
-
118
-
119
-
120
-
121
-
122
-
123
-
124
-
125
-
126
-
127
-
128
-
129
-
130
-
131
-
132
-
133
-
134
-
135
-
136
-
137
-
138
-
139
-
140
-
141
-
142
-
143
-
144
-
145
-
146
-
147
-
148
-
149
-
150
-
151
-
152
-
153
-
154
-
155
-
156
-
157
-
158
-
159
-
160
-
161
-
162
-
163
-
164
-
165
-
166
-
167
-
168
-
169
-
170
-
171
-
172
-
173
-
174
-
175
-
176
-
177
-
178
-
179
-
180
-
181
-
182
-
183
-
184
-
185
-
186
-
187
-
188
-
189
-
190
-
191
-
192
-
193
-
194
-
195
-
196
-
197
-
198
-
199
-
200
-
201
-
202
-
203
-
204
-
205
-
206
-
207
-
208
 |
 |
